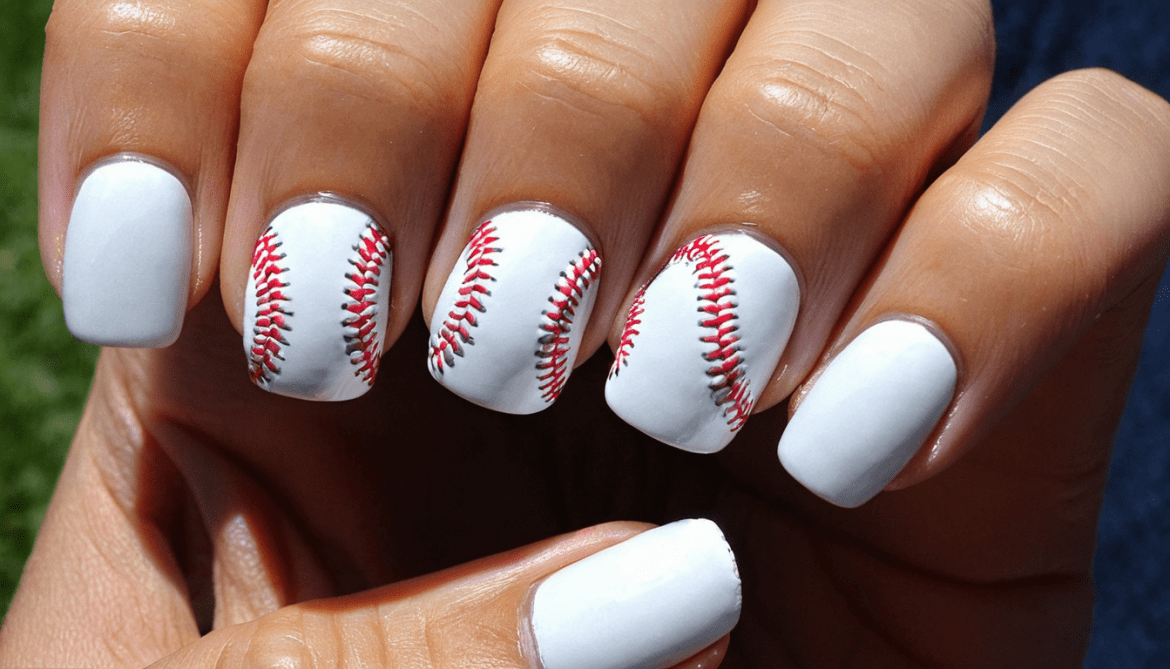
7 Steps to Stunning Baseball Nail Art That Will Knock It Out of the Park
Ever wondered how to add a touch of sporty style to your nails? Whether you’re a baseball fan or just love unique, eye-catching designs, Baseball Nail Art is a fun and fabulous way to show off your personality! Imagine your nails mimicking the iconic red stitches of a baseball, standing out with a playful yet polished look. Today, we’re diving into everything you need to know about this trendy design and guiding you, step-by-step, to create striking Baseball Nail Art right at home.
Why Baseball Nail Art?
Did you know that searches for nail art have skyrocketed by 30% over the last year? With so many creative options, it’s no surprise that sports-inspired nail art is among the hottest trends. For baseball lovers, this design isn’t just about aesthetics—it’s a celebration of your love for the game. Plus, baseball nail art is surprisingly versatile and works for almost any occasion, whether you’re heading to a game or just want a cute, casual look.
Ready to get into the game and try this design yourself? Let’s go!
Step 1: Gather Your Tools – The Ultimate Baseball Nail Kit
Creating a baseball nail art look requires just a few essential tools that you may already have at home. Here’s a quick rundown:
White nail polish (for the base color, mimicking the baseball)
Red nail polish or nail art pen (for the iconic red stitches)
Top coat (to seal and protect your design)
Thin nail brush or dotting tool (optional but helpful for detail work)
Nail polish remover and cotton swabs (for any necessary clean-ups)
Pro Tip: If you’re new to nail art, using a nail art pen for the stitches can make this process a lot easier!
Step 2: Start with a Clean Slate
Before diving into your design, start with clean, filed nails to create the best canvas. Gently buff your nails and push back cuticles for a smooth base. Applying a base coat not only helps your polish last longer but also prevents staining.
Ready to get started? Let’s lay down the base!
Step 3: Apply the White Base – The Field for Your Baseball
To create the look of a baseball, you’ll want a solid white base on each nail. This represents the surface of the baseball and will make the red stitching pop. Apply two coats of white polish, allowing each coat to dry fully before adding the next.
Pro Tip: Think of this base coat like the field in a baseball game—it’s the foundation of your design!
Once your white polish is dry, you’re ready to add the iconic stitching!
Step 4: Draw the Red Stitches – Adding That Signature Touch
Now comes the fun part: adding the red stitches! For this step, you’ll need your red nail polish or nail art pen. Here’s how to get those stitches just right:
Positioning the Stitches: Start by visualizing two curved lines running along the sides of each nail. These lines should mimic the curved stitching on a baseball.
Creating Stitches: Using a thin brush or nail art pen, create short, diagonal red dashes along each curved line.
Add Depth: If you’re feeling adventurous, you can add a small dot at the end of each stitch for extra detail.
Feeling bold? Try adding a bit of glitter along the lines for a unique twist.
Step 5: Let It Dry – Patience Is Key!
Let’s face it—nail art takes a little patience. Once you’ve drawn your stitches, make sure to give your nails a few minutes to dry before applying a top coat. This helps prevent any smudging or accidental blending of the colors.
Step 6: Seal with a Top Coat – For a Lasting Look
When everything’s dry, apply a clear top coat to lock in your design. This step is essential as it protects the design from chipping and adds a beautiful, glossy finish that makes the red stitches pop.
Step 7: Show Off Your Design!
Congratulations! You’ve just created a baseball-inspired nail design that’s both playful and chic. Whether you’re at the ballpark or just running errands, these nails are bound to turn heads. Take a few snaps and share your look on social media—after all, who doesn’t love a little nail art inspo?
Ready to give it a try? Tag us in your creations and show us how you rock the Baseball Nail Art look!
Common Challenges & Solutions
Ever hit a snag while creating your perfect nail art? Here are some common challenges you might face with Baseball Nail Art—and the easy solutions to get you back on track!
My lines aren’t smooth!
No worries! Use a nail art pen for greater control, or practice drawing on paper before trying it on your nails.
The red smudged into the white!
Make sure each layer is completely dry before adding the next. A quick-dry top coat can also help prevent smudging.
Why Baseball Nail Art is a Home Run
Baseball nail art isn’t just a cute design—it’s a personal statement and a fun way to showcase your love for the sport. Plus, it’s versatile enough to wear anywhere, blending sporty vibes with stylish detail. With just a little patience and a steady hand, you can create a look that’s unique, trendy, and totally eye-catching.
So, next time you’re in the mood for a DIY nail project, why not give this baseball-inspired design a shot? You’re bound to knock it out of the park!
Are you ready to step up to the plate and try Baseball Nail Art? Leave a comment below, and let us know how it goes!
