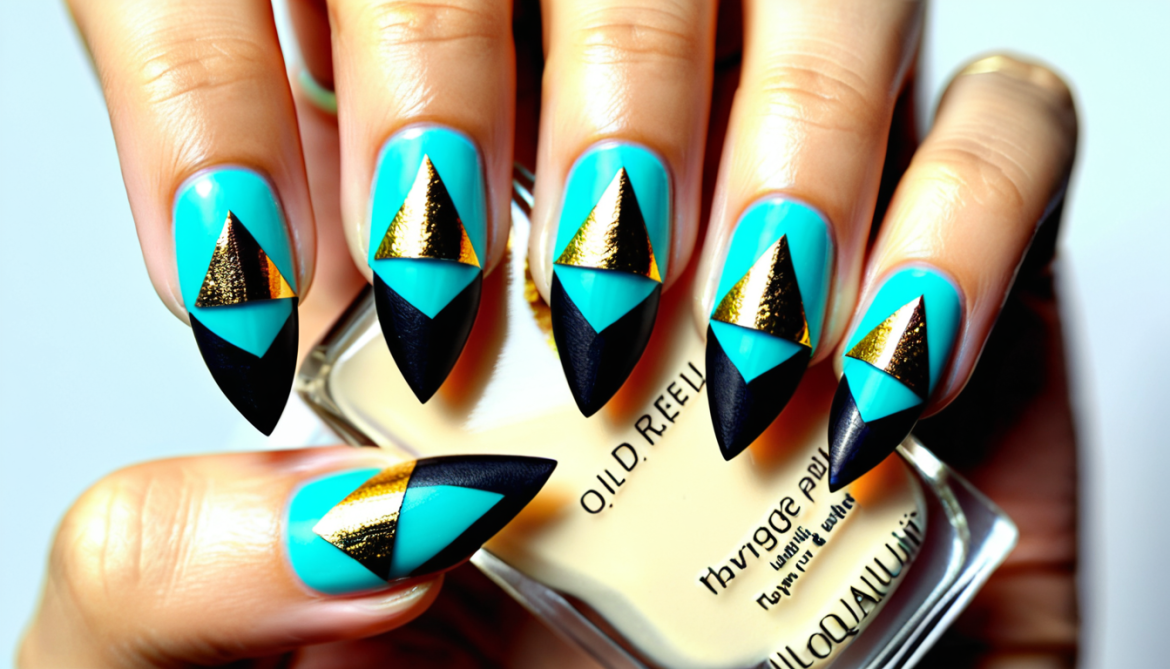
This Layered Triangle Nail Art Trend Is Taking Over the Internet!
Looking for a nail art design that’s bold, sleek, and totally Insta-worthy? The Layered Triangle Nail Art might just be your new obsession. It’s a unique, geometric style that’s been popping up everywhere—on fashion runways, Instagram feeds, and even red carpets. Ready to take your nail game to the next level? Let’s dive into why this design is a total must-try and how you can nail it yourself!
Get Ready to Rock the Triangle: Are You Ready for This?
What do you think of when you hear “nail art”? Flowers? Sparkles? Hearts? While those are classics, why not try something different that adds a bit of edge to your look? The Layered Triangle Nail Art is your perfect solution if you’re looking for something minimalistic yet super striking. It’s bold, it’s modern, and—trust us—it’s going to turn heads. Are you ready to make a statement with your nails?
What Makes Layered Triangle Nails So Special?
You might be wondering, “Why should I choose layered triangles over other designs?” Well, here’s the thing:
Geometric perfection: These triangles can be customized to any size or color, making them ideal for personal expression.
Simplicity with style: The design is clean and sophisticated yet still eye-catching.
Endless combinations: Play with colors, lines, and angles to make each design unique to you.
Want to stand out without looking like you’re trying too hard? This design hits the sweet spot!
Tools You’ll Need to Get Started
Before we dive into the design steps, let’s make sure you’ve got everything you need. Don’t worry; these tools are easy to get your hands on (pun intended!):
Base coat: Essential for nail health and longevity.
Nail polish (multiple colors): Choose a couple of contrasting shades.
Striping tape: This is your best friend for perfect triangle lines.
Nail art brush: For any fine detailing and touch-ups.
Top coat: Seal the design and make it last.
Tweezers: For precise placement of the tape.
Got everything? Great! Let’s get started.
Step-by-Step Guide to the Layered Triangle Nail Art Design
Ready to create the ultimate geometric look? Here’s your foolproof guide to nailing the Layered Triangle design like a pro!
1. Prep Your Nails
The key to any successful nail art is preparation. Start by removing any old polish and giving your nails a quick clean. Apply a base coat to protect your nails and make the design last longer.
Pro Tip: Apply the base coat carefully around the edges to prevent chipping.
2. Apply the First Layer of Color
Pick a color for your base and apply a nice, even layer. You can choose any shade—light pastels for a soft vibe, or bold reds and blacks for something more daring. Wait for the first layer to dry completely.
Pro Tip: Use thin coats of polish for the smoothest finish and to avoid bubbles.
3. Mark Your Triangle Design with Striping Tape
Here’s where the magic happens. Take your striping tape and create triangle shapes on your nails. You can go for simple, small triangles or bigger ones for a dramatic look. Be precise with the tape to get those clean lines.
Pro Tip: Place the tape diagonally or horizontally, depending on the effect you want.
4. Add the Second Color Layer
Once your tape is in place, it’s time to paint inside the triangles with your second color. The contrast will make the design pop! Carefully paint over the exposed areas, ensuring the lines are clean.
Pro Tip: Don’t rush—give it time to dry before removing the tape to avoid smudges.
5. Seal the Design
Now that you’ve created your layered triangles, it’s time for the final step. Apply a top coat to seal everything in place and add that perfect shine.
Pro Tip: Don’t skip the top coat! It’ll protect your design and make it last longer.
Common Mistakes to Avoid (and How to Fix Them!)
Even if you’re a nail art pro, some things can go wrong. Let’s tackle a few common mistakes and show you how to fix them:
Mistake 1: Uneven lines: If your triangles aren’t sharp or straight, use a nail art brush to clean them up.
Mistake 2: Smudging the design: Always wait for each layer to dry before applying the next, especially before peeling off the tape.
Mistake 3: Getting tape residue: If tape leaves behind sticky residue, use a cotton swab dipped in nail polish remover to clean it up.
Got it? Now you’re ready to tackle any design challenge!
Why This Design Will Be Your New Favorite
So, why is the Layered Triangle Nail Art a must-try? Because it’s:
Sleek and modern: Clean, geometric shapes are so in right now.
Totally customizable: Switch up the colors, sizes, and angles to make it your own.
Perfect for any occasion: Whether you’re going for a minimalist look or something bold, this design can fit any vibe!
It’s a design that will look as chic at a formal event as it will at your next brunch date. Talk about versatility!
Ready to Try It?
Layered Triangle Nail Art is the ultimate fusion of simplicity and boldness. Whether you’re a beginner or a seasoned pro, it’s a design that you can adapt to your personal style. Don’t be afraid to experiment with colors, angles, and sizes until you find what works best for you. With just a few steps, you’ll be rocking a trendy and unique nail art look that’s sure to turn heads.
So, what are you waiting for? Grab your tools, get creative, and try this stunning design today. Trust us—you’ll be amazed at the results!
What color combination would you choose for your Layered Triangle Nail Art? Let us know in the comments!
