Effortless Rainbow Swirl Fudge
Easy Rainbow Fudge: A Vibrant Treat for Every Occasion
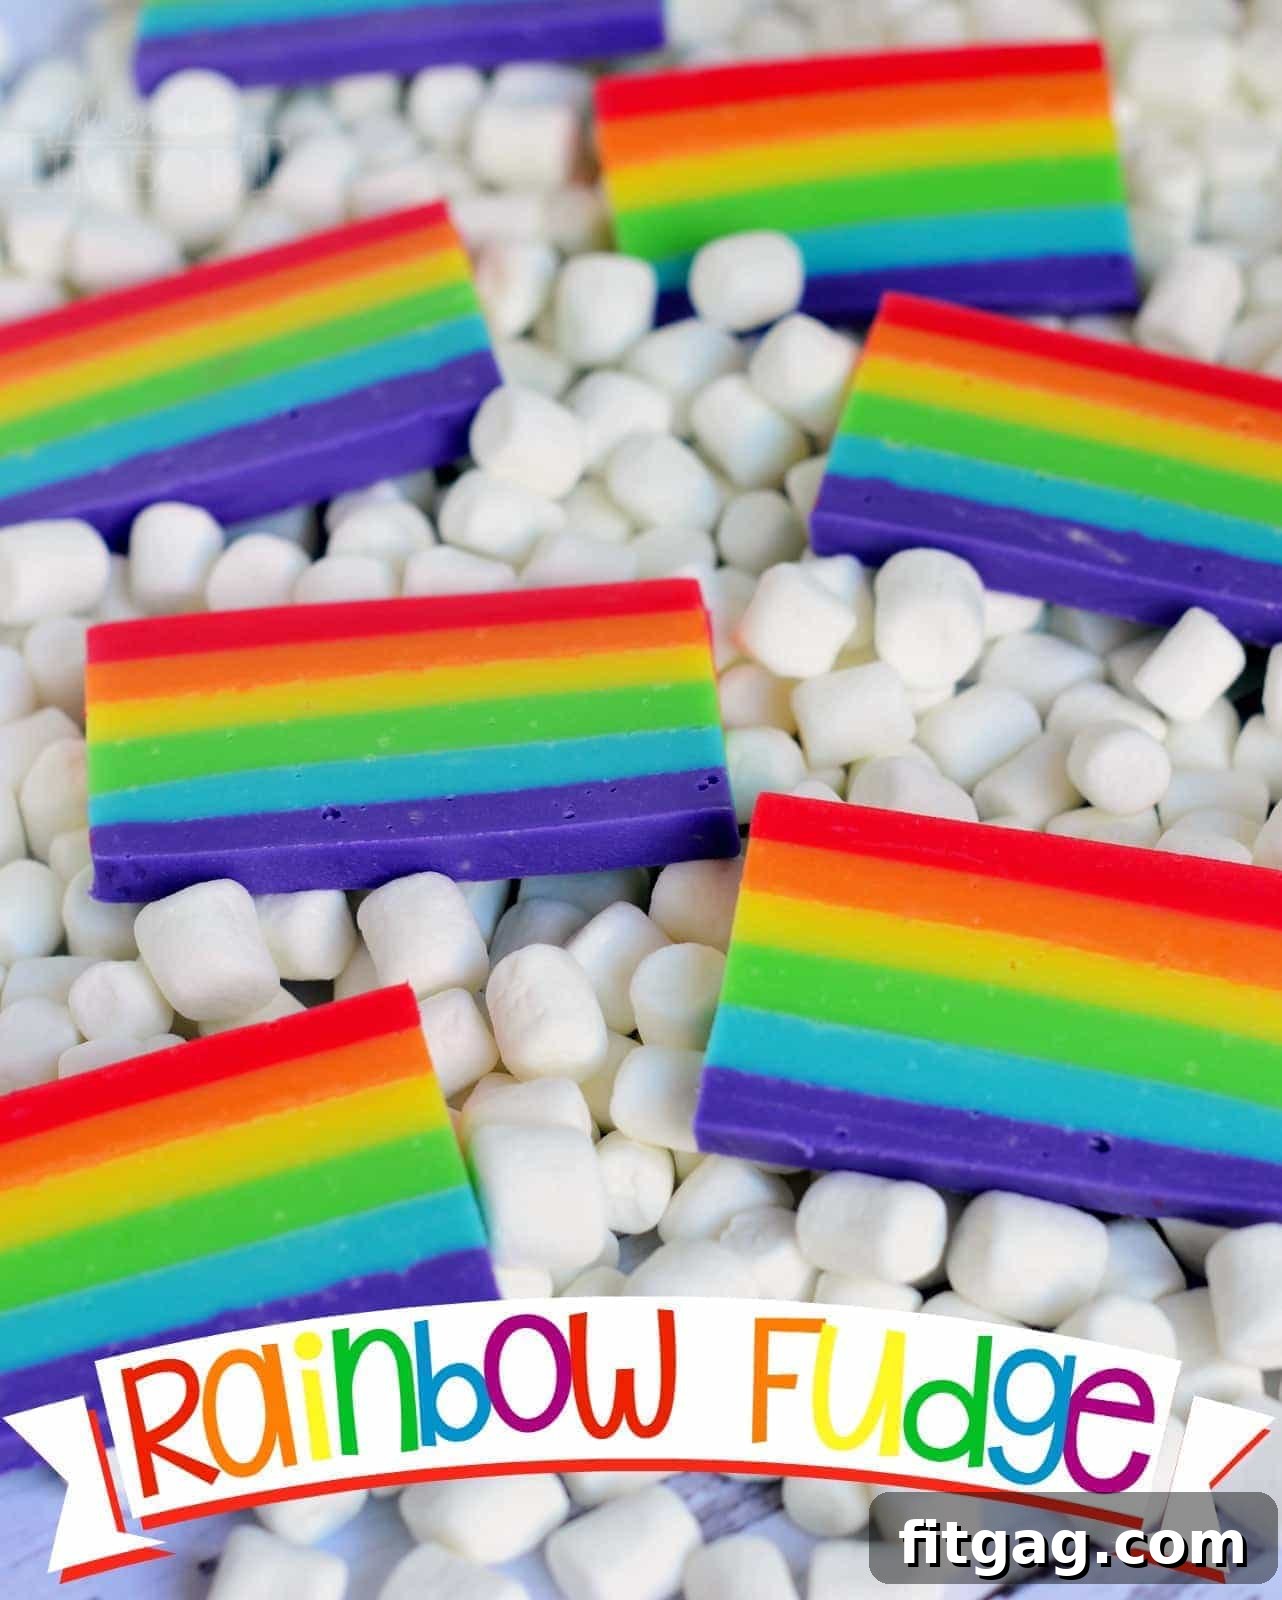
As a passionate home baker, I firmly believe that fudge isn’t just for the holidays – it’s a delightful confection to be savored all year long. And when it comes to making a statement, nothing beats the vibrant charm of this Easy Rainbow Fudge. While it’s an absolute showstopper for St. Patrick’s Day with its festive hues, its joyful appearance makes it equally perfect for birthdays, pride celebrations, or any day you simply crave a burst of color and sweetness. Imagine these beautiful, layered slices served elegantly atop fluffy marshmallow clouds – it’s pure magic!
SAVE THIS RECIPE TO PINTEREST!
I first conceived this recipe two years ago, and the idea of this vividly layered fudge simply wouldn’t leave my mind. It felt like a culinary secret waiting for the perfect moment to be shared. With St. Patrick’s Day just around the corner, there couldn’t be a more opportune time to unveil this spectacular Easy Rainbow Fudge!
The Sweet Simplicity of “Easy” Rainbow Fudge
I proudly call this recipe “easy” because, at its core, it genuinely is. Don’t let the multi-layered appearance intimidate you; the process itself is straightforward and requires no advanced baking skills or specialized equipment like a candy thermometer. The beauty of this recipe lies in its simplicity, making it accessible for even novice bakers.
However, it’s important to set expectations regarding the time commitment. From start to finish, including all the necessary chilling time, you should anticipate dedicating about four hours. The actual hands-on work, where you’re actively mixing and pouring, is surprisingly brief—approximately 20 minutes in total. The reason for the extended duration is crucial for achieving those picture-perfect, distinct color layers. Each individual layer needs adequate time in the refrigerator to chill and firm up properly, preventing the colors from bleeding into one another and preserving the vibrant integrity of your rainbow.
This patience is truly a virtue when making layered fudge. Rushing the chilling process can result in muddied colors, detracting from the stunning visual impact that makes this rainbow fudge so special. So, put on some music, perhaps tackle another task while it chills, and trust the process. The dazzling end result is well worth every minute of waiting.
Crafting Vibrant Hues: The Secret to Stunning Colors
To ensure our rainbow layers are not only beautiful but also maintain a fantastic texture, I highly recommend using gel food coloring. Unlike liquid food coloring, which can thin out your fudge mixture and make it less firm, gel colors are highly concentrated. This means you only need a tiny amount to achieve rich, vivid shades, without compromising the consistency of your fudge.
I’ve personally had great success with this set and this set of gel food colors for all six layers of the rainbow. They deliver incredible pigmentation. If you prefer a softer, more delicate palette, pastel food colors would also create a beautifully subtle rainbow effect. For the red layer, to achieve a truly deep, vibrant shade, I combine the hot pink from the neon gel set with a few additional drops of classic red food coloring. This combination ensures a bold red that stands out beautifully against the other colors.
Endless Flavor Possibilities: Personalize Your Rainbow
One of the most exciting aspects of this rainbow fudge recipe is the incredible flexibility it offers for customization. While the visual appeal is undeniable, you have ample “wiggle room” to infuse each layer with your favorite flavors, making this treat uniquely yours.
When I first made this for my son Reece’s second-grade class, I went all out, flavoring each layer individually, and the kids absolutely loved it! My original flavor profile included:
Red: Cherry extract
Orange: Orange extract
Yellow: Lemon extract
Green: Lime extract
Blue: Vanilla extract
Purple: Coconut extract
This adventurous combination was a huge hit! I even packed individual pieces of fudge with a few marshmallows into little bags for each child, creating the perfect party favor. I only wish I had pictures to share, as it was such a joyous occasion!
Of course, you don’t have to go as “crazy” as I did. For a simpler approach, you could opt for all vanilla layers, letting the colors be the star of the show. Alternatively, a trio of fruity flavors like orange, lemon, and lime would be equally delicious and still offer a delightful variety. You truly can’t go wrong here! If you do choose the vanilla route, a key tip for maintaining the pristine, vibrant colors is to use clear vanilla extract. Regular vanilla extract has a brownish tint that can subtly dull your beautifully bright hues.
Beyond these suggestions, feel free to experiment with other extracts. Think almond, peppermint, strawberry, raspberry, or even a hint of rum extract for an adult twist. The possibilities are truly endless, allowing you to create a rainbow of flavors that perfectly suits your taste buds or the theme of your event.
Choosing the Perfect Pan for Picture-Perfect Slices
When I initially developed this recipe, I considered using a loaf pan, envisioning perfectly thick slices of rainbow fudge. While the idea was good, I quickly realized that the layers in a standard loaf pan would become too chunky for the delicate rainbow effect I was aiming for. I didn’t want to reduce the overall measurements of the fudge, as that would yield too small a batch.
Therefore, I found that an 8-inch square pan is absolutely ideal for this recipe. It allows for six beautifully distinct, yet not overly thick, layers. The width of the pan provides ample surface area for each color, ensuring that when you slice the fudge, you get those iconic, rainbow-striped pieces. A 9-inch square pan would also work wonderfully, resulting in slightly thinner layers but still maintaining that gorgeous visual impact.
To prepare your pan, it’s essential to line it with foil, leaving an overhang on the sides. This overhang will serve as convenient handles later, allowing you to easily lift the entire slab of chilled fudge out of the pan. A light spray of cooking spray over the foil ensures that the fudge won’t stick, making for a clean release and perfectly shaped slices. While you could cut the fudge into traditional squares, I find that slicing it into longer, thinner rectangles or even triangular wedges truly evokes the image of an actual rainbow, enhancing the whimsical presentation of this delightful dessert.
Tips for Success: Achieving Rainbow Perfection
Even though this is an “easy” recipe, a few key tips can elevate your rainbow fudge from good to absolutely spectacular:
Quality Ingredients: Start with good quality white chocolate chips. The flavor of the chocolate will significantly impact the final taste of your fudge. Sweetened condensed milk is the backbone; ensure you have the correct amount (three 14-ounce cans).
Melt Gently: When melting the white chocolate chips with the condensed milk, use short bursts in the microwave (30 seconds at a time), stirring thoroughly after each interval. This prevents scorching the chocolate and ensures a smooth, lump-free base for your colors.
Even Coloring: Add gel food coloring gradually until you reach your desired vibrancy. Remember, it’s easier to add more color than to take it away. Stir well to distribute the color evenly throughout each layer.
Patience with Chilling: This is arguably the most critical step. Do not rush the chilling process between layers. Each layer needs to be firm enough to support the next without blending. This typically takes about 30 minutes in the refrigerator per layer.
Smooth Layers: After pouring each colored layer, gently spread it evenly across the pan using an offset spatula or the back of a spoon. Work quickly but carefully to ensure a consistent thickness for all layers.
Clear Extract for Pure Colors: As mentioned, if you’re using vanilla extract, opt for a clear variety to avoid tinting your white chocolate base.
Sharp Knife for Slicing: Once the final layer is thoroughly chilled (at least an hour), remove the fudge from the pan using the foil handles. Use a sharp, warm knife (run it under hot water and wipe dry) to make clean, precise cuts. Wipe the knife after each slice to prevent color transfer.
Serving and Gifting Your Magical Creation
I had so much fun creating this recipe, and I truly believe it’s a guaranteed showstopper. The visual impact alone is enough to elicit oohs and aahs from anyone who sees it. And for me, no matter the season, fudge is always a good idea.
For the ultimate whimsical presentation, do yourself a favor and serve this vibrant fudge on a bed of miniature marshmallows. They effortlessly create the illusion of fluffy clouds, transforming your rainbow into a magical scene. It’s absolutely necessary, I think, to complete the enchanting experience!
This Easy Rainbow Fudge also makes an incredible edible gift or party favor. Package individual slices in clear cellophane bags tied with a festive ribbon, or arrange a platter for a potluck or celebration. It’s a treat that brings smiles and brightens any gathering.
Finally, please do not be intimidated by the seemingly lengthy instructions in the recipe card below. I simply wanted to be as thorough as possible, providing every detail to ensure your rainbow fudge-making experience is a resounding success!
PIN THIS RECIPE FOR LATER!
Easy Rainbow Fudge Recipe
This vibrant, layered rainbow fudge is incredibly easy to make and perfect for St. Patrick’s Day, birthdays, or any occasion needing a burst of color. Best served on marshmallow clouds!
Course: Dessert
Cuisine: American
Keyword: easy rainbow fudge, fudge, layered dessert
Prep Time: 4 hours
Total Time: 4 hours
Servings: 36 servings
Calories: 244 kcal
Author: Trish – Mom On Timeout
Ingredients
6 cups white chocolate chips
3 cups sweetened condensed milk (you will need three 14 oz cans)
3 tsp extract (your choice of flavor – see instructions for suggestions)
Red, orange, yellow, green, blue, purple gel food coloring
Instructions
Line an 8”x8” baking pan with foil, leaving an overhang on all sides. Lightly spray the foil with cooking spray.
First Layer – Purple
Combine one cup of white chocolate chips and ½ cup sweetened condensed milk in a microwave-safe bowl. Heat on high for 30 seconds; stir well. Repeat in 15-20 second intervals, stirring after each, until the chips are fully melted and the mixture is smooth and creamy. Stir in ½ teaspoon of your desired extract (such as coconut, grape, vanilla, or almond) and purple gel food coloring until the desired vibrant color is achieved. Pour this mixture into the prepared pan, spreading it evenly, and refrigerate for 30 minutes to set.
Second Layer – Blue
Combine one cup of white chocolate chips and ½ cup sweetened condensed milk in a separate microwave-safe bowl. Heat on high for 30 seconds; stir. Repeat until chips are fully melted and the mixture is smooth. Stir in ½ teaspoon of desired extract (such as vanilla or almond) and blue gel food coloring until the desired color is achieved. Carefully pour this blue mixture over the chilled purple layer in the pan, spread evenly, and refrigerate for another 30 minutes.
Third Layer – Green
Repeat the melting process with one cup of white chocolate chips and ½ cup sweetened condensed milk. Stir in ½ teaspoon of desired extract (like lime or lemon) and green gel food coloring. Pour over the chilled blue layer, spread, and refrigerate for 30 minutes.
Fourth Layer – Yellow
Again, combine one cup of white chocolate chips and ½ cup sweetened condensed milk, melting until smooth. Stir in ½ teaspoon of desired extract (such as lemon or vanilla) and yellow gel food coloring. Pour over the chilled green layer, spread, and refrigerate for 30 minutes.
Fifth Layer – Orange
Melt one cup of white chocolate chips and ½ cup sweetened condensed milk together until smooth. Stir in ½ teaspoon of desired extract (like orange or vanilla) and orange gel food coloring. Pour over the chilled yellow layer, spread, and refrigerate for 30 minutes.
Sixth (FINAL) Layer – Red
For the final layer, melt the last cup of white chocolate chips and ½ cup sweetened condensed milk until smooth. Stir in ½ teaspoon of desired extract (such as cherry or a mix of hot pink and red food coloring for extra vibrancy). Pour this red mixture over the chilled orange layer, spread it evenly to cover, and refrigerate for at least one hour, or until the entire fudge slab is firm.
Once completely chilled, remove the fudge from the pan using the foil handles. Carefully peel off the foil. Using a sharp, warm knife, slice the fudge into approximately ¼-inch thick slices. For a more “rainbow-like” appearance, trim off the edges and then cut each slice in half, creating shorter, colorful segments.
Serve your beautiful rainbow fudge with miniature marshmallows scattered around for charming “marshmallow clouds.” Enjoy!
Nutrition
Calories: 244kcal | Carbohydrates: 32g | Protein: 4g | Fat: 12g | Saturated Fat: 7g | Cholesterol: 15mg | Sodium: 59mg | Potassium: 180mg | Fiber: 1g | Sugar: 32g | Vitamin A: 77IU | Vitamin C: 1mg | Calcium: 132mg | Iron: 1mg
Explore More Rainbow Delights!
If you’ve fallen in love with the vibrant charm of this Easy Rainbow Fudge, you’re in for a treat! The world of colorful desserts is vast and exciting. Dive into these other fantastic rainbow recipes that are sure to bring a smile to anyone’s face:
Rainbow Pinwheel Cookies
Easy Rainbow Pretzel Wands
Rainbow JELLO Cubes
Stained Glass Rainbow Craft
Rainbow Sugar Cookie Bark
For a complete collection of St. Patrick’s Day recipes, simply click HERE.
Looking for more sweet treats? Find all my dessert recipes HERE.
Never miss a new recipe! Sign up for my email newsletter.
Connect with me and get even more delicious ideas by following me on Facebook, Pinterest, Instagram, Twitter, and Bloglovin’.
Wishing you a wonderfully sweet day!
The post Effortless Rainbow Swirl Fudge first appeared on Fitgag.