Handcrafted Wooden Snowman Christmas Ornaments
DIY Wood Snowman Ornaments: A Joyful Christmas Craft for Kids and Family
The holiday season often brings with it a delightful mix of cozy moments and, let’s be honest, sometimes a burst of boundless energy from our little ones, especially when the weather keeps them indoors. During those moments when the clouds gather and the festive spirit calls for a creative outlet, there’s nothing quite like diving into a simple yet satisfying Christmas craft project. We recently embarked on a fantastic adventure into the world of DIY decorations, inspired by a charming image in a catalog. My son, Reece, immediately fell in love with the idea of creating his own snowman ornaments, and I instantly thought, “We absolutely have to make these, and we can probably do it with supplies we already have around the house!”
This project quickly became a favorite for its ease, affordability, and the sheer joy it brought to our crafting table. Not only are these adorable wood snowman ornaments a fantastic way to keep busy hands occupied, but they also result in charming, personalized keepsakes that will adorn your Christmas tree or home for years to come. The boys particularly enjoyed selecting their own ribbons, adding unique touches to their snowmen’s hats and giving each one a distinct personality. This simple addition elevates a basic craft into something truly special. Imagine adding the year or even the crafter’s name to the back – they transform from mere ornaments into cherished memories. These versatile creations are perfect as festive tree ornaments, delightful door hangers, or even thoughtful handmade gifts for loved ones.
Why Craft Wood Snowman Ornaments This Christmas?
Crafting during the holidays is more than just an activity; it’s an opportunity to create lasting memories and beautiful decorations. These wood snowman ornaments stand out for several reasons:
Simplicity: They require minimal crafting skills, making them perfect for even the youngest crafters with a little adult supervision.
Affordability: Made primarily from craft sticks, paint, and a few embellishments, this project is incredibly budget-friendly.
Personalization: Each snowman can be customized with different ribbons, paint styles, and facial expressions, reflecting the unique style of its creator.
Versatility: Beyond tree ornaments, they can be used as unique gift toppers, festive door hangers, or integrated into a winter garland.
Family Bonding: It’s a wonderful activity to do together, fostering communication, teamwork, and shared laughter.
Gather Your Supplies: Everything You Need for Your Snowman Craft
Before you begin your crafting journey, gather all your materials. Having everything ready will make the process smoother and more enjoyable, especially when crafting with enthusiastic kids. Here’s what you’ll need:
Jumbo Craft Sticks: These larger sticks provide a sturdy base and a good surface area for painting and decorating.
Black and White Acrylic Paint: Essential for the snowman’s body and hat. Acrylic paint dries quickly and provides good coverage.
Hot Glue Gun and Glue Sticks: For quick and secure assembly. *Adult supervision is highly recommended when using a hot glue gun.*
Assorted Ribbon: This is where creativity truly shines! Choose various colors, patterns, and widths to give each snowman a unique scarf or hat band.
Googly Eyes: To bring your snowmen to life with expressive eyes.
Orange Craft Foam or Felt: Perfect for cutting out little carrot noses.
Black Sharpie Marker: For drawing the snowman’s smile and any other small details.
Step-by-Step Instructions: Crafting Your Adorable Wood Snowman Ornaments
Follow these detailed steps to create your own charming wood snowman ornaments. Remember, the beauty of handmade crafts lies in their imperfections and unique touches!
Step 1: Constructing the Snowman’s Body
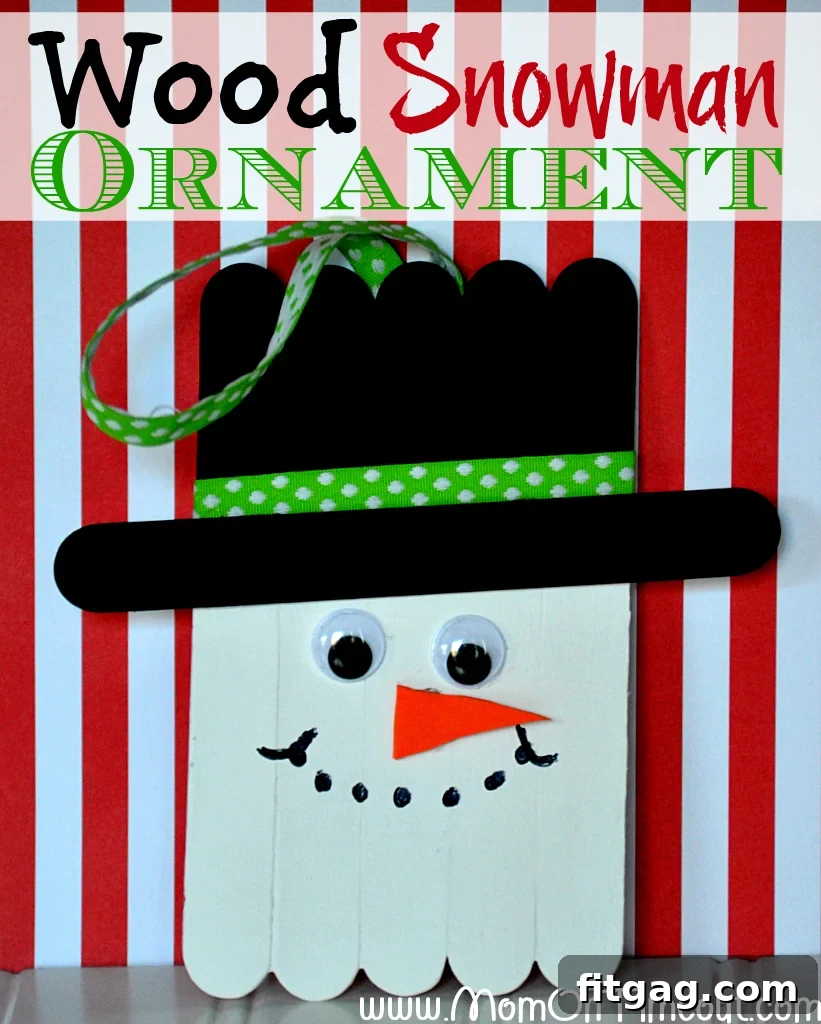
Each snowman requires a total of seven jumbo craft sticks. Five of these will form the main body and head of the snowman, one will be used for the hat’s brim, and the final stick will serve as a stabilizing brace to hold the entire structure together. Begin by laying five craft sticks side-by-side on a flat surface. Make sure they are as close to each other as possible, without any gaps. Next, take the sixth craft stick and carefully break or cut it in half. Apply a line of hot glue to one of these broken halves. Immediately place it horizontally across the five parallel sticks, about one-third of the way down from the top. Press firmly to ensure all five sticks adhere securely together. Repeat this process with the other half of the sixth stick, placing it about one-third of the way up from the bottom. This method creates a stable foundation for your snowman.
Step 2: Bringing Color to Your Snowman
Now it’s time to add color! Using your black and white paints, approximately paint the top third of your assembled five-stick body black – this will form the snowman’s hat. Then, paint the bottom two-thirds white, creating the snowman’s face and body. Don’t worry too much about perfect lines; a slightly rustic, hand-painted look adds to the charm. For younger crafters, you might need to assist with touch-ups, as I certainly did with Bryce’s enthusiastic brushwork! While these pieces dry, take your seventh craft stick and paint it entirely black. This will become the brim of the snowman’s hat.
Step 3: Adding the Ribbon Hat Band
Once the paint is dry, select a festive ribbon for your snowman’s hat. Apply a thin line of hot glue around the bottom edge of the painted black area on your snowman’s head. Carefully press the ribbon onto the glue, wrapping it completely around. You can choose to place the ribbon straight across for a classic look, or angle it slightly for a more playful, whimsical feel, giving your snowman’s hat a little extra “attitude.” This step is where each snowman truly starts to gain its individual character!
Step 4: Completing the Hat
Take the black-painted craft stick (from Step 2) that will form the hat’s brim. Apply hot glue along one edge of this black stick. Carefully position and glue it horizontally just below the ribbon you just added, or slightly overlapping the bottom edge of the ribbon, depending on your desired look. This step completes the snowman’s distinctive winter hat, giving it a charming, dimensional appearance.
Step 5: Bringing Your Snowman to Life with Facial Features
This is arguably the most fun part – giving your snowman a face! Using hot glue, attach two googly eyes to the white painted section of the snowman’s head. Next, cut a small triangle shape from your orange craft foam or felt to create a classic carrot nose. Glue this into place below the eyes. Finally, use your black Sharpie marker to draw a cheerful, dotted smile below the nose. This combination of elements instantly brings your snowman to life with character and expression!
Step 6: Adding the Hanger
The final touch is to add a hanger so your snowman can be displayed. Cut a piece of ribbon to your desired length. For a Christmas tree ornament, a shorter loop (around 4-6 inches when folded) works best. For a door hanger, you’ll want a longer piece. Form the ribbon into a loop and apply a small dot of hot glue to the ends. Carefully glue the ends to the back of the snowman’s hat, ensuring the loop extends upwards. Press firmly until secure. Now your adorable wood snowman ornament is ready to hang and brighten up your home!
Tips for Success and Creative Variations
We’ve been enthusiastically “mass producing” these little guys this week, and through our crafting adventures, I’ve picked up a few helpful tips that I’d love to share, especially if you’re planning a similar crafting session:
Budget-Friendly Supplies: Keep an eye out for sales and coupons at craft stores. For instance, I purchased a 200-piece pack of jumbo craft sticks for just $2.50 at Michaels with a 50% off coupon! This makes each stick a little over a penny, bringing the total cost per snowman craft to roughly 10 cents. Now that’s what I call affordable holiday cheer!
Safety First: When using a hot glue gun, adult supervision is crucial, especially with younger children. Consider using a low-temp glue gun for safer handling. For very young children, craft glue can be used, though it will require longer drying times.
Embrace Imperfection: Remind kids that handmade items are meant to be unique. A slightly crooked hat or an uneven paint line adds to the charm and tells the story of their creative effort.
Experiment with Colors: While classic black and white are traditional for snowmen, don’t shy away from incorporating other colors! Blue or green hats, or even colorful patterns on the snowman’s body, can add a vibrant twist.
Additional Embellishments: Get creative with extra details! Small buttons could be glued down the snowman’s front. Glitter glue can add a sparkly, snowy effect. Tiny fabric scraps or felt can be used for scarves instead of ribbon.
Personalize with Details: Use a fine-point Sharpie or paint pen to write the year and the crafter’s name on the back of each ornament. This turns them into precious time capsules.
Beyond the Tree: Creative Uses for Your Snowman Ornaments
While these wood snowmen make absolutely delightful Christmas tree ornaments, their utility extends far beyond just hanging on branches. Consider these alternative ideas to maximize their festive charm:
Festive Door Hangers: Use a longer ribbon loop to transform them into charming mini door hangers for bedrooms or interior doors, spreading holiday cheer throughout your home.
Unique Gift Toppers: Attach a snowman to a wrapped present instead of a traditional bow. It adds a personal, handmade touch that makes the gift even more special.
Winter Garland Accent: String several snowmen together with festive beads or pinecones to create a unique winter garland for your mantelpiece, staircase, or window.
Party Favors: If you’re hosting a holiday party for kids, these can be a fun craft activity and then double as a memorable take-home favor.
Classroom Decorations: Teachers can use this as a simple and engaging classroom activity, creating a display of student-made snowmen.
Handmade Gifts: Package a set of these snowmen for grandparents, teachers, or friends. Handmade gifts carry a special warmth and thoughtfulness.
Making it a Family Holiday Tradition
In a world of store-bought decorations, creating homemade ornaments with your children offers a unique opportunity to slow down, connect, and build cherished family traditions. Imagine years from now, pulling out a box of ornaments and seeing these handmade snowmen, each one a tangible reminder of a fun afternoon spent together. These aren’t just crafts; they’re memories waiting to be made. Each snowman will carry a story, a laugh, or a particular moment from the day it was created, making your Christmas decorations truly priceless.
Do you have a favorite ornament you love to make with your kids during the holidays? We’re always looking for new ideas to add to our crafting repertoire!
Connect with Us for More Inspiration!
We love sharing simple, fun, and family-friendly ideas to make every season special. Join our community and stay connected for more crafting inspiration, delicious recipes, and helpful parenting tips!
Linking up at some of these parties.
The post Handcrafted Wooden Snowman Christmas Ornaments first appeared on Fitgag.