DIY Outdoor Beverage Bar for Effortless Entertaining
For years, the dream of transforming my backyard into a vibrant hub for outdoor entertaining has fueled countless ideas. While ambitious projects like building a pub shed may take considerable time and planning, sometimes all it takes is a unique challenge to kickstart an incredible DIY transformation. And just like that, with a dash of ingenuity and a powerful adhesive, a bespoke outdoor drink station designed to impress any crowd came to life.
Prepare for an inspiring journey through this project, which involved a bit of strategic thinking, hands-on construction, and a whole lot of fun. This isn’t just about building a piece of furniture; it’s about pushing DIY boundaries and discovering surprising capabilities in everyday materials.
This post is proudly sponsored by Krazy Glue. All opinions expressed are genuinely my own.
Embracing the Krazy Glue Challenge: A DIYer’s Test of Strength and Skill
Let’s be upfront: this entire project was made possible through a fantastic sponsorship with Krazy Glue. Beyond the legal necessity of disclosure, their challenge was the very catalyst that shaped this build. A few months ago, they reached out with an intriguing proposition: could I construct something large and heavy using *only* Krazy Glue? For someone who loves to test limits, this was an irresistible invitation.
Krazy Glue boldly claims their ultra-fast drying adhesive can hold an astounding 2,000 pounds. My prior experience with super glues was largely confined to small crafts and minor repairs, so the idea of using it for a substantial outdoor piece was both exciting and daunting. Of course, I accepted. It meant stepping outside my comfort zone, potentially gluing my fingers together a time or two (a small price to pay for discovery!), but the results, as you’ll soon see, were truly remarkable.
Witnessing those concrete blocks adhere so powerfully was genuinely impressive. Rest assured, I managed to avoid becoming permanently attached to my project – though a stray drop did find its way into my hair, adding a touch of humor to the process!
My woodworking skills, I must admit, are firmly in the beginner category. While DIY home renovations have broadened my practical knowledge, crafting furniture taps into a different part of my brain – one that often feels overwhelmed by complex structural engineering. My tool arsenal is fairly basic: a miter saw and a drill. Methods like pocket holes have been my go-to for many projects, simplifying the joinery process. However, to truly test Krazy Glue’s performance, relying on these familiar tricks was not an option. This stipulation forced me into the fascinating, sometimes mind-bending, world of traditional woodworking joinery.
What initially felt like a restriction quickly evolved into a profound learning experience. I experimented with new joint types, expanded my woodworking vocabulary, and occasionally reverted to trusted methods when frustration peaked. I’m incredibly grateful to Krazy Glue for pushing me to challenge my conventional approach. The project not only turned out better than I imagined but also ignited a new passion for exploring the intricacies of wood joinery.
Even Charlie, our furry friend, was excited about the new outdoor drink station!
Designing Your Perfect DIY Outdoor Drink Station for Entertaining
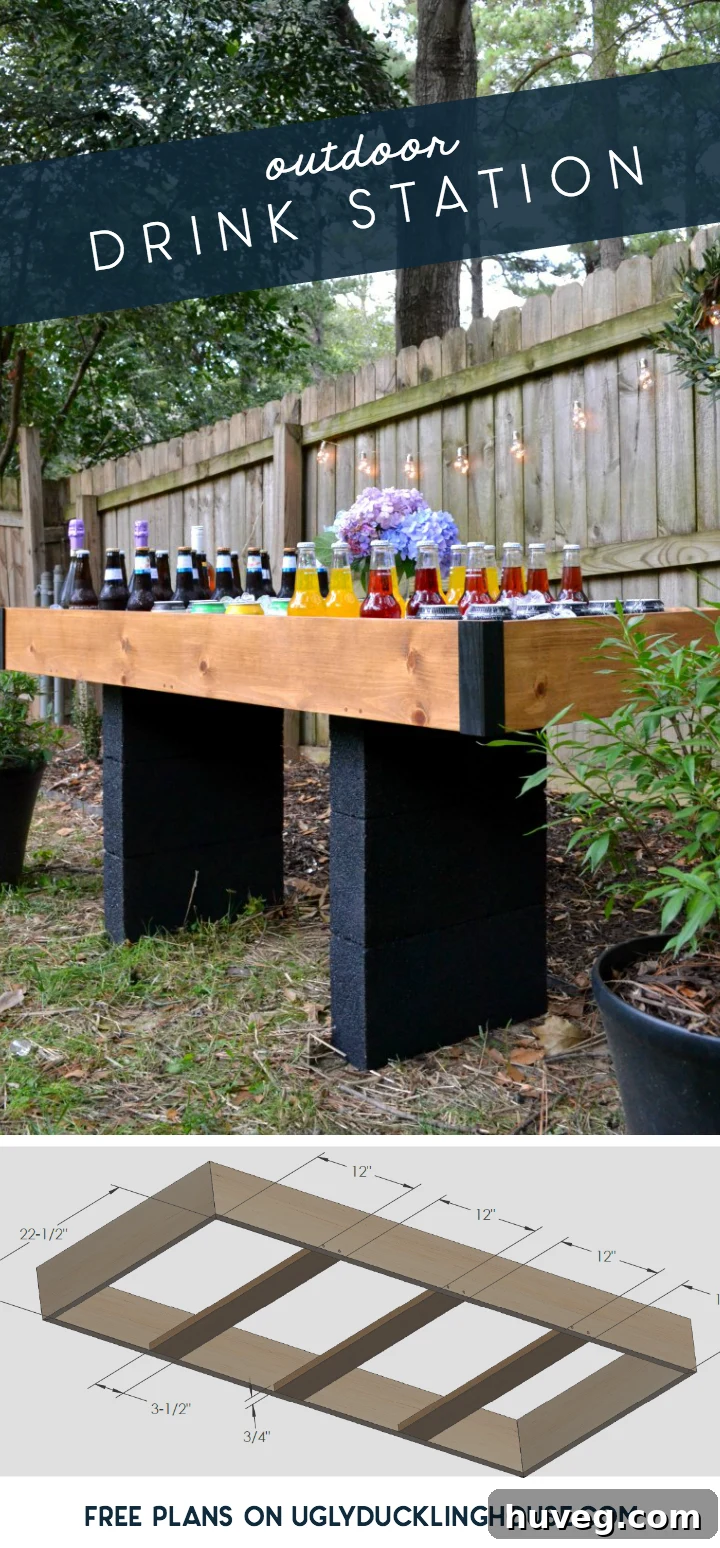
Let’s dive into the core concept: I envisioned a versatile drink buffet, perfect for hosting friends throughout the fall and beyond. The key requirements were functionality, aesthetic appeal, and importantly, portability. I didn’t want a permanent outdoor fixture that would require constant maintenance against the elements. The ideal solution would be a modular design, easily assembled for parties and disassembled for convenient storage.
This meant designing a robust base capable of supporting considerable weight – ice, drinks, and potentially some decorative elements – without tipping or bowing under pressure. My inspiration stemmed from a beautiful wedding rehearsal setup I’d seen circulating on Pinterest from a 2012 blog post (link to inspiration). Though widely shared, a DIY blueprint for it was elusive. So, I took it upon myself to reverse-engineer the concept and create comprehensive plans for fellow DIY enthusiasts, which you’ll find as you scroll down. A downloadable version will be available soon!
Crafting the Wooden Tray: The Heart of Your Outdoor Beverage Bar
One of the most satisfying aspects of this project was its reliance on scrap wood. Much like my DIY coffee table, the initial assembly phases unfolded comfortably in my living room, often accompanied by background TV. For the main tray, I used a couple of pine 1x6s, cutting them to 5 feet for the sides and 2 feet for the ends. I opted for mitered corners to create a seamless, box-like structure. After applying Krazy Glue, I clamped the pieces together. However, I observed that the mitered corners, despite initial adhesion, felt somewhat weak as the bond set. This made me reflect on glue’s performance, which often excels on flat, flush surfaces. To bolster the corners, I added painter’s tape for extra compression and stability during the curing process. Simultaneously, I cut three bottom support pieces from scrap poplar and glued them into place, laying the groundwork for the tray’s strength.
Building a Robust Cinder Block Base: The Foundation of Your Party Cooler
While the wooden tray cured indoors, I moved outside to tackle the cinder block bases. The original inspiration photo appeared to use standard 8-inch wide blocks. However, I envisioned a sleeker, slightly lower profile, opting for three 4-inch wide blocks per side, bringing the entire structure to a comfortable height just below my waist. This narrower choice presented a potential challenge: a top-heavy structure. Therefore, it was paramount that these blocks were meticulously and solidly glued together to ensure unwavering stability.
This phase was where my genuine concern for the project’s integrity peaked. I approached it with patience, using a generous amount of Krazy Glue. I discovered that one side of the blocks adhered almost instantly, while the other, likely due to the rougher, more porous texture of the cinder block, required a slightly different approach. I applied glue, let it cure, and then reapplied in the same areas, effectively gluing the adhesive onto itself to create a smoother, more effective bonding surface. Ample curing time was essential, so I let the stacks sit overnight, relying on the sheer weight of each block to maintain pressure. My diligence paid off spectacularly: the next morning, I could lift each stack from the top as a single, solid unit! This validated Krazy Glue’s incredible holding power and boosted my confidence immensely.
Reinforcing the Tray Bottom: Essential Support for Durability
With the main frame of the top tray cured, I moved everything outside and flipped it upside down to focus on the base. Knowing that the scrap plywood bottom, along with waterproofing, would add significant weight, I decided to incorporate additional support. My solution involved gluing in 1/4-inch dowels. Using a progression of drill bits, starting with a narrower one and then re-drilling with larger sizes until the dowel fit snugly, I created two dowel placements for each end of the supporting cross pieces along the bottom. (Note: in the image, the tray is flipped, so what appears to be the top is actually the bottom section we’re reinforcing.)
Next, I dry-fitted the 1/4-inch dowels through the holes and marked them for precise cutting. A small but impactful tip: lightly sanding the ends of the dowels before insertion significantly reduced friction, making the gluing process smoother and ensuring a tighter fit.
Once all the dowels were securely in place, the clamps could finally be removed, and the tray flipped over for the final assembly steps.
With some additional scrap wood on hand, I also glued triangular pieces into the bottom of each corner of the tray. These pieces, visible in the plans below, provided invaluable extra support, especially since the scrap plywood I used wasn’t perfectly flat. Every bit of reinforcement counts when durability is key.
Finishing the Plywood Base: Ensuring Drainage and Stability
With the tape and clamps removed, the frame was ready for its plywood base. This crucial step brought the tray closer to its functional form.
Admittedly, the plywood wasn’t cut perfectly square. However, this imperfection turned into a happy accident, as the small gaps it created provided a natural drainage system for melting ice, eliminating the need to drill specific drain holes. Sometimes, DIY “mistakes” yield unexpected benefits!
Despite weighing down the plywood to help the glue set with the bottom supports, the bond wasn’t as robust as I’d hoped, likely due to the uneven nature of scrap wood. To ensure ultimate security, I resorted to a few screws – a practical solution for common “scrap wood problems” in DIY. This further reinforced the tray’s bottom, preparing it for heavy loads of ice and beverages.
As a final reinforcement, I glued in another small corner piece on top of the plywood, effectively sandwiching the plywood between the two corner supports. And here’s where my journey into woodworking joinery took a hilarious turn: according to this woodworking chart, this particular configuration is called a “Butt Rub Joint.” My inner sense of humor couldn’t help but find this name absolutely priceless, especially as one of my first deliberate forays into formal joinery terms!
Detailed Plans for Your Own Outdoor Drink Station
Ready to build your own? Here are the comprehensive plans, illustrating the dimensions and assembly of each component, ensuring you have all the information needed to recreate this versatile outdoor drink station.
(A closer look at that small corner “M” piece mentioned earlier)
Full Assembly: Bringing Your Portable Bar to Life
Witness the ease of assembly in this quick GIF:
Protect, Stain, and Paint: Finishing Your Outdoor Party Cooler
With the tray fully assembled, the final stage involved crucial steps to ensure its longevity and aesthetic appeal: waterproofing, staining, and painting. For the interior, I utilized leftover paint-on waterproofing membrane from my bathroom renovation. This proved to be a fantastic choice, drying quickly enough to apply two coats within a few hours. I always appreciate finding alternative uses for home renovation scraps – it’s both economical and environmentally friendly!
The waterproofing membrane goes on pink and dries bright red, but don’t worry, it’ll soon be covered!
To achieve a rich, appealing color for the exterior, I applied a custom blend of Minwax Ipswich Pine and Early American stains. This layering technique allows for greater control over the final hue, often resulting in a unique, nuanced finish. Following the stain, I sprayed on three coats of Indoor/Outdoor spar urethane. This protective layer is vital for outdoor furniture, offering superior resistance against UV damage, rain, and general weather exposure. As you can see in the photo, the corners were initially used to test stain colors, with the intention of covering them later with decorative elements that would complement the concrete block base.
For a cohesive and sophisticated look, I taped off a small lip inside the tray and sprayed it, along with the corner decorative pieces (fashioned from simple wooden lath) and the entire concrete block base, with a striking nearly-black spray paint: Valspar Outdoor Spray Paint in Dark Knight. A future video on my YouTube channel will delve into a comparison of various spray paints, highlighting the significant difference quality paint makes on these types of surfaces.
To set the scene for an outdoor gathering, I positioned the drink station near the new hedge line along the backyard fence. Just imagine how spectacular it will look once those hedges fill in! To add immediate greenery and combat the fall browns, I incorporated potted gardenias, a small bouquet of clipped hydrangeas, an olive leaf wreath, and a few decorative outdoor lights to complete the inviting ambiance.
Maximizing Stability and Portability: Smart Tips for Your Cinder Block Base
A crucial tip for the cinder block base, especially given its modular and non-permanent nature: to enhance stability and mitigate any risk of it becoming top-heavy, I reinforced each base with rebar hammered directly into the ground. While it likely would have held fine without it, I preferred not to leave anything to chance. The significant advantage of this approach is that the rebar can be easily removed, allowing for much more convenient storage of the separate pieces compared to a permanently affixed structure. This modularity also means I can move the station in and out of the garage solo (a blessing when unexpected rain hits, as it did earlier this week!). For future iterations, I might add small scrap wood pieces to the underside of the wooden tray, creating precise interlocking slots over each cinder block for even greater stability and easier alignment.
Once all the assembly and finishing touches were complete, it was time for the ultimate test: a party!
The Ultimate Outdoor Entertainment Hub: Performance and Practicality
This DIY outdoor drink station truly exceeded expectations! It comfortably held a substantial quantity of drinks, effortlessly serving a large gathering. The accidental drainage feature worked perfectly, allowing melting ice to escape without creating a soggy mess. The waterproofing held up like a champion, ensuring the wooden tray remained pristine throughout the evening. Most importantly, the all-purpose formula of Krazy Glue maintained its rock-solid bond through hours of use, proving its exceptional suitability for demanding outdoor applications. This project stands as a testament to the adhesive’s reliability and strength.
I eagerly anticipate bringing out this drink station for many future get-togethers. In the interim, its ingenious design allows it to be stored in three separate, manageable sections – the tray and two cinder block legs – making it incredibly easy to fit into my somewhat narrow garage storage space. It’s a complete win-win: functional, durable, and space-efficient!
This project has been an incredibly rewarding experience, demonstrating that with a bit of courage and the right tools (or in this case, the right adhesive!), even a beginner can tackle seemingly complex builds. I’m currently compiling a new video for my YouTube channel, where I’ll share more insights from this build, along with additional tips on spray paint techniques. This challenging build has truly ignited my curiosity for other woodworking ideas, and I suspect I’ve just found myself another hobby to enthusiastically (and perhaps excessively!) invest in. Don’t be afraid to take on your own DIY challenges – you might just surprise yourself with what you can create!
Have you embarked on any creative projects with Krazy Glue lately? Share your experiences!
This comprehensive guide was brought to you in partnership with Krazy Glue, the versatile instant adhesive known for its ultra-fast drying and powerful bonding capabilities across a wide array of surfaces and applications. A huge thank you to their team for inspiring such a fun and challenging project!
The post DIY Outdoor Beverage Bar for Effortless Entertaining first appeared on Decxu.