Bewitching Apples Delicious Halloween Delight
This post is brought to you by Mars candy. All opinions expressed are 100% my own.
Bewitching Apple Treats: A Spooky & Sweet Halloween Craft for All Ages!
The air is getting crisp, pumpkins are appearing on doorsteps, and the excitement for Halloween is palpable! This festive season is one of my absolute favorites, especially since it brings families together for creative fun and delightful treats. Our family loves to embrace the spirit of Halloween by hosting a gathering each year. It’s a wonderful tradition that allows us to enjoy the magic of the holiday through the eyes of our little ones, creating cherished memories.
Every year, I look forward to surprising our guests with unique, homemade Halloween treats that are as fun to make as they are to eat. This year, I’ve conjured up something truly special and adorable: these “Bewitching Apple Treats.” They combine wholesome apples with delicious Mars candies to create a spooky-sweet masterpiece that will surely charm everyone at your Halloween party.
The Inspiration Behind Our Witchy Creation
My journey to create these bewitching delights began while browsing through various Halloween recipes. I stumbled upon some incredibly cute witch hat designs and instantly knew I had to incorporate them into our party spread. The concept of crafting miniature witch hats from cookies and ice cream cones immediately sparked my imagination. But as I gathered my supplies, a brilliant idea hit me – why stop at just hats?
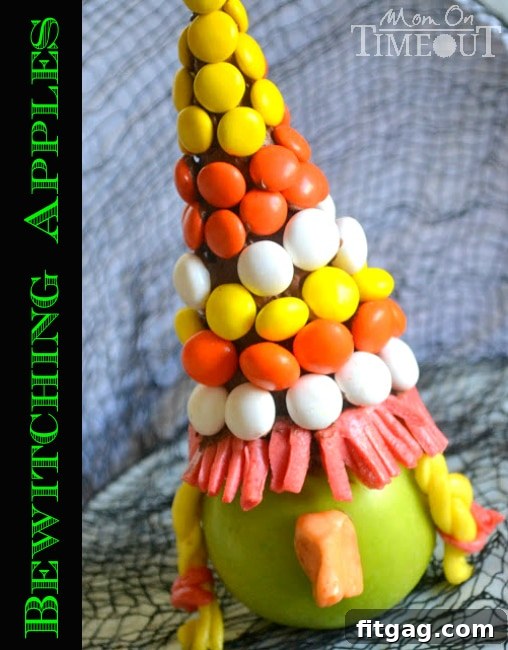
Why not give these enchanting hats a head to rest upon? And what better head than a crisp, green apple? This simple twist transformed a cute treat into a playful character, making the whole creation even more captivating. Not only do these apples add a refreshing, slightly healthier element to our otherwise candy-filled celebration, but they also serve as a delightful surprise for guests. Once the delicious witch hat is enjoyed, a tasty apple awaits!
Before diving into the recipe, a quick trip to Walmart was in order. Armed with a $1 coupon for Mars Halloween candy, I filled my cart with a bounty of sweets, including M&M’S® Brand Chocolate Candies and STARBURST® Fruit Chews, along with essential party supplies and, of course, a generous supply of green apples. Mars candy is always a go-to for Halloween, offering a fantastic variety that appeals to everyone. We often set up a “Caramel Apple Station” for our fall-themed or Halloween parties, allowing guests to customize their own caramel apples with various toppings like M&M’s, gummy worms, or chopped Snickers bars. These witchy apples felt like a perfect extension of that fun, interactive spirit.
Crafting these Bewitching Apple Treats is not just about making a snack; it’s an experience. It’s a chance to get creative, play with colors, and bring a touch of whimsical magic to your Halloween festivities. So, let’s gather our ingredients and start crafting these adorable witches!
Ingredients {for 8 Bewitching Apple Treats}:
40 pieces STARBURST® Fruit Chews FUN SIZE® (assorted colors for hats, hair, and nose)
1 cup M&M’S® Brand Chocolate Candies for Halloween (or other small candies for decoration)
1 can (approximately 16 ounces) of prepared chocolate frosting
8 (3 1/2-inch) packaged chocolate cookies (e.g., chocolate wafers or similar flat cookies)
8 ice cream cones (waffle or sugar cones work best)
8 medium green apples (such as Granny Smith, for their vibrant color and tartness)
Sharp kitchen scissors or a small paring knife
Optional: Small edible candy eyes or an edible food marker for facial details
Directions: Crafting Your Bewitching Apple Treats
Let’s embark on the delightful journey of bringing these adorable witch apples to life! This recipe is designed to be fun and engaging, whether you’re crafting solo or with little helpers.
Step 1: Building the Witch Hats
First, take your chocolate cookies and spread a generous layer of prepared chocolate frosting evenly over the top of each. This frosting will serve as the base for our witch hats and also act as a delicious adhesive. Once frosted, carefully place one ice cream cone, open-end down, squarely onto the center of each frosted cookie. Press down gently to ensure it adheres well. Now, proceed to frost the entire surface of each ice cream cone, creating a smooth, dark canvas for your hat decorations. Don’t worry about perfection here; a rustic charm adds to the witchy aesthetic!
Step 2: Creating the Starburst Fringe
This is where the STARBURST® Fruit Chews truly shine! For each hat, you will need approximately four STARBURST® candies. Unwrap each candy and, using clean kitchen scissors or a small paring knife, carefully cut it in half lengthwise. Now, take each half and make small, parallel cuts along one of the long edges, creating a whimsical fringe effect. Be careful not to cut all the way through, leaving a solid strip at the top. Once you have your fringed STARBURST® pieces, arrange them artfully around the base of the ice cream cone, pressing gently into the frosting. You can overlap them slightly to create a fuller, more textured “brim” for your witch’s hat. Feel free to mix and match colors for a vibrant, eclectic look, or stick to a single color for a more classic witch hat. This fringe can mimic a hat accessory or even the witch’s hair!
Step 3: Decorating the Cones with Candies
Now for the fun part: decorating the hats! Take your M&M’S® Brand Chocolate Candies (or other small, colorful candies) and press them into the frosting on the cone in random or patterned designs. This is a fantastic opportunity to let your creativity run wild! I personally love using M&M’s White Chocolate Candy Corn for a festive touch, mixed with classic plain M&M’s for a burst of color. Feel free to experiment with different types of Mars candies – small chopped pieces of SNICKERS® or SKITTLES® could also add interesting textures and flavors. The goal is to cover the cone entirely, making it look vibrant and appealing.
Step 4: Adding Braided Starburst Hair (Optional, but Highly Recommended!)
This step is completely optional, but for me, it adds an irresistible charm. The fringe from the previous step could certainly pass as the witch’s hair or a stylish hat accessory. However, I have a soft spot for braids – perhaps because I don’t have little girls to braid hair for myself! I even used braids on my B-Witchin’ Pumpkins. To create these adorable braids, choose STARBURST® Fruit Chews in your desired “hair” color. Unwrap them, then flatten, roll, and stretch each candy until it becomes nice and long and pliable. It helps if your hands are slightly warm. Once elongated, cut each piece in half lengthwise. Take three of these long, thin strips and gently braid them together. Repeat the process to create a second braid. For an extra touch of cuteness, I like to use another contrasting STARBURST® to make small “ribbons” for the ends of the braids, just because it adds that extra spark of personality.
Step 5: Assembling Your Bewitching Apple
Now, it’s time to bring our witch to life! Take your clean, green apples. If you opted for braids, firmly press the top ends of the braids onto the upper portion of the apple, allowing the braids to drape down the sides. Secure them with a little extra chocolate frosting if needed. Then, generously apply a layer of chocolate frosting to the very top of the apple, where the hat will sit. Carefully place your prepared witch hat on top of the frosted apple, pressing down gently to ensure it adheres securely. The frosting will help everything stay in place. I was initially going to stop there, but then I realized my little witch needed a nose! So, I took another STARBURST® Fruit Chew, shaped it into a small, pointed nose, and pressed it onto the apple just below the hat. For an even more expressive witch, consider adding small candy eyes or drawing a simple mouth with an edible food marker.
And there you have it – perfection! A delightful, spooky, and utterly charming Bewitching Apple Treat, ready to enchant your Halloween guests.
Halloween Safety: A Parent’s Guide for a Worry-Free Night
As much as I adore the fun and festivities of Halloween, as a parent, safety is always at the forefront of my mind. I vividly remember coming home after trick-or-treating as a child, and my parents meticulously going through my candy haul. Back then, I suspected they were just looking for the “good stuff” to claim for themselves (and maybe that was partly true!), but now, I understand their genuine concern. It was all about ensuring that none of my treasured candy had been tampered with.
To ensure a safe and enjoyable Halloween for everyone, here are some essential safety tips:
Candy Inspection: Always check your children’s candy before they eat it. Discard anything that is unwrapped, appears opened, or looks suspicious. It’s a small step that provides immense peace of mind.
Familiar Neighborhoods: Whenever possible, stick to neighborhoods you are familiar with, and ideally, those where you know the residents. This adds an extra layer of security.
Community Events: Many communities now host supervised “Trunk-or-Treat” events or organized trick-or-treating nights in safe environments like malls or community centers. These are fantastic alternatives that often eliminate many of the worries associated with traditional door-to-door trick-or-treating, offering just as much fun.
Costume Safety: Ensure costumes are visible in the dark (add reflective tape!), flame-resistant, and fit properly to prevent trips and falls. Avoid masks that obstruct vision; face paint is often a safer alternative.
Lighting and Pathways: If you’re handing out candy, make sure your porch and walkways are well-lit and clear of any obstacles to prevent falls for trick-or-treaters.
Pet Safety: Keep pets safely secured indoors, away from the front door, to prevent them from becoming stressed or accidentally escaping. Also, ensure that all candy, especially chocolate, is kept out of their reach.
Buddy System: Encourage older children to trick-or-treat in groups and to always let you know their route and estimated return time.
We typically have many trick-or-treaters in our neighborhood, and we always make sure to stock up on individually wrapped Mars candies that parents can feel good about. It’s a simple way to contribute to a safe and happy Halloween for all the little goblins and ghouls who visit our door.
Just talking about these spooky treats and safety tips has me even more excited for Halloween! Have you and your family picked out your costumes yet? This year, our family is embracing the heroic spirit by going as Avengers characters. So, if you happen to be in our area, you can rest easy knowing that Thor and Captain America will be on patrol, protecting the ones you love! Wishing you and your family a very safe, fun, and Happy Halloween filled with delightful memories and, of course, delicious Bewitching Apple Treats!
Connect with me!
Linking up at some of these parties.
The post Bewitching Apples Delicious Halloween Delight first appeared on Fitgag.