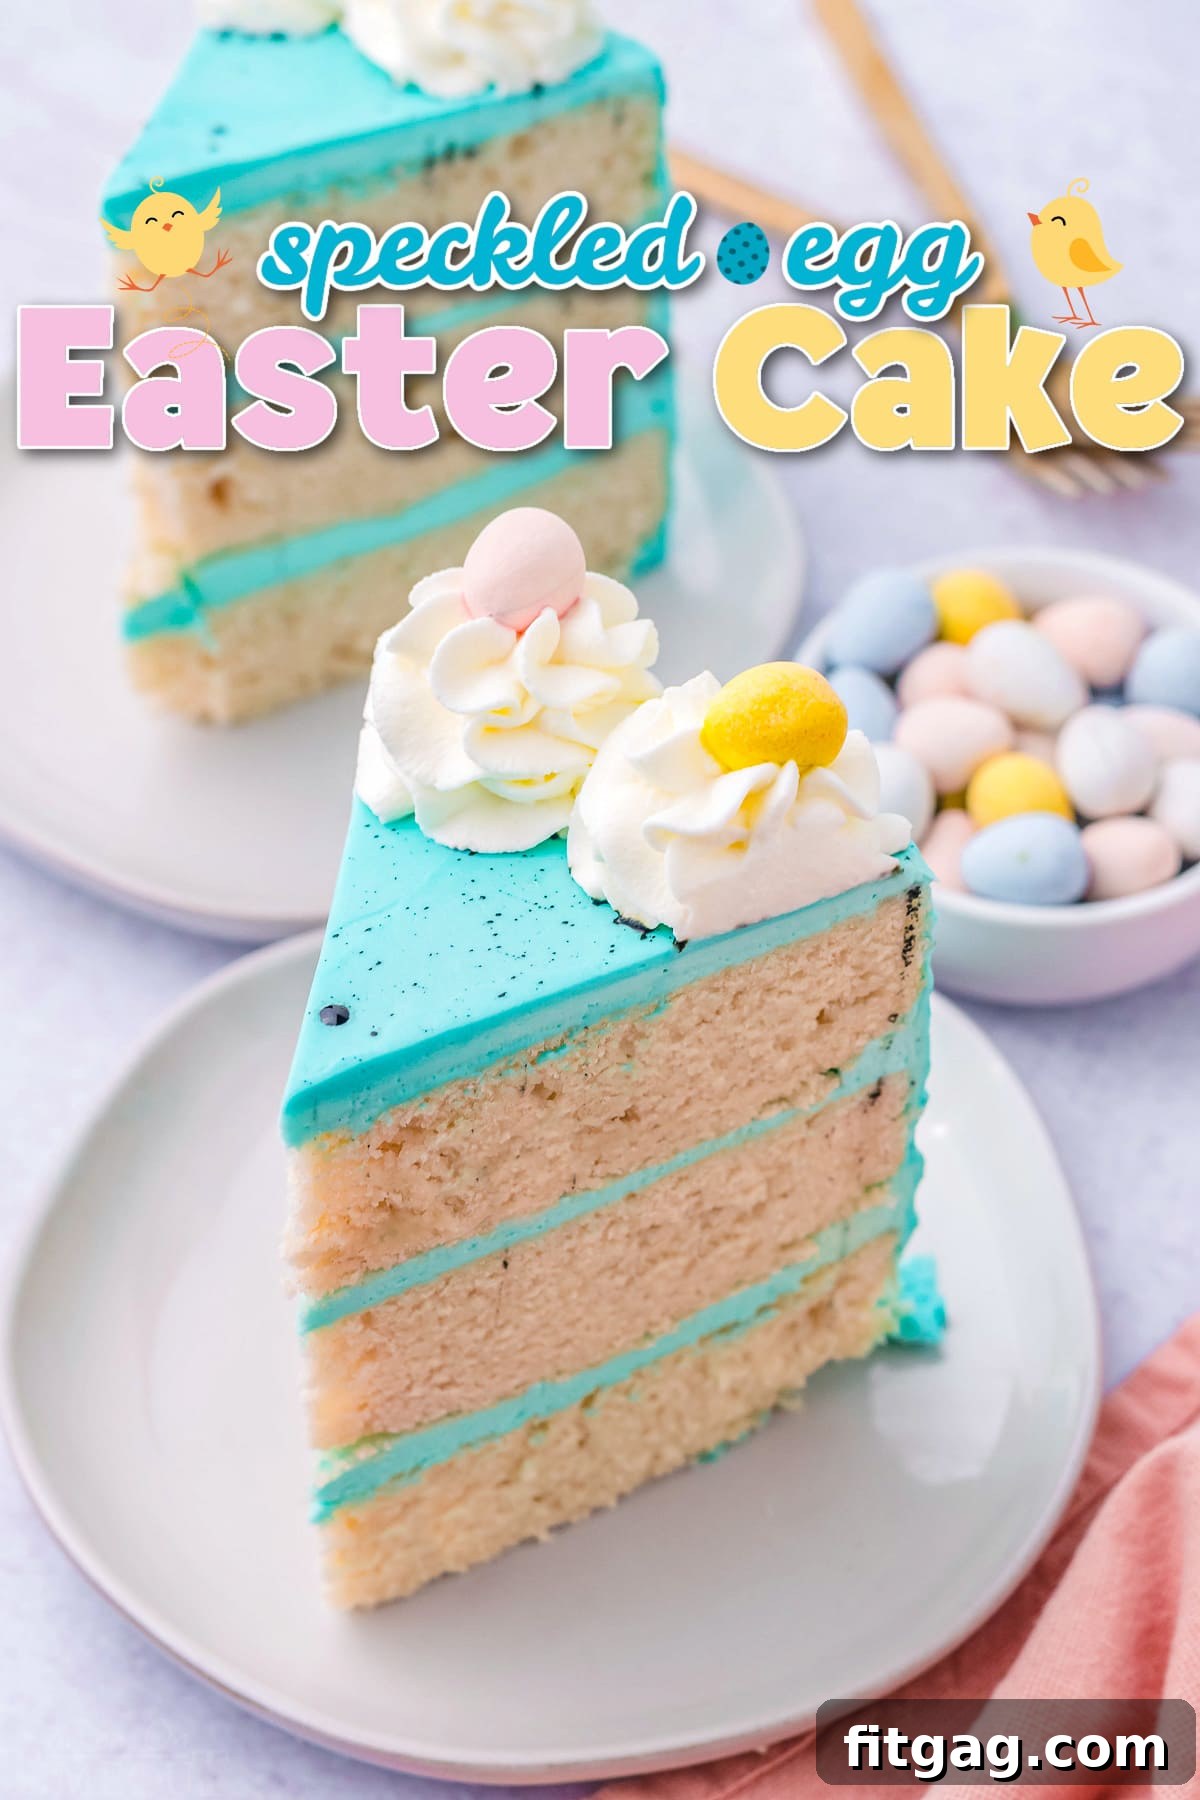
Whimsical Speckled Egg Easter Cake
This Easter, elevate your celebration with a show-stopping dessert that’s as delightful to behold as it is to taste. Our **Speckled Egg Easter Cake** is a masterpiece of festive baking, combining layers of moist, fluffy vanilla cake with a dreamily smooth vanilla buttercream, all adorned with charming speckled egg decorations. Forget ordinary desserts; this beautiful creation promises to make your Easter gathering truly unforgettable.
There’s something uniquely magical about Easter, and for many, that magic is intrinsically linked to sweet treats. While all Easter candies hold a special place in our hearts, those delightful speckled eggs often steal the spotlight – and now, they literally inspire the cake! This festive and fun Easter cake recipe isn’t just a dessert; it’s a beautiful centerpiece that will impress everyone at your table. It truly is one of the best Easter cake ideas you’ll discover.
So, gather your ingredients and prepare to create the prettiest and most delicious Easter cake ever, crowned with everyone’s favorite mini Cadbury Eggs!
More Enchanting Easter Desserts to Sweeten Your Holiday
Easter Sunday is a time for joy, family, and, of course, an abundance of delicious treats! If you’re looking to expand your dessert table beyond this beautiful cake, here are some other cherished Easter favorites that are sure to bring smiles:
Three Minute Easter Fluff: A light, airy, and incredibly quick dessert that’s perfect for a last-minute addition.
Easter Chocolate Chip Cookies: Classic cookies with a festive twist, ideal for little hands to help decorate.
To Die For Carrot Cake: A timeless Easter staple, rich with spices and creamy frosting.
Best Coconut Cream Pie: A tropical delight with a luscious coconut filling and fluffy topping.
Watergate Salad (Pistachio Fluff): A retro favorite, light, sweet, and vibrantly green for spring.
Crafting Your Easter Masterpiece: Key Ingredients Unveiled
For this delightful Easter cake, we’ve chosen a classic vanilla cake base paired with a velvety vanilla buttercream, creating a flavor profile that appeals to everyone. However, feel free to get creative and swap out the flavors to suit your personal preferences. The full, detailed, and printable recipe awaits you at the bottom of this post, but let’s first explore the ingredients that bring this beautiful cake to life.
For the Light and Fluffy Vanilla Cake Layers:
All-Purpose Flour: Opt for bleached all-purpose flour for the lightest texture. Sifting your flour can help ensure a supremely tender crumb.
Baking Powder: This leavening agent is crucial for giving your cake its characteristic rise and airy structure. Ensure it’s fresh for optimal results.
Salt: A pinch of salt is vital to balance the sweetness and enhance all the other flavors in the cake, preventing it from tasting flat.
Unsalted Butter: Always use unsalted butter for baking, as it gives you control over the overall salt content. Make sure it’s softened to room temperature – this is key for proper creaming and a smooth batter. Do not melt it!
Granulated Sugar: Standard white granulated sugar provides the perfect sweetness and contributes to the cake’s fine texture and moistness.
Egg Whites: Using only egg whites gives this vanilla cake a beautiful, pure white color and contributes significantly to its light, delicate lift. Don’t discard those leftover egg yolks; they’re perfect for making a rich homemade lemon curd! Ensure egg whites are at room temperature for better incorporation.
Pure Vanilla Extract: The soul of vanilla cake! Use a high-quality pure vanilla extract for the most authentic and amazing flavor.
Whole Milk: Whole milk, at room temperature, adds richness and moisture to the cake batter, resulting in a tender and decadent crumb.
For the Silky Vanilla Buttercream and Eye-Catching Decorations:
Salted Butter: For the buttercream, salted butter works wonderfully, providing a balanced flavor. If you opt for unsalted butter, add about 1/2 teaspoon of fine salt to the frosting to achieve a similar balance. Softened butter is a must for a smooth consistency.
Powdered Sugar (Confectioners’ Sugar): This is non-negotiable for buttercream! Its fine texture dissolves easily, creating a smooth, lump-free frosting. Do not substitute with any other type of sugar.
Pure Vanilla Extract: Essential for infusing the buttercream with that classic, beloved vanilla flavor that complements the cake perfectly.
Heavy Whipping Cream: This is the “secret ingredient” that transforms standard buttercream into a light, fluffy, and incredibly creamy frosting, making it a dream to spread and pipe.
Food Coloring: To replicate our cake’s stunning appearance, use a vibrant teal food coloring. Pink and yellow are also charming alternatives for Easter. For the distinctive speckles, you’ll need black or a very dark food coloring. Gel food coloring is highly recommended for both the main frosting and the speckles, as it provides intense color without adding excess liquid.
Mini Cadbury Eggs: These iconic chocolate eggs are the absolute perfect cake toppers, instantly recognizable and adored by all, adding a touch of playful festivity.
Whipped Cream (or additional uncolored buttercream): Used for the charming swirls on top of the cake, providing a beautiful contrast. You can either make a fresh batch of homemade whipped cream or prepare a half batch of the vanilla buttercream recipe and leave it uncolored.
Your Guide to Creating the Prettiest Speckled Egg Easter Cake
Even though this cake looks incredibly impressive, don’t let its beauty intimidate you! Crafting this stunning Easter Egg cake is simpler than you might think. We’ll break it down into easy, manageable steps, ensuring a successful and delightful baking experience.
Phase One: Baking the Perfect Vanilla Cake Layers
Prepare Your Oven and Pans: Begin by preheating your oven to 350°F (175°C). Prepare three 8-inch round cake pans by generously greasing them with shortening or butter, then lightly dusting them with all-purpose flour. This creates a non-stick surface, ensuring your cakes release beautifully. You can also use nonstick baking spray with flour.
Combine Dry Ingredients: In a large mixing bowl, whisk together the flour, baking powder, and salt until well combined. Set this dry mixture aside.
Prepare Wet Ingredients (Milk & Vanilla): In a separate small bowl or liquid measuring cup, stir together the milk and vanilla extract. This ensures they are evenly distributed when added to the batter.
Cream Butter and Sugar: In the bowl of a stand mixer fitted with a paddle attachment, cream the softened butter and granulated sugar together on medium-high speed for 2 to 3 minutes until the mixture is light, fluffy, and pale in color. This step incorporates air, which contributes to a tender cake.
Add Egg Whites: With the mixer on low speed, add the room temperature egg whites one at a time, mixing until just combined after each addition. Be careful not to overmix at this stage.
Alternate Wet and Dry Ingredients: Gradually add the dry flour mixture and the milk mixture to the butter mixture, alternating between the two. Always start and end with the dry ingredients. Mix on low speed until just combined. Overmixing will develop the gluten in the flour too much, leading to a dense, tough cake.
Ensure Uniformity: Stop the mixer and use a rubber spatula to scrape down the sides and bottom of the bowl thoroughly. This ensures all ingredients are fully incorporated and no lumps remain, leading to a consistent batter.
Divide and Prepare for Baking: Divide the cake batter evenly among the three prepared cake pans. To remove any large air bubbles that could create holes in your cake, gently drop each pan onto the counter a few times.
Bake to Perfection: Bake the cake layers for 30 to 35 minutes, or until a wooden toothpick inserted into the center of each cake comes out clean or with a few moist crumbs attached.
Cooling Process: Allow the cakes to cool in their pans for about 10 minutes. This helps them firm up before you transfer them. Then, carefully invert them onto a wire rack to cool completely. Ensuring the cakes are fully cooled before frosting is essential to prevent melting and sliding.
Phase Two: Whipping Up Silky Vanilla Buttercream
Cream the Butter: While your cake layers are cooling, begin preparing your frosting. Add the softened butter to the bowl of a stand mixer with the paddle attachment. Cream it on medium speed for 2 to 3 minutes until it becomes smooth and pale. This aerates the butter, making the frosting lighter.
Gradually Add Powdered Sugar: With the mixer on low speed, add the powdered sugar one cup at a time, mixing thoroughly after each addition until fully incorporated. This prevents a sugar cloud in your kitchen and ensures a smooth consistency.
Add Liquids and Whip: Pour in the heavy whipping cream and vanilla extract. Mix on low speed until just combined. Then, increase the speed to high and beat for 1 to 2 minutes. Watch for a light, whipped, and fluffy consistency. The heavy cream makes all the difference!
Color Your Frosting: Add your desired food coloring (we recommend teal gel food coloring for our speckled egg look) and mix on low speed until the color is evenly distributed throughout the frosting. Add more drops as needed to achieve your preferred shade.
Phase Three: Assembling Your Stunning Easter Cake
Level Your Cake Layers: For a perfectly even and professional-looking cake, use a sharp serrated knife or a dedicated cake leveler to remove any domed tops from your cooled cake layers. This creates flat surfaces for stacking. A cake turntable can be incredibly helpful for smooth leveling and frosting.
Stack and Fill Layers: Place one leveled cake layer, top-side down, onto your serving plate or cake turntable. Spread about 1/3 cup of your prepared buttercream evenly over the top. Repeat this process with the remaining two cake layers.
Apply the Crumb Coat: Take roughly half of the remaining frosting and apply a thin, even layer over the entire cake (sides and top). This “crumb coat” traps any loose crumbs, ensuring a smooth, crumb-free finish for your final layer of frosting.
Chill the Crumb Coat: Transfer the crumb-coated cake to the refrigerator for 15 to 20 minutes. This allows the crumb coat to firm up, making the final frosting application much easier and cleaner.
Apply the Final Frosting Layer: Once the crumb coat is set, retrieve the cake and apply the remaining buttercream, covering the entire cake evenly. Use an offset spatula or bench scraper to smooth the frosting to your desired finish.
Add Texture (Optional): For an elegant textured finish like ours, hold your spatula or bench scraper against the side of the cake. While slowly rotating the cake on a turntable, gently drag the spatula upwards to create subtle vertical ridges.
Create the Speckled Effect: This is the fun part! Using a food-safe paintbrush, dip it lightly into black (or dark) liquid food coloring. Hold the brush a few inches away from the cake and gently flick or sling the bristles, allowing small drops of color to splatter onto the cake, creating a natural speckled egg appearance.
Caution: This step can be messy! We strongly recommend laying down paper towels or newspaper to protect your countertops and wearing gloves. Clean your brush and workspace immediately after use to prevent staining. If using gel food coloring for speckles, dilute it slightly with a few drops of vodka, clear vanilla extract, or Everclear for a more splattering consistency.
Final Decorations: Just before serving, pipe decorative swirls of white whipped cream or uncolored buttercream onto the top of the cake. Arrange mini Cadbury Eggs nestled into these swirls. This adds a beautiful final touch and a delicious chocolatey surprise.
Pro Tips for a Flawless Easter Cake
Room Temperature Ingredients: This is a golden rule in baking! Ensuring your butter, eggs, and milk are all at room temperature allows them to emulsify properly, creating a smooth, homogenous batter and frosting.
Don’t Overmix: While creaming butter and sugar requires a good mix, once you add the flour, mix only until just combined. Overmixing develops gluten, which can lead to a tough, dry cake.
Quality Vanilla: Invest in good quality pure vanilla extract. It makes a noticeable difference in the flavor of both the cake and the buttercream.
Patience with Cooling: Resist the urge to frost warm cakes! Warm cakes will melt your frosting, leading to a runny, messy result. Ensure your cake layers are completely cool before starting the frosting process.
Chill Your Crumb Coat: Don’t skip the crumb coat and subsequent chilling step. It’s crucial for trapping crumbs and creating a smooth, even surface for your final layer of frosting.
Frequently Asked Questions (FAQs) About Your Easter Cake
How do I store my leftover cake to keep it fresh?
To prevent your beautiful homemade cake from drying out, it’s essential to store any leftover slices properly. Place them in an airtight container. Your cake will remain fresh and delicious in the refrigerator for up to 3 days. For the best flavor and texture, remember to bring the cake to room temperature for about 30-60 minutes before serving.
Can I achieve a textured look on the side of my cake?
Absolutely, and it’s super simple! To add an elegant texture like the one seen in our photos, after applying your final layer of frosting, hold a clean offset spatula or a bench scraper gently against the side of the cake. Then, while slowly rotating the cake on a turntable, carefully drag the spatula upwards. This technique creates beautiful, subtle vertical ridges.
Can I use this recipe to make cupcakes instead of a layer cake?
Yes, this recipe is wonderfully versatile and can certainly be adapted for cupcakes! This batter should yield approximately 24 standard-sized cupcakes. When baking cupcakes, you’ll need to adjust the baking time. Bake them for about 18-22 minutes, or until a toothpick inserted into the center of a cupcake comes out clean. Ensure they are fully cooled before frosting and decorating.
Can I change the flavor of the cake or frosting?
Of course! This recipe provides an excellent vanilla base that can be customized. For the cake, you could experiment with almond extract, lemon zest, or even a different type of flavored emulsion. For the buttercream, consider adding a different extract (like lemon, almond, or even a touch of coffee essence), or incorporating fruit purees (be mindful of moisture content) for a distinct flavor profile. Just remember to adjust liquid ingredients as needed to maintain consistency.
What if my buttercream is too thick or too thin?
Buttercream consistency is key. If your frosting is too thick, add heavy cream (or milk) one teaspoon at a time, mixing well after each addition, until it reaches your desired spreadable consistency. If it’s too thin, gradually add more sifted powdered sugar, one tablespoon at a time, until it thickens up. Temperature can also affect consistency, so if it’s too warm, chill it briefly, then re-whip.
More Fabulous Cake Recipes to Delight Your Palate
To Die for Carrot Cake
Peanut Butter Icebox Cake
Cookies and Cream Oreo Cake
Chocolate Pound Cake
Chocolate Peanut Butter Ice Cream Cake
No Bake Banana Cream Pudding Cheesecake
Strawberry Shortcake Roulade
Easy Ice Cream Cake
Speckled Egg Easter Cake: The Full Recipe
This speckled egg Easter Cake isn’t just pretty, it’s also incredibly delicious! This Easter will be even more special when you serve this truly beautiful layered vanilla cake with easy vanilla buttercream frosting! The perfect Easter dessert!
Course: Dessert | Cuisine: American | Keyword: easter cake, layer cake, vanilla buttercream, vanilla cake
Prep Time: 30 minutes | Cook Time: 30 minutes | Servings: 12 | Calories: 879 kcal | Author: Trish – Mom On Timeout
Ingredients for Vanilla Cake:
4 ¼ cup all-purpose flour
1 ½ tablespoons baking powder
¾ teaspoon salt
1 cup salted butter, softened
1 ½ cups granulated sugar
8 egg whites, room temperature
1 tablespoon vanilla extract
2 cups milk
Ingredients for Vanilla Buttercream Frosting and Toppings:
2 cups salted butter, softened (4 sticks)
4 to 5 cups powdered sugar
2 teaspoons vanilla extract
4 to 5 tablespoons heavy whipping cream
1 to 2 drops teal food coloring (gel recommended)
Black food coloring – liquid (or gel diluted with vodka/clear vanilla for speckles)
Mini Cadbury eggs
Whipped cream or additional uncolored buttercream (optional, see notes)
Instructions for Vanilla Cake:
Preheat your oven to 350°F (175°C). Prepare three 8-inch cake pans by greasing generously with vegetable shortening or butter and dusting with flour. Set aside. You may also use nonstick spray with flour.
In a large bowl, whisk together the flour, baking powder, and salt. Set aside.
In a separate small bowl or liquid measuring cup, stir together the milk and vanilla extract. Set aside.
In the bowl of a stand mixer equipped with a paddle attachment, cream the softened butter and granulated sugar until light and fluffy (2-3 minutes). Add the room temperature egg whites one at a time, mixing until just combined after each addition.
Alternate adding the dry ingredients mixture and the milk mixture to the butter mixture, starting and ending with the dry ingredients. Mix on low speed until just combined. (NOTE: Be careful not to overmix, or you will end up with a very dense cake.)
Scrape down the sides and bottom of the bowl often, making sure all of the ingredients are incorporated and there are no lumps.
Divide the batter evenly between the three prepared cake pans. Drop the pans gently on the counter a couple of times to release any trapped air bubbles.
Bake for 30 to 35 minutes, or until a toothpick inserted into the center of each cake comes out clean or with a few moist crumbs.
Allow the cakes to cool for about 10 minutes in the pan, then transfer them to a wire rack to cool completely before frosting.
Instructions for Frosting:
While the cakes are cooling, prepare your frosting. Add the softened butter into the bowl of a stand mixer and cream for 2 to 3 minutes until smooth and pale.
Add the powdered sugar one cup at a time, fully combining after each addition until smooth.
Add the heavy cream and vanilla extract. Mix on low speed until incorporated, then increase speed to high for 1 to 2 minutes or until you get a nice, whipped, and fluffy consistency. Add in your desired food coloring (e.g., teal) and mix until distributed evenly throughout the frosting.
Instructions for Assembly:
Level each cake layer by carefully removing any domes with a sharp cake knife or a cake leveler. A cake turntable can greatly assist this process.
Place one leveled cake layer (top-side down) on a serving tray or cake turntable. Top with about 1/3 cup of frosting and smooth evenly. Repeat this process with the remaining two cake layers.
Take half of the remaining frosting and apply a thin layer over the entire cake (sides and top) to create a crumb coat. This seals in any loose crumbs. Place the cake in the refrigerator for 15 to 20 minutes to allow the crumb coat to set.
Once the crumb coat is firm, cover the cake with the remaining frosting and smooth the sides and top to your desired finish. (NOTE: For an added texture, hold your spatula to the side of the cake and slowly drag it upward while spinning the cake on a turntable.)
Once the cake is fully covered, take your black liquid food coloring on a food-safe paintbrush. Gently sling or flick the food coloring onto the cake to create a “speckled” look. (CAUTION: This can be messy and black food coloring stains! Protect your work area with paper towels and wear gloves. Rinse tools immediately after use.)
Just prior to serving, pipe swirls of whipped cream (or additional uncolored buttercream) on top of the cake. Arrange mini Cadbury eggs on the swirls. Serve and enjoy!
Store any leftovers in an airtight container in the refrigerator for up to three days. Bring the cake to room temperature before enjoying for best texture.
Notes:
Leftovers should be stored in an airtight container in the refrigerator for up to three days. For optimal enjoyment, allow the cake to come to room temperature before serving.
To create the white swirls for the Cadbury eggs, you can choose one of the following methods:
Option 1: Homemade Whipped Cream
1 cup heavy whipping cream
¾ cup powdered sugar
½ teaspoon vanilla extract
Chill your mixing bowl and whisk attachment in the freezer for 5 to 10 minutes.
Pour the cold heavy whipping cream into the chilled bowl and beat on medium-high speed until the cream starts to get bubbly and thicken. Add the vanilla extract.
Gradually add the powdered sugar and continue beating on medium-high speed until stiff peaks form.
Option 2: Half Batch of Uncolored Buttercream Frosting
1 cup salted butter, softened
2 to 2 ½ cups powdered sugar
1 teaspoon vanilla extract
2 to 2 ½ tablespoons heavy whipping cream
Prepare this half batch of frosting by creaming the softened butter in a stand mixer for 2 to 3 minutes until smooth.
Add the powdered sugar one cup at a time, fully combining after each addition.
Add the heavy cream and vanilla extract. Mix on low speed until incorporated, then increase speed to high for 1 to 2 minutes or until you achieve a nice, whipped consistency.
Transfer this uncolored frosting to a piping bag with your preferred piping tip and pipe directly onto the cake as desired.
Nutrition Information:
Calories: 879kcal | Carbohydrates: 102g | Protein: 9g | Fat: 50g | Saturated Fat: 31g | Trans Fat: 2g | Cholesterol: 133mg | Sodium: 607mg | Potassium: 306mg | Fiber: 1g | Sugar: 67g | Vitamin A: 1558IU | Vitamin C: 1mg | Calcium: 137mg | Iron: 2mg
The post Whimsical Speckled Egg Easter Cake first appeared on Fitgag.