Petite Pumpkin Bundtlets
Delight in the quintessential tastes of autumn with these incredibly charming Mini Pumpkin Bundt Cakes. Each individual cake is a testament to tender, moist perfection, generously infused with authentic pumpkin puree and a warming medley of seasonal spices. What truly elevates these delectable treats is the crowning glory: a dreamy cinnamon brown butter frosting that adds an irresistible layer of nutty sweetness and spice. Whether gracing your holiday dessert table or serving as a comforting companion to a steaming cup of coffee or tea, these mini bundt cakes are designed to impress and satisfy.
For those eager to explore more pumpkin-infused delights, consider trying our other cherished recipes: the indulgent Pumpkin Delight, our charming Mini Pumpkin Pies, or the ever-popular Pumpkin Cupcakes with Cream Cheese Frosting.
Irresistible Mini Pumpkin Bundt Cakes: Your Go-To Fall Dessert Recipe
Prepare to be enchanted by these mini pumpkin bundt cakes – they are not just adorable; they are exponentially delicious! Perfectly sized and bursting with flavor, these miniature delights are an ideal addition to any fall or winter gathering, bringing a touch of festive elegance to your dessert spread. Each bundt is exceptionally soft, wonderfully tender, and deeply imbued with the rich, aromatic essence of warm pumpkin spices, making every bite a celebration of the season.
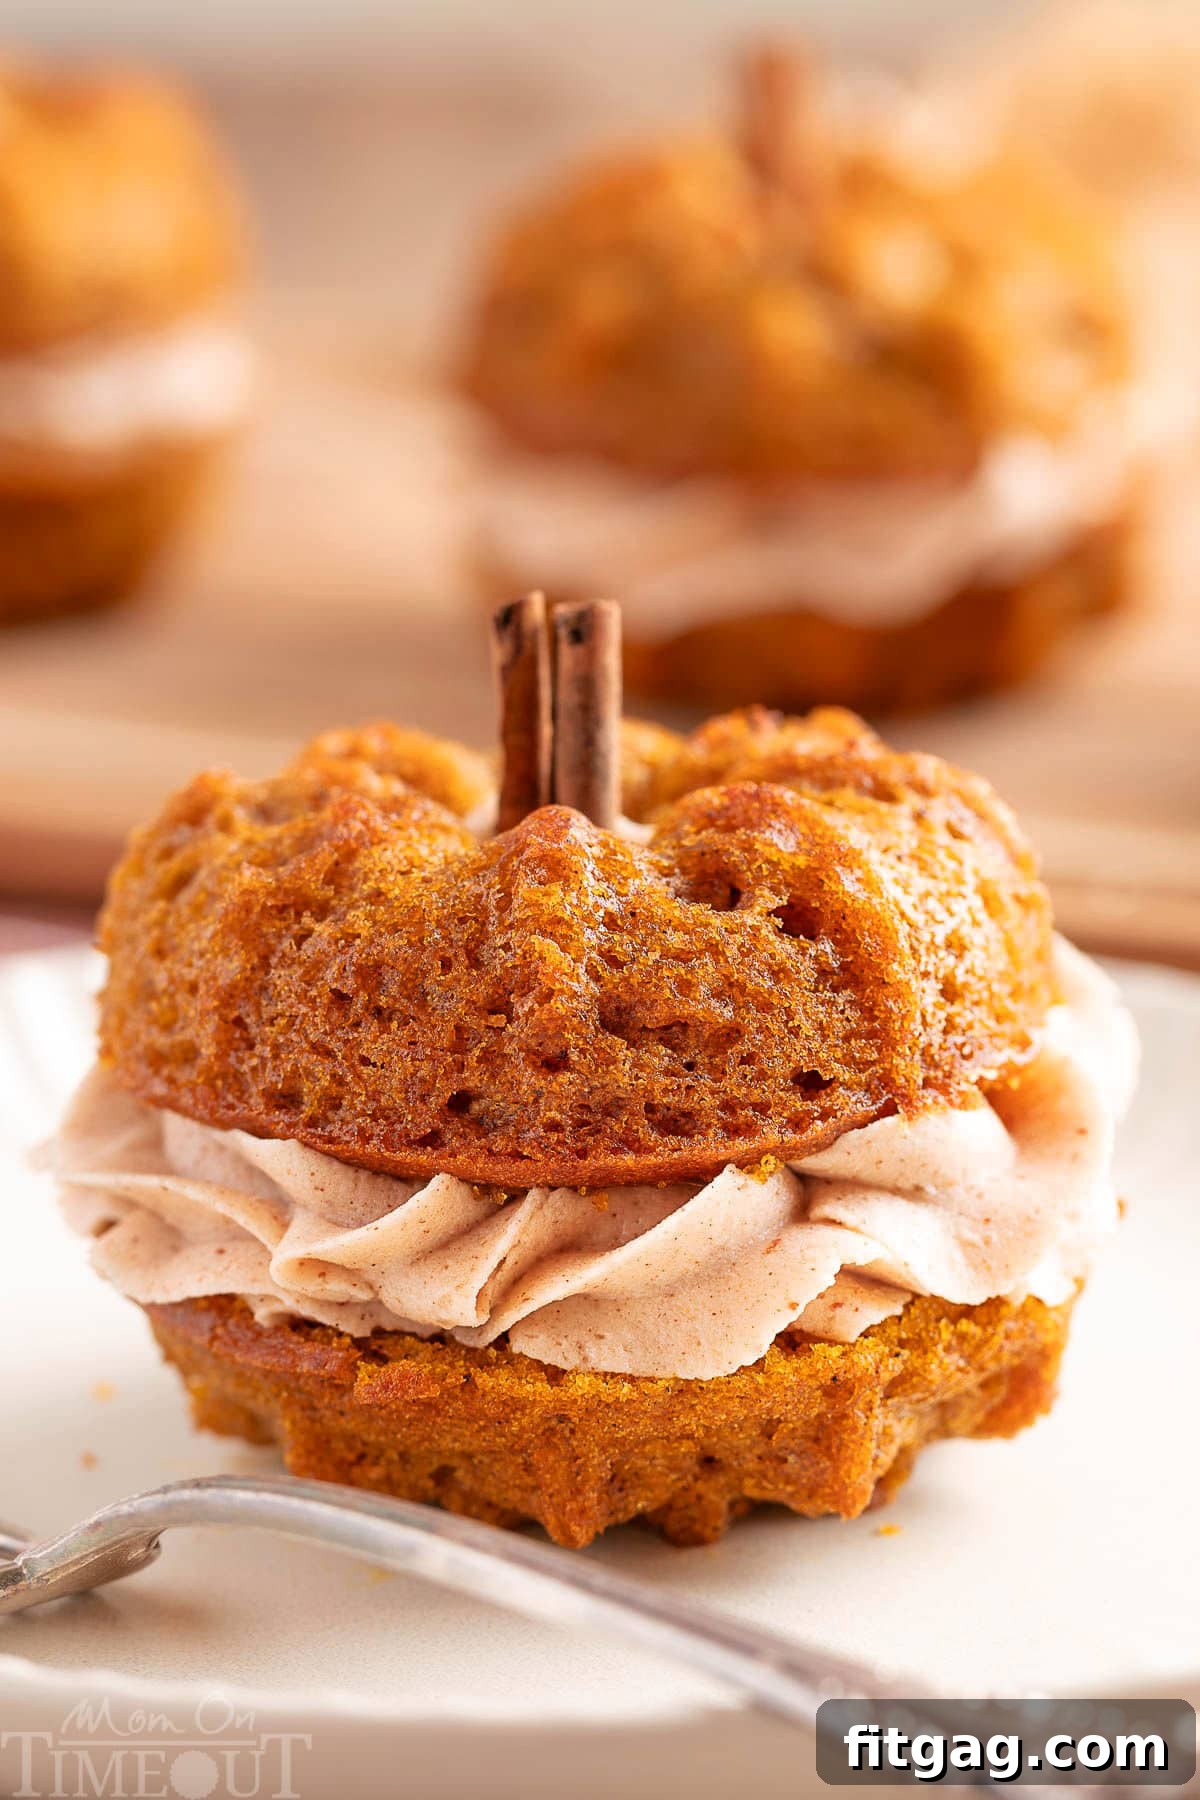
What makes these cakes truly special is their clever presentation. Two mini bundt cakes are stacked and joined by a generous swirl of luscious cinnamon brown butter buttercream, artfully creating the shape of a charming, plump pumpkin. This creamy, nutty, and subtly sweet frosting not only enhances the spiced pumpkin flavor but also adds a visually appealing touch that will capture the hearts of your guests. These tiny confections are guaranteed to be the talk of your autumn celebrations, from Thanksgiving feasts to cozy family dinners.
The secret to their incredible moisture and tenderness lies in the use of real pumpkin puree, ensuring each mouthful is packed with authentic fall goodness. Because of their individual serving size, these mini bundt cakes are incredibly convenient, eliminating the need for slicing and making every guest feel like they’re receiving a personalized, delightful treat. They’re effortlessly elegant and always elicit enthusiastic “Wows!” from everyone who tries them, disappearing from plates almost as quickly as they’re served. Embrace the spirit of the season with these delightful miniature masterpieces!
The Magic of Cinnamon Brown Butter Buttercream Frosting
Let’s take a moment to truly appreciate the star of the show: our exquisite cinnamon brown butter buttercream frosting. This isn’t just any frosting; it’s a meticulously crafted topping that perfectly complements the rich, spiced pumpkin cake. The brown butter introduces a deep, nutty, and slightly caramel-like flavor that is inherently sophisticated. This complex base is then delicately spiced with cinnamon, adding a warm, aromatic hint that elevates the overall profile without overwhelming the pumpkin’s natural sweetness.
The texture is wonderfully creamy and smooth, making it an absolute dream to work with and even better to eat. It strikes a perfect balance, providing just the right amount of sweetness to enhance the spiced pumpkin cake, creating a harmonious blend of flavors. We use this heavenly frosting to sandwich two mini bundt cakes together, forming the signature “pumpkin” shape that makes these treats so visually appealing and festive. Not only do they look incredibly fun and seasonal, but they taste like an absolute dream, delivering a gourmet experience in a charming miniature package. Their compact size makes them incredibly easy to serve and enjoy, making them an instant favorite for anyone who tries them. Once you experience the unparalleled flavor combination of the spiced pumpkin cake and this unique brown butter frosting, these will undoubtedly become a staple in your fall baking repertoire.
Why You’ll Fall in Love with This Recipe
There are countless reasons why these Mini Pumpkin Bundt Cakes will quickly become a cherished recipe in your kitchen. Here are just a few:
Embrace the Season with Warm Fall Flavors: Every single bite of these mini bundt cakes is a warm hug of autumn. We expertly blend rich pumpkin puree with a generous amount of homemade pumpkin pie spice, ensuring a truly authentic and deeply satisfying taste of fall. These cakes are the perfect way to savor the best flavors of the season, whether you’re hosting a grand holiday feast or simply enjoying a quiet moment of self-indulgence. The aromatic spices like cinnamon, nutmeg, ginger, and cloves create an inviting fragrance and a comforting taste that evokes cozy memories and autumnal joy.
Experience Brown Butter Frosting Perfection: This recipe truly stands out thanks to its unique brown butter frosting. Unlike standard buttercream, brown butter adds an unparalleled depth of flavor – nutty, slightly toasted, and with subtle caramel undertones that perfectly complement the robust spiced pumpkin cake. This rich, complex taste takes these humble cakes to an entirely new level, offering a sophisticated flavor combination that you simply won’t find in typical fall desserts. It’s an elegant twist that transforms a good cake into an extraordinary one, making it memorable for all who taste it.
Simple to Create, Stunning to Serve: Don’t let their fancy appearance fool you; these mini bundt cakes are surprisingly easy to make. The straightforward recipe ensures beautiful results every time, even for novice bakers. Their individual portion size is a huge advantage, making them incredibly convenient to serve without any messy slicing or plating. Each guest receives their own perfectly formed, delightful treat, creating a special and personalized experience. This thoughtful presentation makes them ideal for parties, potlucks, or any occasion where you want to impress without the stress.
Crafting Your Mini Pumpkin Bundt Cakes: A Step-by-Step Guide
Making these adorable mini pumpkin cakes is not only incredibly fun but also immensely rewarding! Before you dive into the cake batter, remember to take the crucial first step of browning your butter. This allows ample time for it to cool adequately, which is essential for achieving the perfect frosting consistency. As always, the detailed full printable recipe card is conveniently located at the end of this post for your easy reference.
The Art of Browning Butter for Your Frosting
Browning butter might sound intimidating, but it’s a simple process that adds an incredible depth of nutty, caramel flavor to your frosting. The key is to be attentive and watch it carefully, as it can go from perfect to burnt in a matter of seconds. Start this process first to ensure your browned butter has plenty of time to cool completely and solidify slightly before you begin making your frosting.
Select Your Pan and Melt: Begin by melting your butter over medium heat in a light-colored or stainless steel skillet. The lighter color of the pan will allow you to easily monitor the butter’s color transformation. Stir the butter frequently as it melts to ensure it heats evenly.
Observe the Transformation: As the butter melts, it will initially begin to foam. This foam indicates that the water content in the butter is evaporating. Continue stirring gently through this stage. Once the foaming subsides, the milk solids at the bottom of the pan will start to toast.
Watch for Color and Aroma: Keep a very close eye on the butter. It will transition from a bright yellow to a beautiful golden brown color. At this crucial point, you’ll notice a distinct, enticing nutty and caramel-like fragrance. This aroma is your strongest indicator that the butter is perfectly browned.
Remove and Cool Immediately: The moment you detect that wonderful nutty scent and see the golden-brown color, immediately remove the skillet from the heat. Pour the browned butter, including all the delicious browned bits at the bottom, into a separate heat-safe bowl. Allow it to cool completely at room temperature, or even in the refrigerator or freezer if you’re short on time, until it returns to a soft, solid (but not rock-hard) room temperature consistency. This cooling process is vital for the frosting.
Whipping Up the Pumpkin Bundt Cakes
Now that your browned butter is cooling, it’s time to prepare the fragrant pumpkin bundt cakes that will form the base of your delightful dessert. Preheat your oven to 350°F (175°C) to ensure it’s ready for baking.
Combine Dry Ingredients: In a medium bowl, whisk together all-purpose flour, baking soda, baking powder, sea salt, and pumpkin pie spice until thoroughly combined. This ensures even distribution of the leavening agents and spices throughout the batter. Set this bowl aside.
Mix Wet Ingredients (First Stage): In a large mixing bowl or the bowl of a stand mixer, combine the light brown sugar, granulated sugar, pumpkin puree, and vegetable oil. Mix these ingredients together until they are smooth and well-incorporated. The sugars will dissolve slightly, and the mixture will take on a uniform consistency.
Incorporate Eggs and Vanilla: Add the vanilla extract and large eggs to the pumpkin mixture. Beat until everything is thoroughly combined, ensuring the eggs are fully integrated into the batter. Room temperature eggs blend more easily, contributing to a smoother batter and a more tender cake.
Fold in Dry to Wet: Gradually add the reserved dry ingredients to the wet pumpkin mixture. Mix just until combined. Be careful not to overmix, as this can lead to a tough cake. A few small lumps are acceptable.
Prepare Pans and Fill: Lightly spray your mini bundt pan with nonstick cooking spray, ensuring all crevices are coated to prevent sticking. Fill each mold to about 1⁄4” from the top, allowing room for the cakes to rise during baking.
Bake to Perfection: Bake the mini bundt cakes for 15-20 minutes, or until they are golden brown and a toothpick inserted into the center comes out clean or with just a few moist crumbs. Once baked, remove them from the oven and let them cool in the pan for 10 minutes. This allows them to firm up slightly before you carefully remove them from the molds. Transfer the cakes to a wire rack to cool completely before you begin decorating.
Crafting the Cinnamon Brown Butter Frosting
With your cakes cooling, it’s time to prepare the star frosting. Remember, your browned butter should be at a soft, room temperature consistency – not melted, but easily pliable.
Whip the Brown Butter: In the bowl of a stand mixer fitted with the paddle attachment, or with a hand mixer, beat the cooled, soft brown butter until it becomes light, fluffy, and noticeably paler in color. This aeration is crucial for a smooth, creamy frosting.
Add Powdered Sugar and Flavorings: Gradually add the powdered sugar, about 2 cups at a time, mixing on low speed until each addition is fully incorporated before adding more. Once all the sugar is mixed in, add the vanilla extract, ground cinnamon, and fine sea salt. Mix again until the frosting is smooth and creamy.
Adjust Consistency (Optional): If the frosting appears too stiff or thick for piping, you can add 2 to 4 tablespoons of heavy whipping cream, one tablespoon at a time, mixing well after each addition until you achieve your desired, spreadable consistency.
Assembling Your Adorable Pumpkin Cakes
Now for the creative part – transforming your mini bundt cakes into delightful little pumpkins!
Prepare for Piping: If using, transfer your cinnamon brown butter frosting into a piping bag fitted with a large decorator’s tip of your choice. A round tip or star tip works wonderfully.
Create the “Pumpkin” Base: Place one mini bundt cake upside down on your serving platter or individual plate. Pipe a generous amount of buttercream onto the flat top of this cake, ensuring good coverage.
Stack and Decorate: Carefully place another mini bundt cake right-side up on top of the frosted base. This creates the rounded, plump shape of a pumpkin. For the finishing touch, gently insert a cinnamon stick into the middle hole of the top bundt to serve as the pumpkin’s stem, adding both visual appeal and a lovely aroma! If you’re feeling extra festive, you can add a few green candies (like M&M’s) around the base of the cinnamon stick to mimic small leaves.
Important Note on Browning Butter: Always keep a very close eye on your butter while browning, as the transition from perfectly golden brown to unfortunately burned can happen incredibly quickly! The process involves several stages: first, the butter will melt, then it will begin to foam, and finally, the milk solids will settle and turn a rich golden brown color. The moment you detect that delightful, nutty aroma – reminiscent of toasted hazelnuts or caramel – remove it from the heat immediately. This aromatic cue is your best friend in preventing over-browning and ensuring a perfectly flavored frosting.
Storage and Preservation Tips
Proper storage is key to maintaining the freshness and deliciousness of your Mini Pumpkin Bundt Cakes and their accompanying brown butter frosting. Here’s how to keep them at their best:
Storing Mini Pumpkin Bundt Cakes
Room Temperature Storage: If you intend to enjoy these delightful cakes within two days, they can be stored in an airtight container at room temperature. Ensure they are kept away from direct sunlight or any heat sources to prevent them from drying out or spoiling prematurely.
Refrigerator Storage for Extended Freshness: For longer enjoyment, place the completely cooled cakes in an airtight container and refrigerate them for up to 5 days. The cool environment of the refrigerator will help lock in their moisture and preserve their tender texture.
Freezing for Long-Term Delight: To keep your mini bundt cakes fresh for an extended period, individually wrap each cooled cake tightly in plastic wrap. Then, place the wrapped cakes into a freezer-safe container or a large zip-top freezer bag. They can be frozen for up to 3 months. When you’re ready for a treat, simply thaw them overnight in the refrigerator, and they’ll be ready to enjoy.
Storing Brown Butter Frosting
Refrigerator Storage: Any leftover brown butter frosting can be stored in an airtight container in the refrigerator for up to 1 week. Before you plan to use it again, allow the frosting to come to room temperature to soften. If needed, you can re-whip it for a minute or two with an electric mixer to restore its light and fluffy consistency.
Freezer Storage: The frosting also freezes beautifully! Place it in a freezer-safe container or a heavy-duty zip-top bag, and it will remain fresh for up to 3 months. When you’re ready to use it, thaw the frosting in the refrigerator overnight, then give it a good re-whip before applying it to your cakes.
Exciting Variations to Elevate Your Bundt Cakes
While these Mini Pumpkin Bundt Cakes are absolutely divine as is, don’t hesitate to get creative with these delicious variations to add your own personal touch:
Maple-Kissed Brown Butter Frosting: Introduce an additional layer of autumnal delight by mixing a touch of pure maple syrup into your brown butter frosting. The rich, earthy sweetness of maple syrup pairs exceptionally well with the nutty brown butter and the spiced pumpkin cake. Start with a tablespoon or two and taste as you go, adjusting the amount of powdered sugar slightly if necessary to maintain the perfect frosting consistency. This simple addition transforms the frosting into an even more irresistible topping.
Nutty Crunch Addition: For an exquisite textural contrast and an extra layer of nutty flavor, fold in finely chopped toasted nuts into your cake batter or sprinkle them generously on top of the frosting. Pecans, walnuts, or even candied almonds work wonderfully. Toasting the nuts beforehand intensifies their flavor, adding a delightful crunch that complements the soft cake and creamy frosting beautifully. This variation introduces a sophisticated element that will surely impress.
Extra Spice Kick: If you’re a true fan of warm, aromatic spices, consider adding an extra dash of your favorite pumpkin pie spice or a bit more ground cinnamon directly to the frosting. This will enhance the overall warmth and create a more pronounced spicy undertone that ties all the flavors together in a cohesive and deeply comforting way. It’s a subtle adjustment that can make a big difference for spice lovers.
Frequently Asked Questions About Mini Pumpkin Bundt Cakes
What if I don’t have mini bundt pans? Can I still make this recipe?
Absolutely! While mini bundt pans give these cakes their signature charming shape, you can easily adapt this recipe to fit standard muffin tins. Simply fill each muffin cup about two-thirds full with batter. You’ll need to adjust the baking time slightly; usually, muffin-sized cakes will bake for approximately 15-20 minutes, or until a toothpick inserted into the center of a cake comes out clean with no wet batter. The result will be equally delicious pumpkin muffins, perfect for a grab-and-go treat!
Can I make a full-sized bundt cake or layered cake with this recipe?
Yes, this versatile pumpkin cake recipe works wonderfully for both a full-sized bundt cake or a beautiful two-layer cake. Keep in mind that the baking time will significantly increase for larger formats. For a standard full-sized bundt pan (10-12 cups), you can expect to bake the cake for approximately 60-75 minutes. If you’re opting for 8-inch layer cakes, they will typically require about 25-30 minutes in the oven. To determine when your cake is perfectly done, insert a toothpick into the very center; it should come out with moist crumbs attached, indicating a tender, fully baked cake.
What can I use instead of vegetable oil in the cake recipe?
If you prefer an alternative to vegetable oil, there are several suitable substitutes, though each may impart a slightly different flavor and texture to your cake. You can successfully replace vegetable oil with an equal amount of melted coconut oil for a subtle tropical hint, or melted unsalted butter for a richer, more buttery flavor. For a lower-fat option that adds a touch of natural sweetness, unsweetened applesauce can be used, though this might result in a slightly denser cake. Experiment to find your favorite!
Do I have to brown the butter for the frosting, or can I use regular butter?
While you certainly *can* use regular unsalted butter in the frosting, and it will still be delicious, I wholeheartedly recommend taking the extra step to brown the butter. The browning process is a game-changer; it infuses the frosting with an incredible, rich, nutty, and slightly caramelized flavor that truly elevates the entire dessert and complements the spiced pumpkin cakes in a unique way. It adds a depth that plain butter simply cannot achieve, transforming a good frosting into an extraordinary one.
Trish’s Expert Baking Tips for Perfection
Achieving bakery-quality mini pumpkin bundt cakes is easier than you think with these professional tips and tricks:
Make sure your eggs and any other refrigerated ingredients are at room temperature before you begin mixing. This seemingly small detail is incredibly important as room temperature ingredients emulsify more smoothly and evenly with other ingredients, creating a more uniform batter and ultimately a cake with a finer, more tender crumb. Cold ingredients can cause the batter to seize and result in a denser, less desirable texture.
When filling your bundt pans, aim to fill each mold only about 2/3 full. This crucial step provides ample room for the cakes to rise beautifully during baking without the risk of overflowing the molds, which can lead to messy edges and uneven baking. Giving them space to expand ensures a perfect shape.
To guarantee an easy release and prevent any sticking disasters, thoroughly coat your mini bundt pans with nonstick cooking spray. Don’t be shy; get into every crevice! Alternatively, using a high-quality non-stick bundt pan can significantly simplify the cake release process, making your baking experience much smoother.
If you opt for a silicone mold, it’s a good practice to place it on top of a sturdy baking sheet before transferring it to the oven. Silicone molds are flexible, and a baking sheet provides the necessary support, preventing spills and making it much easier to handle and move the filled mold in and out of the oven.
Allow the cakes to cool in their pans for approximately 10 minutes after baking before attempting to transfer them to a wire rack. This brief cooling period allows the cakes to firm up slightly and settle, which helps them retain their intricate bundt shape and prevents them from breaking or crumbling when you invert them from the pans.
It’s common for bundt cakes to dome up slightly in the center while baking. If your mini bundts have a noticeable dome, don’t worry! Once they are completely cool, you can easily level them out. Use a serrated knife to carefully trim off the rounded tops, creating a flat surface. This ensures that your two mini bundt halves will fit together perfectly, creating a stable and attractive “pumpkin” shape.
When preparing the brown butter frosting, remember to taste it as you go. This allows you to fine-tune the sweetness and flavor balance to your personal preference. You can always add a little more powdered sugar for increased sweetness or a tiny pinch of salt to enhance and round out the flavors, cutting through some of the sweetness if desired.
Explore More Delightful Pumpkin Desserts
If you’ve fallen in love with these Mini Pumpkin Bundt Cakes, you’ll be thrilled to discover our other fantastic pumpkin recipes that celebrate the flavors of fall:
Soft & Chewy Pumpkin Chocolate Chip Cookies
Irresistible Pumpkin Snickerdoodle Cheesecake Cookies
Elegant Praline Pumpkin Roll
Sweet & Spiced Pumpkin Pull Apart Bread
Hearty Pumpkin Oatmeal Cookies
Mini Pumpkin Bundt Cakes with Brown Butter Buttercream Frosting
These adorable Mini Pumpkin Bundt Cakes are tender, moist and perfectly spiced! Made with real pumpkin puree and a warm blend of spices that perfectly complement the dreamy cinnamon brown butter frosting that adds even more fabulous flavor. These pumpkin bundt cakes are ideal for holiday dessert tables or as a comforting treat to enjoy with a hot cup of tea or coffee.
Course: Dessert
Cuisine: American
Keyword: mini pumpkin bundt cake recipe, mini pumpkin bundt cakes
Prep Time: 20 minutes
Cook Time: 20 minutes
Total Time: 40 minutes
Servings: 8 mini cakes
Calories: 1123kcal
Author: Trish – Mom On Timeout
Equipment
Mini Bundt Pan
Silicone Mini Bundt Pan
Ingredients
Cake
2 cups all-purpose flour (250g)
2 teaspoons baking powder
1 teaspoon baking soda
1 teaspoon sea salt
1 tablespoon pumpkin pie spice
1 cup light brown sugar (packed, 200g)
½ cup granulated sugar (100g)
15 ounces pumpkin puree (1 can)
1 cup vegetable oil (240ml)
4 large eggs (room temperature)
Frosting
1 ½ cups unsalted butter (room temperature, 340g)
4 to 5 cups powdered sugar (520-650g)
1 tablespoon vanilla extract
2 teaspoons ground cinnamon
¼ teaspoon fine sea salt
2 to 4 tablespoons heavy whipping cream (optional)
Assembly (Optional)
cinnamon sticks
tootsie rolls
green M&Ms
Instructions
Brown Butter
Use a light-colored or stainless steel skillet to easily monitor the butter’s color change.
Place 1 ½ cups unsalted butter into the skillet. Turn the heat to medium and let the butter melt completely. Stir occasionally to help it melt evenly.
As the butter melts, it will begin to foam. This is the water content evaporating. Stir gently during this stage.
After the foaming subsides, keep stirring. The milk solids will begin to brown, turning from yellow to golden brown.
The butter will release a nutty, caramel-like fragrance when it reaches the browning stage. This is a key indicator it’s ready.
Once the butter is browned, immediately remove the skillet from the heat to prevent burning.
Once finished, pour it into a bowl and set it in the fridge or freezer until it is back to a soft room temperature and not melted.
Cake
Preheat your oven to 350°F.
Whisk together 2 cups all-purpose flour, 2 teaspoons baking powder, 1 teaspoon baking soda, 1 teaspoon sea salt, and 1 tablespoon pumpkin pie spice in a separate bowl. Set aside.
In the bowl of a stand mixer or large mixing bowl, mix together 1 cup light brown sugar, ½ cup granulated sugar, 15 ounces pumpkin puree, and 1 cup vegetable oil until combined and smooth.
Add 1 teaspoon vanilla extract and 4 large eggs and mix together until well combined.
Add the dry ingredients to the pumpkin mixture and mix just until combined.
Spray the mini bundt pan with nonstick cooking spray and fill each mold to about 1⁄4” from the top.
Bake for 15-20 minutes or until golden brown and set. Set aside and let the cakes cool in the pan for 10 minutes before carefully removing from the mold. Let the cakes cool completely before decorating.
Prepare the frosting. Make sure that your brown butter has cooled enough that it’s at a soft room temperature.
In the bowl of a stand mixer or medium mixing bowl, beat 1 ½ cups unsalted butter until it’s light and fluffy.
Add in 4 to 5 cups powdered sugar 2 cups at a time and mix until combined.
Add in 1 tablespoon vanilla extract, 2 teaspoons ground cinnamon, and ¼ teaspoon fine sea salt. Mix again. If the icing is a bit stiff, you can add 2 to 4 tablespoons of heavy whipping cream to the frosting.
Assemble Cake
Place the frosting into a piping bag fitted with the large decorators tip of your choice.
Place one bundt upside down and pipe a generous amount of buttercream onto the top. Place another bundt right-side up on top of this to form a “pumpkin”.
A cinnamon stick in the middle of the bundt completes the pumpkin look! Finish with a few green candies for leaves if you like. (cinnamon sticks, tootsie rolls, green M&Ms)
Notes
Storage Information
Mini Pumpkin Bundt Cakes:
Room Temperature: If you plan to enjoy the cakes within a couple of days, you can store them in an airtight container at room temperature for up to 2 days. Just be sure to keep them away from direct sunlight or heat.
Refrigerator: For longer storage, place the cooled cakes in an airtight container and refrigerate for up to 5 days. This will help maintain their moisture.
Freezer: To freeze, wrap each cooled cake tightly in plastic wrap and place them in a freezer-safe container or a zip-top freezer bag. They can be frozen for up to 3 months. Thaw them in the refrigerator overnight when you’re ready to enjoy.
Brown Butter Frosting:
Refrigerator: Store any leftover brown butter frosting in an airtight container in the refrigerator for up to 1 week. Before using it again, let it sit at room temperature to soften or re-whip it if necessary.
Freezer: You can also freeze the frosting. Place it in a freezer-safe container or a zip-top bag, and it will keep for up to 3 months. Thaw it in the refrigerator and then re-whip before using.
Tools and Equipment (affiliate links): Mini Bundt Pan | Silicone Mini Bundt Pan | Kitchen Scale | Glass Mixing Bowls | Whisk | Electric Mixer (Hand Mixer or Stand Mixer) |
Please see post above for more information, recipe tips and frequently asked questions.
Nutrition
Calories: 1123kcal |
Carbohydrates: 129g |
Protein: 8g |
Fat: 66g |
Saturated Fat: 28g |
Polyunsaturated Fat: 18g |
Monounsaturated Fat: 16g |
Trans Fat: 2g |
Cholesterol: 189mg |
Sodium: 555mg |
Potassium: 341mg |
Fiber: 3g |
Sugar: 100g |
Vitamin A: 9530IU |
Vitamin C: 2mg |
Calcium: 123mg |
Iron: 3mg
The post Petite Pumpkin Bundtlets first appeared on Fitgag.