Smart DIY Drawer Organizers
DIY Drawer Organizer: Transform Clutter into Colorful Order
Add a vibrant pop of color and impeccable organization to those messy drawers with this incredibly fun and simple DIY Drawer Organizer project!
This transformative post is proudly sponsored by Scotch Brand. Rest assured, all opinions expressed within are, as always, 100% my own and authentically reflect my experience and enthusiasm for their products!
The Frustration of Disorganized Drawers: A Universal Problem Solved
We all encounter them – those ubiquitous drawers that start with the best intentions, perhaps after a brief moment of tidying, but inevitably devolve into a chaotic abyss. A few weeks ago, I found myself staring into the depths of my desk cabinet, a workspace essential that was meant to be a hub of efficiency. Instead, it had become anything but. This cabinet, conveniently situated right under my desk, is my primary storage for pretty much everything I need at arm’s reach. The inherent problem, however, lay in the design of its drawers: they are exceptionally long and somewhat deep, creating a perfect storm for items to slide freely, jumble together, and ultimately disappear into forgotten corners. Pens, paper clips, sticky notes, charging cables, and various small tools would all end up in a tangled heap, making the simple act of retrieving an item a frustrating archaeological dig. It became undeniably clear that I desperately needed a robust and functional drawer organizer, a solution that could bring lasting order to the chaos and, in turn, make my entire workspace a more productive and serene environment.
Why Custom DIY Drawer Organizers Outshine Store-Bought Solutions
My initial reaction, much like most people, was to seek an immediate, off-the-shelf remedy. I spent considerable time scouring local home goods stores and browsing endless online marketplaces, holding onto the hope of finding a drawer organizer that would perfectly fit my unique and somewhat challenging drawer dimensions. To my increasing dismay, finding something that truly maximized the available space and accommodated the quirky length of my specific drawers proved to be an utterly impossible task. Most pre-made organizers were either too short, too wide, or featured fixed compartments that simply didn’t align with my particular storage requirements for different sized items. It quickly became evident that if I truly desired an effective, enduring, and personalized solution – one that would genuinely transform my messy drawers – I would have to embrace the spirit of DIY and build one myself. This realization, while initially presenting a daunting prospect, swiftly evolved into an exciting and empowering crafting challenge.
Crafting Your Custom Drawer Organizer: An Enjoyable and Simple Project!
And guess what amazing thing I discovered? This DIY project was not only surprisingly straightforward and quick to execute, but it was also incredibly rewarding! My vision for these drawers extended far beyond mere functionality; I wanted them to be a consistent source of joy and a spark of inspiration every single time I opened them. Functional, absolutely, but beautiful and personality-filled too. This is precisely where the creative magic of Scotch Expressions Washi Tape truly shone brightest. I meticulously selected and used a delightful variety of their vibrant patterns and captivating colors to infuse a distinctive pop of personality and undeniable charm into each individual compartment within the custom organizer. The result? I just absolutely LOVE it, and I’m confident you will too!
It’s genuinely incredible how such a seemingly small detail, like the strategic application of colorful washi tape, can so profoundly transform a purely utilitarian item. Now, every single time I open my formerly chaotic desk drawer, I can’t help but break into a genuine smile. The sight of the fun prints and perfectly arranged items not only makes locating what I need an absolute breeze but also injects an element of vibrant design that visibly brightens my entire workspace. This simple addition serves as a powerful testament to how practical storage solutions can, and should, also be aesthetically pleasing, elevating mundane storage into a delightful visual experience. It truly fosters a sense of calm and encourages a more positive start to every task.
Essential Materials: Gathering Your Supplies for a Successful Build
Before you enthusiastically dive into the creative construction process, the very first and most crucial step is to meticulously gather all your necessary materials. Having everything neatly laid out and within easy reach will undoubtedly ensure a smooth, efficient, and thoroughly enjoyable crafting experience. Here’s a comprehensive and detailed list of exactly what you’ll need to successfully create your personalized, custom drawer organizer:
Assorted Scotch Expressions Washi Tape: This is truly where your creativity takes center stage and you get to infuse your unique personality into the project! I personally used a delightful and eclectic mix of patterns, including Striped Circles, Illustrated Alpha, Cracked, and a shimmering Silver, but the beauty lies in choosing colors and designs that genuinely resonate with your personal style, existing decor, or simply whatever brings you the most joy.
6″ Scotch Precision Scissors: A high-quality pair of sharp, precise scissors is an absolutely indispensable tool for this project, especially when it comes to achieving clean, crisp cuts on the delicate washi tape.
Measuring Tape: Unwavering accuracy is paramount for ensuring a perfect, snug fit for your organizer within the drawer. A reliable and easy-to-read measuring tape will undoubtedly be your best friend throughout the entire process.
White Spray Paint (Primer + Paint Combination): Opting for a primer + paint combined formula is a smart choice as it elegantly saves you an entire step and consistently provides excellent coverage and adhesion, ensuring your wooden dividers look polished, professional, and will last for years to come. Of course, you can boldly choose any color that flawlessly matches your aesthetic vision.
Hammer: An essential tool for securely joining your wooden dividers and attaching the base. Ensure you select one that feels comfortable and balanced in your hand for ease of use.
3/4″ Brads: These small, slender nails are perfectly suited for discreetly and securely joining the thinner wood pieces of your organizer.
Pencil: An absolutely essential tool for accurately marking all your measurements and for clearly tracing your compartment design onto the plywood base.
3M SandBlaster Pro Sanding Sponge: Critical for thoroughly smoothing out any potential rough edges or splinters on your cut wood pieces, thereby ensuring a safe, refined, and professional finish that’s pleasing to the touch.
Wood Glue (Optional but Recommended): While the brads provide excellent structural integrity, adding a small amount of wood glue can significantly enhance the durability and overall stability of your joints, especially if you desire extra reassurance or are less confident with nailing techniques alone.
8’x.25″x2.25″ Lattice (Pine Recommended): This thin, lightweight, yet sturdy wood material is ideally suited for meticulously crafting the divider walls of your custom organizer. Pine is a particularly popular and user-friendly choice due to its inherent ease of cutting, sanding, and general workability.
.25″ Plywood, cut to your exact drawer size: This precisely cut piece will form the robust and stable bottom of your entire organizer. It is absolutely vital to ensure it is cut to the exact interior dimensions of your drawer, leaving just a tiny bit of wiggle room, for a truly perfect and custom fit.
Step-by-Step Instructions: Building Your Custom Drawer Organizer with Ease
Now that you have meticulously gathered all your supplies and are feeling inspired, let’s roll up our sleeves and dive into the satisfying process of building! Follow these detailed, easy-to-understand steps to construct your beautiful, highly functional, and perfectly tailored drawer organizer. Each step is designed for clarity and efficiency, ensuring a successful outcome.
Step 1: Measure Your Drawer and Plan Your Design Carefully
The foundation of any successful custom project is precise measurement. Begin by meticulously measuring the interior dimensions of your desk drawer. It is crucial to pay extremely close attention to any minor protrusions, such as screws, hinges, or other hardware, as these elements will directly affect the usable space and may require slight adjustments in your cutting plan. To ensure your organizer slides in and out effortlessly without any snagging or sticking, it’s always a wise practice to give yourself at least 1/8″ of wiggle room on all sides of the entire organizer. Once you have these precise measurements, take a piece of paper and calmly sketch out the desired design of your drawer organizer. Envision the types of items you intend to store and determine how many compartments, and of what sizes, you will need. This visual blueprint will serve as your invaluable guide throughout the cutting and assembly process, preventing errors and ensuring a layout tailored to your needs.
Step 2: Cut Plywood Base and Lattice Dividers to Size
With your meticulously recorded measurements firmly in hand, proceed to cut the .25″ plywood to the exact dimensions you determined for your drawer. This precisely cut piece will serve as the sturdy and reliable bottom of your custom organizer. Next, carefully refer back to your detailed sketch and begin cutting the different sized pieces of lattice according to your planned design. Precision in this step is paramount, as it will ensure all your compartment walls fit together seamlessly and create a visually appealing structure. To simplify the cutting process and reduce waste, I strategically opted to cut only three distinct lengths of board: Boards 1 and 2 were cut to the same length for the longest structural sections; Boards 3, 4, 5, and 6 were cut to another consistent length for the mid-sized compartments; and Boards 7, 8, and 9 were cut to the shortest length for the smallest, most detailed sections. Once all pieces are cut, it is highly recommended to perform a dry fit: lay out your entire design either within the actual drawer or on a flat surface that mimics its shape to double-check that everything fits snugly and as intended before you commit to assembly.
Step 3: Sand All Edges for a Perfectly Smooth Finish
Prior to beginning any assembly, it is an absolutely crucial step to thoroughly sand all the freshly cut edges of your lattice boards. Using a 3M SandBlaster Pro Sanding Sponge, or any similar fine-grit sandpaper, gently yet firmly smooth away any potential splinters, rough patches, or sharp points. This meticulous sanding process not only makes the finished organizer significantly safer to handle and use, but it also imparts a noticeably more professional, polished, and aesthetically pleasing appearance. Pay particular attention to the cut ends, ensuring they are impeccably clean and perfectly even; this precision will contribute to tighter, more secure joints during the subsequent assembly phase. While this step might seem minor, it profoundly enhances both the tactile quality and the overall visual appeal of your completed DIY project.
Step 4: Assemble the Divider Framework
Now, with your sanded pieces ready, it’s time to bring your design to life by assembling the individual divider pieces. Carefully position and then nail the lattice boards together to form your desired rectangular compartment shapes. If you’ve chosen to use wood glue for added strength and longevity (which is an optional but highly recommended step for maximum durability), apply a small, even amount to the ends of the boards before meticulously joining them with nails. After you have successfully assembled all the individual divider sections according to your design, carefully lay the entire divider framework out on top of your plywood base. This is a critical alignment check – meticulously ensure that all your divider walls line up perfectly with the edges of your plywood base, thereby creating the distinct, well-defined compartments you envisioned. Make any necessary minor adjustments to the alignment now, before they are permanently fixed.
Step 5: Trace Compartment Layout onto the Plywood Base
This particular step is absolutely crucial for achieving a professional and perfectly aligned finish for your decorative elements. With the assembled wooden dividers temporarily positioned precisely on top of the plywood base (as confirmed in the previous step), use your pencil to carefully and accurately trace the interior outlines of each compartment onto the plywood. These clearly marked pencil lines will serve as your precise and invaluable guide for the subsequent step of placing the decorative Scotch Expressions Tapes. Accurate tracing at this stage will guarantee that your vibrant washi tape patterns align flawlessly with each individual compartment, creating an impeccably clean, crisp, and professional look once the dividers are permanently attached to the base. This attention to detail will elevate the entire aesthetic of your DIY organizer.
Step 6: Spray Paint the Divider Framework
With your divider framework ready, it’s time to add the base color. Take your assembled wooden dividers to a very well-ventilated area, ideally outdoors or in a garage with open doors, to ensure proper airflow and safety. Apply your chosen white (or any other color you prefer) spray paint to the dividers. Using a primer + paint formula is highly recommended for this step, as it offers superior coverage, excellent adhesion to the wood, and typically reduces the number of coats required, ultimately providing a smoother, more uniform, and impressively durable finish. Apply as many thin, even coats as needed to achieve your desired level of coverage and a rich, consistent color, ensuring you allow each coat to dry completely to the touch before applying the next. This patience will prevent drips and ensure a beautiful, uniform color that truly stands out.
Step 7: Add Decorative Washi Tape to the Plywood Base
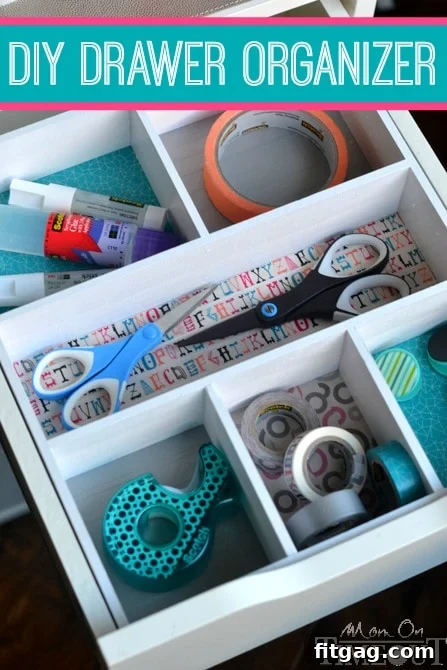
This is arguably the most exciting and transformative step, where your organizer truly comes alive with a glorious burst of color and unique personality! Now, it’s time to choose your absolute favorite Scotch Expressions Washi Tapes. Using your trusty Scotch Precision Scissors, meticulously cut pieces of tape that are long enough to perfectly cover each compartment area that you precisely traced in Step 5. Carefully align each piece of tape with your pencil guides, ensuring it sits squarely within the defined boundaries, and then press firmly to adhere it smoothly to the plywood surface. Don’t hesitate to mix and match different patterns, layer colors, or create your own unique custom designs – this step encourages maximum creativity and customization, guaranteeing that your organizer will be truly one-of-a-kind. The vibrant tape will artfully peek through each compartment, adding a delightful and unexpected surprise every time the drawer is opened, making organization a joy.
Step 8: Position and Secure Dividers to the Taped Plywood
Once your spray-painted wooden dividers are completely dry to the touch, and your beautifully washi-taped plywood base is fully prepared, it’s time for the critical final assembly. Carefully and precisely position the dried dividers on top of the taped plywood base, taking extra care to ensure they align perfectly with the edges of your chosen tape patterns within each compartment. This meticulous alignment will create distinct, visually appealing, and colorful compartments that are both functional and decorative. Take your time during this crucial step to get the alignment exactly right, as this will be the permanent placement of your dividers on the base. Proper alignment here will result in a professional, seamless finish.
Step 9: Attach the Plywood Backing to the Dividers Permanently
With the dividers now perfectly positioned and aligned, it’s time to permanently attach the plywood base to the divider framework. Using your hammer and the 3/4″ brads, carefully nail the plywood backing onto the bottom edges of each individual divider section. Work your way around the entire organizer, ensuring that each divider wall is securely fastened to the base. For an extra secure hold, consider adding a dab of wood glue to each joint before nailing. If you prefer the very bottom of the organizer (the part that faces the drawer bottom) to aesthetically match your painted dividers, you are certainly welcome to spray paint it as well. However, since this surface typically won’t be visible once the organizer is placed within the drawer, I personally chose not to paint mine, saving a step without compromising the visual appeal of the visible interior compartments.
Step 10: Place in Drawer and Enjoy Your Newfound Organization!
Congratulations, you’ve done it! Your custom-built DIY drawer organizer is now complete and ready for action! Gently place the finished organizer into your drawer. It should fit snugly, yet slide in and out with effortless ease, a testament to your precise initial measurements. The most deeply satisfying part comes next: filling it with all your favorite supplies! Arrange your pens, staplers, paper clips, sticky notes, small tools, and any other desk essentials into their new, dedicated, and beautifully defined compartments. Revel in the immediate and dramatic transformation of your once-messy drawer into a perfectly organized, highly functional, and visually appealing space. Say a final goodbye to frustrating rummaging and a hearty hello to effortless access and increased productivity!
Embrace the Joy of a Beautifully Organized Space
Completing this project brought an immense sense of personal accomplishment and, more importantly, immediate and tangible benefits to my daily routine. This remarkably quick and easy DIY drawer organizer project proved to be so unexpectedly effective and deeply satisfying that my husband has already enthusiastically put in a special request for me to tackle our notoriously messy bathroom drawers next! This clearly demonstrates the universal appeal and broad practical application of custom organization solutions within any home. Imagine the calm and efficiency you could bring to your kitchen utensil drawer, your craft room supplies, or even a cluttered junk drawer! What drawers in your home are currently crying out for a similar, personalized transformation? Embrace the profound satisfaction that comes from transforming frustrating clutter into serene calm, all while adding a unique touch of personal flair and vibrant color in the process. Your future organized self will thank you!
Connect with Us and Stay Inspired!
Stay continuously inspired, discover more creative DIY ideas, and connect with a vibrant community by following me across my various social media channels. Let’s create more beauty and order together!
You can also find more inspiring DIY projects, connect with fellow crafting enthusiasts, and get featured by linking up at some of these fantastic creative parties!
Disclosure: I have been formally selected to be a proud brand ambassador for Scotch Brands. As such, I have been compensated for my time, creative efforts, and valuable contributions to this sponsored project. However, it is paramount to state that all opinions expressed herein are genuinely 100% my own and are solely based on my authentic, positive experience with their exceptional products!
The post Smart DIY Drawer Organizers first appeared on Fitgag.