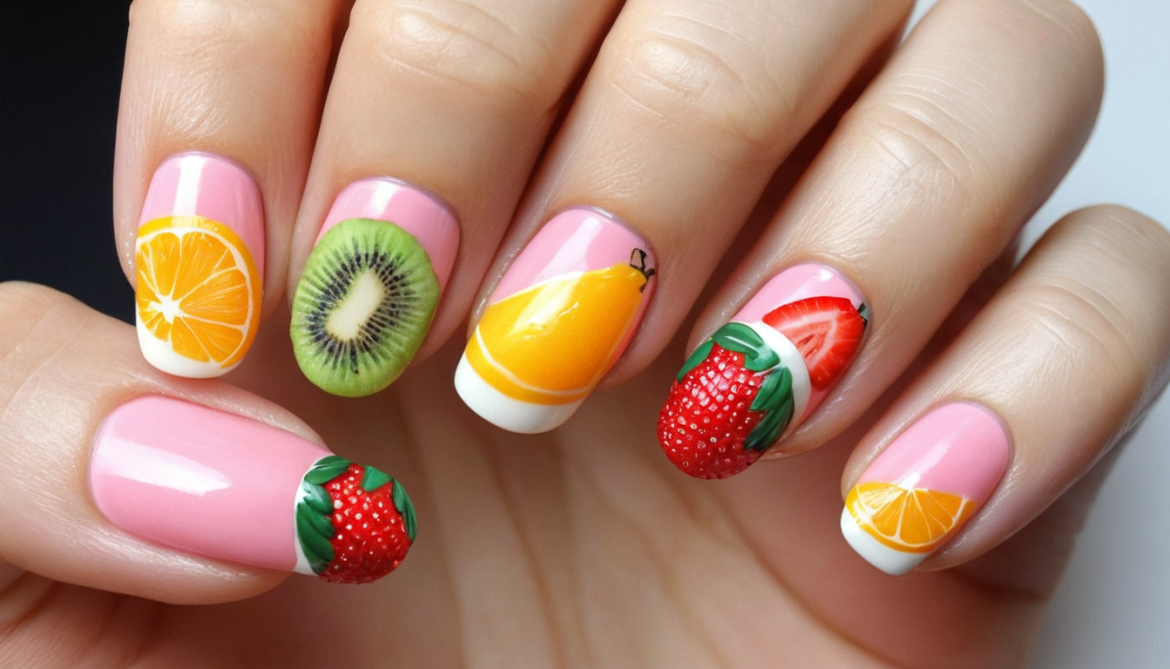
Fruit Salad French Manicure: A Fresh, Fun, and Easy-to-Follow Guide for Juicy Nail Art!
Are you looking to add a splash of summer fun to your nails or simply want to brighten up your hands with a playful, refreshing twist? Fruit Salad French Manicure might be your answer! This delightful nail design combines the classic elegance of a French manicure with a fun, fruity twist, bringing in shades and patterns inspired by juicy fruits. Imagine strawberries, watermelons, kiwis, and lemons adorning your fingertips, giving you that vibrant, tropical vibe.
Why Fruit Salad French Manicure?
Ever stared at your nails after attempting a DIY design, wondering why they don’t look as Pinterest-perfect as the picture? Fruit Salad French Manicure is easy to achieve and gives you that head-turning look without the need for professional experience. Did you know that nail art searches have surged over 30% this year? There’s no better time to experiment with something bold and cheerful.
Ready to dive into the details? Let’s walk you through everything you need to know, from materials to step-by-step instructions, pro tips, and even a bit of nail art trivia to keep things interesting!
1. Gather Your Supplies: Everything You Need for a Perfect Fruit Salad Manicure
Before you begin, it’s essential to have all the necessary tools on hand. This way, you’ll avoid smudges and mishaps by reaching for tools halfway through!
Here’s what you’ll need:
Base Coat and Top Coat: For long-lasting protection and shine.
Nail Polish in Fruit Colors: Think of the color palette – red, green, yellow, and pink for fruits like strawberries, watermelons, and lemons.
Dotting Tools: These are for adding seeds and details; even a toothpick can do the trick!
Thin Nail Art Brush: For precision lines when drawing fruit details.
Fruit Stickers or Decals (Optional): Perfect for beginners who want the look without the artistic skill.
Pro Tip: Always have some nail polish remover and a small angled brush nearby to clean up any mistakes along the way!
2. Prepping Your Nails: The Foundation of a Flawless Look
Think of prepping your nails as laying the foundation of a house. A strong base will help keep the design looking fresh and professional.
Trim and File: Start by trimming and shaping your nails. This design looks great on both round and almond shapes.
Buff Your Nails: A smooth surface helps polish adhere better.
Apply a Base Coat: This not only protects your nails but also prevents any staining, especially if you’re working with vibrant colors like red and green.
Ready to start? Let’s dive into the fruity details!
3. Painting the Tips: Adding Fruit Colors to the French Manicure
This is where we start bringing the fruit theme to life! Here’s how you can create the Fruit Salad French Tip:
Classic French Base: Apply a light pink or clear polish across the nail, leaving the tips bare.
Choose Your Fruit Colors: Each nail tip will represent a different fruit, so pick a bright color for each nail.
Red for Strawberry
Green for Kiwi
Pink for Watermelon
Yellow for Lemon
Paint the tip of each nail with these colors, creating the classic French manicure curve. If you’re worried about achieving a clean line, use nail tape as a guide for a precise finish.
Pro Tip: If you’re new to freehand painting, go slow! Let each nail dry for a few seconds to avoid color mixing.
4. Detailing the Fruits: Bringing Out the Juicy Charm
Now for the fun part—details! Each nail will represent a different fruit, and we’ll add seeds, lines, and little touches that will make each tip unique.
Strawberry
Using a thin brush, add small black dots across the red tip to represent seeds.
Add tiny green lines at the top for the leaves.
Watermelon
Paint a thin, green line at the base of the pink tip, then add a white line between the green and pink to create the rind.
Add a few tiny black dots for seeds.
Kiwi
Using a white polish, add small lines radiating out from the center of the green tip.
Add black dots in between the lines for seeds.
Lemon
Draw white segments inside the yellow tip to create a sliced lemon effect.
5. Finishing Touches for a Glossy, Long-Lasting Manicure
Once the design is complete, seal it with a clear top coat to protect your artwork. This also helps to add a glossy finish that brings out the colors and details.
Pro Tip: For best results, use a quick-dry top coat to avoid smudging. Apply one coat first and wait 10 minutes before adding a second layer.
FAQs & Myth-Busting: Is It Really That Hard?
Wondering if this design is as tricky as it looks? Let’s bust some myths and answer your burning questions!
Won’t This Take Forever?
Not at all! With just a few tools and a steady hand, each fruit tip can be done in about a minute or two.
I’m Not a Professional – Can I Do This?
Absolutely. Practice makes perfect, and even beginners can nail this design. Plus, there are stickers available if you want to skip the detailing.
Fun Facts and Trends: Why Fruit-Inspired Nails Are So Popular
Fruit nail art has gained popularity due to its playful, lively aesthetic and connection to summer vibes. Influencers and celebrities have been spotted sporting fruity nails, giving the trend a big boost!
Did You Know? Some studies even suggest that bright colors like yellow and pink can improve your mood!
Time to Show Off Your Fruit Salad French Manicure!
So, are you ready to add some juicy flavor to your nails? The Fruit Salad French Manicure is not only unique and eye-catching, but it’s also a great way to showcase your creativity and experiment with different colors and designs. Whether you’re a nail art novice or an experienced pro, this design is approachable and rewarding.
Go on, try it out! Don’t forget to tag us in your creations.
