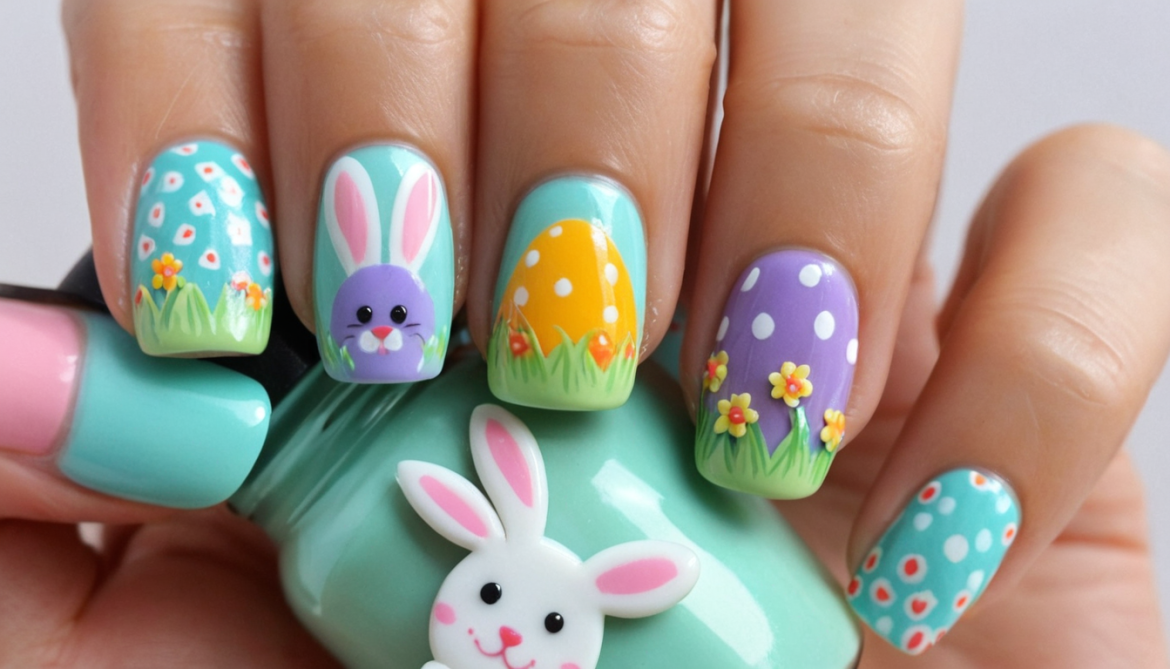
Your Nails Are Begging for This Easter Basket Nail Art Glow-Up!
Nail art doesn’t have to be complicated – it can be a basket full of fun!”
Imagine this: pastel perfection, intricate details, and a design so charming it’s practically begging for compliments. That’s the magic of the Easter Basket Accent nail art! This whimsical design combines the charm of a springtime tradition with the flair of modern nail artistry. Ready to hop into it?
Why Just Paint When You Can Create?
Ever found yourself scrolling through Pinterest, mesmerized by intricate nail designs and wondering, “Could I really do that?” Well, spoiler alert: you absolutely can! The Easter Basket Accent nail design is not only beginner-friendly but also a perfect way to welcome the sunny vibes of spring.
But first—have you ever considered how a simple accent nail can transform your entire look?
What Is the Easter Basket Accent Design?
Think of a mini Easter basket… now imagine it on your nail. This design typically features:
A pastel base (think light pink, mint green, or baby blue).
Delicate basketweave patterns created with thin, precise strokes.
Miniature ‘eggs’ painted with speckles of contrasting colors.
Optional 3D embellishments, like pearls or gems, to mimic real basket handles or candy.
What You’ll Need: The Nail Artist’s Basket of Tools
Before we dive into the how-to, gather your materials:
Base Coat & Top Coat – For long-lasting results.
Pastel Nail Polishes – Choose at least three colors for variety.
Fine Nail Art Brush – Essential for those basketweave details.
Dotting Tool – To create perfect little eggs.
Nail Tape (optional) – Helps with clean, precise lines.
3D Decorations – Pearls, tiny beads, or nail decals for an extra wow factor.
Nail Polish Remover & Q-Tips – Mistakes happen, and that’s okay!
How to Create the Easter Basket Accent Design
Ready to transform your nails into a charming Easter basket with pastel perfection and intricate details? Here’s your step-by-step guide to mastering the design!
Step 1: Prep Like a Pro
Start with clean, shaped nails. Apply a base coat to protect your nails and prevent staining.
Pro Tip: Buff your nails beforehand for a smoother surface—it makes those basket patterns pop!
Step 2: The Perfect Pastel Canvas
Choose a pastel shade for your base color. This will set the tone for your Easter basket masterpiece.
Light pink for a feminine vibe.
Baby blue for a soft, airy feel.
Mint green for a fresh, springy look.
Let it dry completely before moving on.
Step 3: Create the Basketweave
Using your fine nail art brush:
Paint horizontal lines across the nail with a darker pastel shade.
Add vertical lines to intersect the horizontals, creating a woven pattern.
Keep the strokes light for a realistic, textured look.
Shortcut: Use nail tape to map out straight lines if freehand isn’t your thing!
Step 4: Paint the Mini Eggs
Now for the fun part!
Use a dotting tool to create tiny ovals or circles in various pastel colors.
Add speckles using a toothpick dipped in darker polish for an authentic egg look.
Think of this as decorating Easter eggs—but on the tiniest scale possible!
Step 5: Optional 3D Flair
For an elevated look:
Attach tiny pearls or gems with nail glue to act as candy or basket accents.
Consider using thin gold or silver wire to mimic a basket handle (yes, it’s extra—but worth it).
Step 6: Seal the Deal
Once your masterpiece is complete, apply a glossy top coat to protect the design and add a shiny, polished finish.
Pro Tip: Use a quick-dry top coat to avoid smudging those delicate details.
Step 7: Flaunt Your Nails!
Take a moment to admire your work. Bonus points if you share it on Instagram with hashtags like #EasterNails or #NailArtGoals.
Why Everyone’s Hopping on This Trend
The Easter Basket Accent design isn’t just a nail art look—it’s a conversation starter! Here’s why you’ll love it:
It’s Festive – Perfect for Easter brunches, springtime events, or just brightening your day.
It’s Unique – While florals are always in, a mini basket? Now that’s creative.
It’s Customizable – Play with colors and details to make it your own.
FAQs About Easter Basket Nails
Got questions about the Easter Basket Accent nail design? We’ve got you covered with the answers you need to make your nail art experience a breeze!
Is this design too hard for beginners?
Not at all! Start with simple patterns and build your skills over time.
How long will it last?
With a good top coat, expect 7-10 days of wear.
Can I do this on press-on nails?
Absolutely! This is a great way to practice before committing to your natural nails.
Don’t Be Intimidated—Get Creative!
If you’re still hesitant, remember this: nail art is about having fun. The Easter Basket Accent design is the perfect excuse to unleash your inner artist.
So, what are you waiting for? Grab your tools, pick your pastels, and start creating a look that’s uniquely you.
What’s Your Go-To Nail Design?
Have you tried the Easter Basket Accent look? Share your thoughts or tips below—we’d love to see your creations!
