Golden Cherry Fritters
Irresistible Fresh Cherry Fritters: Your Ultimate Summer Delight
If you’ve been following my culinary adventures, you’ll know that this time of year is all about embracing the glorious **cherry overload**! The bountiful harvest of fresh, ruby-red cherries is a seasonal gift that demands to be celebrated in every imaginable way. From vibrant Very Berry Cherry Smoothies to refreshing cherry shakes and icy cherry-limeade slushies, our kitchen has been a whirlwind of cherry-infused creations. While I might have been a tad lazy in sharing these delights with you, the wait is over! Just yesterday, we whipped up a batch of the most incredible **Fresh Cherry Fritters**, and I simply couldn’t keep this recipe to myself any longer. They were, without a doubt, spectacularly delicious!
Why These Fresh Cherry Fritters Are an Absolute Must-Try
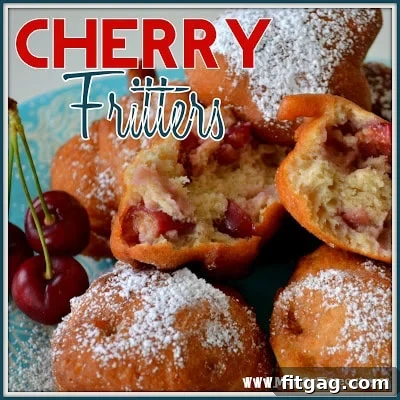
Imagine biting into a perfectly golden, crispy fritter, only to discover a warm, tender pocket of sweet, juicy cherry bursting with flavor. It’s an experience akin to savoring a slice of homemade cherry pie, but in a wonderfully portable and less fussy form. There’s an undeniable magic that happens when cherries are heated; their natural sweetness intensifies, and their vibrant flavor deepens into something truly amazing. The aroma alone as these fritters fry is enough to make your mouth water!
This recipe isn’t just about taste; it’s about pure, unadulterated joy. My boys devoured these fritters in blissful silence – a clear sign that I’ve struck gold with this delightful treat. They’re perfect for a special breakfast, a decadent brunch, or a simple, satisfying dessert. When fresh cherries are in season, making these fritters is the ultimate way to capture their fleeting sweetness and transform it into a memorable culinary experience that the whole family will adore.
The Joy of Seasonal Cherries: More Than Just a Fruit
Cherry season is a highlight of the summer, bringing with it a vibrant splash of color and an abundance of flavor. These small, versatile stone fruits are not only delicious but also packed with nutrients. Making homemade cherry fritters allows you to harness the peak freshness of this season’s bounty. Choosing ripe, firm cherries is key to achieving that exquisite taste and texture in your fritters. Look for bright, glossy skins and green stems – indicators of premium quality. While you can certainly use frozen cherries when fresh ones aren’t available, nothing quite compares to the vibrant flavor and juicy pop of a fresh, pitted cherry baked into a warm, fluffy fritter.
Beyond the delightful taste, the process of preparing these fritters, from pitting the cherries to watching them turn golden in the oil, is a rewarding kitchen experience. It’s a chance to connect with your ingredients and create something truly special from scratch. This recipe focuses on simple, accessible ingredients, ensuring that even novice bakers can achieve spectacular results with minimal effort.
Ingredients for the Perfect Fresh Cherry Fritters:
2 cups all-purpose flour (The foundation for a light and airy fritter)
1 Tablespoon baking powder (For that delightful rise and tender texture)
1/2 teaspoon salt (Balances the sweetness and enhances flavor)
4 Tablespoons granulated sugar (Just enough sweetness for the batter)
1 teaspoon ground cinnamon (A warm spice that perfectly complements cherries)
1 1/4 cups whole milk (Adds richness and moisture to the batter)
1 teaspoon vanilla extract (A must-have for depth of flavor)
4 large egg whites (Whipped for extra lightness and volume)
3 large egg yolks (For richness, color, and binding the batter)
1 Tablespoon vegetable oil (Keeps the batter tender)
1 Tablespoon fresh lemon juice (Brightens the flavor profile of the cherries)
1 3/4 cups fresh cherries, pitted and coarsely chopped (The star of the show! Ensure good, chunky pieces)
Neutral oil for frying (Such as canola, vegetable, or peanut oil)
Powdered sugar (optional, but highly recommended for dusting)
Directions: Crafting Your Delicious Cherry Fritters
Step 1: Prepare the Batter Base. In a large mixing bowl, meticulously combine all the dry ingredients: the all-purpose flour, baking powder, salt, granulated sugar, and ground cinnamon. Whisk them together thoroughly, ensuring an even distribution of leavening agents and spices. This crucial step prevents clumps and ensures a consistent texture. Next, in a separate bowl, combine the wet ingredients: milk, egg yolks, vegetable oil, fresh lemon juice, and vanilla extract. Gradually add these wet ingredients to the dry mixture, beating gently until just combined and smooth. Be careful not to overmix; a few small lumps are perfectly acceptable and often result in a more tender fritter.
Step 2: Incorporate Whipped Egg Whites for Lightness. In a separate, impeccably clean bowl, whip the four egg whites until soft peaks beautifully form. This means when you lift the whisk, the egg whites hold their shape but the tips gently curl over. The addition of whipped egg whites is the secret to achieving that wonderfully light and airy texture that makes these fritters so irresistible. Gently, yet thoroughly, fold these whipped egg whites into your prepared batter. Use a spatula to carefully incorporate them, preserving as much of that precious volume as possible. You’ll notice the batter gain significant volume and a fluffy consistency at this stage – a promising sign of the deliciousness to come!
Step 3: Fold in the Fresh Cherries. Now for the star ingredient! Take your pitted and coarsely chopped cherries. Remember, you want nice, substantial chunks of cherry in your fritters, so resist the urge to chop them too finely. Gently fold these vibrant cherry pieces into your batter. The goal here is to distribute the cherries evenly without deflating the airy batter you’ve just created. The contrast of the sweet batter and the tart-sweet cherries is what makes these fritters truly special.
Step 4: Fry to Golden Perfection. Heat about 2-3 inches of neutral oil (like canola or vegetable oil) in a deep, heavy saucepan or a Dutch oven until it reaches a consistent 375°F (190°C). Maintaining the correct oil temperature is paramount for perfect fritters – too cool and they’ll be greasy; too hot and they’ll burn on the outside before cooking through. A deep-fry thermometer is highly recommended here. Using an ice cream scoop or two tablespoons, carefully drop dollops of batter into the hot oil. Avoid overcrowding the pan; fry in batches to maintain the oil temperature and ensure even cooking. Fry for approximately 4 to 5 minutes, turning occasionally, until each fritter is beautifully golden brown on all sides and cooked through.
Pro Tip: Always fry a “test fritter” first! This allows you to check for doneness and adjust the size of your fritters or the oil temperature as needed. You want the fritters to have ample time to cook all the way through, ensuring those cherry chunks become wonderfully hot and juicy, without the outsides becoming overly dark or burnt. Patience is key for that perfect, crispy exterior and tender interior.
Step 5: Drain and Serve Hot. Once your fritters have reached that perfect golden hue, carefully remove them from the hot oil using a slotted spoon or spider. Transfer them immediately to a plate lined with paper towels to drain any excess oil. This helps them maintain their delightful crispiness. If you’re frying in batches, you can keep the finished fritters warm in a low oven (around 200°F or 90°C) on a baking sheet. These cherry fritters are truly best when served hot, straight from the fryer, allowing the warm cherries and soft batter to shine through.
Step 6: The Finishing Touch. For that ultimate, irresistible finish, generously dust your warm cherry fritters with a shower of powdered sugar. This simple step adds a touch of elegant sweetness and makes them even more appealing. Alternatively, you could drizzle them with a light, simple glaze made from powdered sugar and a splash of milk or lemon juice for an extra layer of sweetness and shine. A dollop of whipped cream or a scoop of vanilla ice cream would also be absolutely divine!
Tips for Perfect Homemade Cherry Fritters Every Time
Cherry Selection: Always use fresh, ripe, and sweet cherries for the best flavor. Dark sweet cherries like Bing or Rainier work wonderfully. Don’t forget to pit them thoroughly!
Pitting Made Easy: If you don’t have a cherry pitter, a chopstick or a sturdy straw can be used to push the pit out from the stem end.
Oil Temperature is Key: Invest in a good deep-fry thermometer. Consistent oil temperature (375°F / 190°C) ensures even cooking and prevents greasy or burnt fritters.
Don’t Overcrowd: Fry fritters in small batches to prevent the oil temperature from dropping too much. This ensures a consistent golden-brown crust.
Gentle Folding: When incorporating the whipped egg whites and cherries, fold gently to maintain the airy texture of the batter. Overmixing can lead to tough fritters.
Drain Properly: Always drain freshly fried fritters on paper towels to absorb excess oil.
Serve Immediately: While leftovers are still tasty, these cherry fritters are truly at their best when served warm, straight from the fryer.
Glaze Variations: Beyond powdered sugar, consider a lemon glaze (powdered sugar + lemon juice) or a cream cheese glaze for an extra decadent touch.
Storing and Reheating Your Cherry Fritters
If by some miracle you have any leftover cherry fritters (it’s rare in my house!), they can be stored in an airtight container at room temperature for up to 2 days, or in the refrigerator for up to 4 days. To enjoy them again with a semblance of their original crispiness, it’s best to reheat them. A toaster oven or a regular oven set to 300°F (150°C) for 5-10 minutes works wonders. Avoid the microwave, as it will make them soft and rubbery rather than crispy. A quick re-dusting of powdered sugar after reheating will make them feel fresh again.
Embrace the Cherry Season!
I sincerely hope you’ll seize the opportunity this season to give these incredibly yummy Fresh Cherry Fritters a try! They are more than just a recipe; they are a celebration of summer, a delightful treat that brings smiles to faces and warmth to hearts. Whether you’re an experienced baker or a kitchen novice, this recipe is straightforward and promises wonderfully rewarding results. Enjoy the process, savor the flavors, and create some cherished memories around these golden-brown beauties. Happy frying!
If you make these delicious fritters, please share your experience in the comments below! I love hearing about your culinary adventures.
The post Golden Cherry Fritters first appeared on Fitgag.