Mastering Roasted Red Peppers: From Pan to Pantry
Unlock Winter Flavor: Your Guide to Roasting and Freezing Red Bell Peppers
Summer brings an abundance of vibrant produce, and with it, the opportunity to enjoy incredible flavors at significantly lower prices. Savvy home cooks know that this is the prime time to stock up on seasonal delights like bell peppers. By buying in bulk when prices are low and quality is at its peak, you can extend the taste of summer far into the colder months. One of the most rewarding ways to preserve this fresh goodness is by roasting and freezing bell peppers.
Today, we’re diving deep into the art of roasting bell peppers and an incredibly effective freezer storage technique. This method promises to deliver that glorious, smoky-sweet roasted red bell pepper flavor to your dishes all winter long. Forget the bland, often overly acidic jarred versions you find in stores; homemade roasted peppers are a revelation. You’ll not only enjoy a superior taste and texture but also have complete control over the ingredients, ensuring a wholesome addition to your meals. Imagine the convenience of simply pulling these flavor-packed gems from your freezer to elevate soups, add zest to a classic bruschetta, infuse cornbreads with depth, enrich hearty casseroles, or form the base of an irresistible roasted red pepper dip.
Why Homemade Roasted Bell Peppers Reign Supreme
The difference between store-bought and homemade roasted bell peppers is night and day. Jarred peppers often come swimming in a brine that can dilute their natural sweetness and introduce unwanted sodium or preservatives. When you roast them yourself, you capture their intrinsic sweetness, enhanced by the subtle charring process, and lock in that pure, unadulterated flavor. This DIY approach isn’t just about taste; it’s about making smarter, healthier choices for your family while also being incredibly cost-effective, especially when you capitalize on seasonal sales.
Selecting the Perfect Peppers for Roasting
Start your roasting journey with the freshest red bell peppers you can find. Look for peppers that are firm to the touch, free of blemishes, soft spots, or wrinkles. Their skin should be taut and vibrant. Red bell peppers are particularly ideal for roasting because they are fully ripened, boasting a natural sweetness that intensifies beautifully with heat. While green, yellow, and orange peppers can also be roasted, red peppers offer the deepest, most complex flavor profile for this preservation method. Farmers’ markets and grocery stores are often brimming with these beauties during their peak season, making it the perfect time to stock up and take advantage of those lower prices.
Step-by-Step Guide to Perfectly Roasted Bell Peppers
Method 1: Stovetop Flame Roasting (The Traditional Approach)
This classic method imparts a wonderfully smoky flavor. Begin by setting your burner to a low to medium flame. Carefully place a bell pepper directly onto the burner grate, positioning it on its side. Allow the flame to slowly char the pepper’s skin. Patience is key here; resist the urge to crank up the heat, as this can result in burnt patches rather than an even char, or worse, setting the pepper ablaze. The goal is to slowly blacken and blister the outer skin, not to cook the flesh through entirely at this stage.
Check your peppers every few minutes, using tongs to rotate them gradually over the flame until all sides are nicely charred and blistered. Don’t forget the ends! If your burner grate allows, you can stand the peppers upright to ensure even charring around the stem and bottom. While this process doesn’t require constant supervision, it’s wise to remain in the room in case of any unexpected flare-ups. The smoky aroma filling your kitchen is a wonderful preview of the deliciousness to come.
Alternative Roasting Methods for Every Kitchen
If stovetop roasting isn’t an option or you prefer other methods, here are a few popular alternatives:
Oven Roasting: Preheat your oven to 400°F (200°C). Halve and de-seed the peppers, then place them cut-side down on a baking sheet lined with parchment paper. Roast for 25-35 minutes, or until the skins are blistered and blackened.
Grill Roasting: Heat your grill to medium-high. Place whole bell peppers directly on the grates. Close the lid and turn them every 5-7 minutes until all sides are evenly charred. This method also imparts a fantastic smoky flavor.
Broiler Method: Cut the peppers in half, remove seeds, and place them cut-side down on a baking sheet. Set your oven rack about 6 inches from the broiler element. Broil for 10-15 minutes, watching closely, until the skins are thoroughly blackened.
Step 2: The Steaming Secret – Loosening the Skin
Once your peppers are beautifully charred, immediately transfer them to a glass bowl. Cover the bowl tightly with plastic wrap or a snug-fitting lid. If you’re roasting peppers in batches, simply add each finished pepper to the bowl as it’s done. The magic happens now: as the hot peppers cool, they release steam, which becomes trapped within the covered bowl. This moist, steamy environment acts like a mini sauna, causing the charred skin to loosen and separate from the tender flesh beneath. You’ll observe condensation building up on the inside of the bowl – a clear sign that the process is working effectively. Allow the peppers to steam for at least 15-20 minutes, or even longer until they are cool enough to handle comfortably.
Step 3: Peeling and Preparing
Now comes the satisfying part: removing the skin. The steaming process should make this remarkably easy. Gently peel the loosened skin off the peppers using your fingers or a paper towel. The skin should come away with minimal effort. If you encounter any stubborn bits, don’t force it; you can always return the pepper to the covered bowl for a few more minutes of steaming.
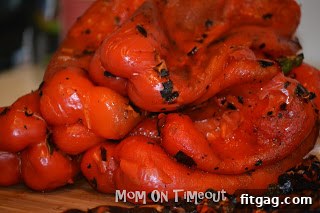
With the skin removed, you’re left with gorgeous, smoky-sweet roasted red bell peppers. The next step is to remove the stems, seeds, and any pale pith (the white membrane) from the interior. The pith can sometimes be slightly bitter, so it’s best to remove it for the purest flavor.
There are a few ways to approach this. I typically find it easiest to simply pull on the stem; it often detaches, bringing a good number of seeds with it. Then, I tip the pepper upside down and give it a gentle shake to dislodge most of the remaining seeds. For any persistent seeds or pith, you can carefully cut or tear the pepper open and use a small spoon or your fingers to scrape the interior clean. While some people are meticulous about removing every single seed, my philosophy is “get as many as you can and call it good.” Ultimately, the choice is yours – perfection or practicality, both yield delicious results.
Step 4: Flash Freezing for Future Convenience
With your beautiful roasted red bell peppers peeled and cleaned, it’s time for the final prep before freezing. Cut the peppers into strips. Strips are incredibly versatile and are my preferred shape for freezing because they flash freeze easily and fit perfectly into quart-sized freezer bags. However, feel free to cut them into any shape or size that best suits your future culinary plans – diced, halved, or even pureed, if you have a specific recipe in mind.
Now, for the flash-freezing secret to ultimate convenience. Line a baking sheet with parchment paper, wax paper, or a silicone mat (parchment is my top choice). Arrange the pepper strips in a single layer on the prepared baking sheet, ensuring that none of the pieces are touching each other. This is crucial for successful flash freezing.
Why do we go to this extra step? Flash freezing individually freezes each piece of pepper. This preserves their texture, prevents them from clumping together into one large, unmanageable block, and makes them incredibly easy to use later. Just like frozen peas, you’ll be able to reach into the bag and pull out exactly the amount you need, whether it’s a handful of strips for a quick stir-fry or just one or two for a garnish, without having to thaw an entire block. Place the baking sheet with the peppers in the freezer for 1-2 hours, or until the strips are completely solid.
Step 5: Long-Term Storage and Enjoyment
Once your roasted red pepper strips are flash-frozen solid, transfer them from the baking sheet into airtight, freezer-safe bags or containers. Squeeze out as much air as possible from the bags to prevent freezer burn (a vacuum sealer is fantastic for this, or you can use the straw method to suck out the air). Don’t forget to label your bags with the date and contents so you can easily identify them later. Roasted red peppers can be stored in the freezer for 6-12 months while maintaining their quality and flavor, giving you access to summer’s bounty throughout the year.
When you’re ready to use them, you can thaw them in the refrigerator, quickly warm them in the microwave, or even toss them directly into hot dishes like soups, stews, or sauces. Their versatility is truly unmatched.
Endless Culinary Possibilities
The culinary applications for your homemade roasted red bell peppers are vast. Beyond the soups, bruschetta, cornbreads, casseroles, and dips mentioned earlier, consider using them to:
Create rich pasta sauces or pizza toppings.
Blend into creamy hummus or flavor-packed cream cheese spreads.
Add a smoky sweetness to salads, both warm and cold.
Elevate sandwiches, wraps, and paninis.
Fold into omelets, frittatas, or scrambled eggs for a gourmet breakfast.
Enhance marinades for meats or vegetables.
Garnish savory dishes for an extra pop of color and flavor.
Even stuff roasted halves with grains and cheese for a unique twist on stuffed peppers.
I’ve got a super duper Roasted Red Pepper Dip recipe that I am going to be sharing with you next week that is just absolute perfection. Super creamy and full of flavor – it’s the perfect dip for any party and the ultimate way to showcase your beautifully preserved peppers.
Embrace the satisfaction of preserving your own food and enjoy the superior taste and health benefits that come with it. Happy roasting!
Linking up here.
The post Mastering Roasted Red Peppers: From Pan to Pantry first appeared on Fitgag.