Redemption Coin Cross Craft
Crafting a Meaningful “Paid In Full” Easter Cross: A Symbolic DIY Project
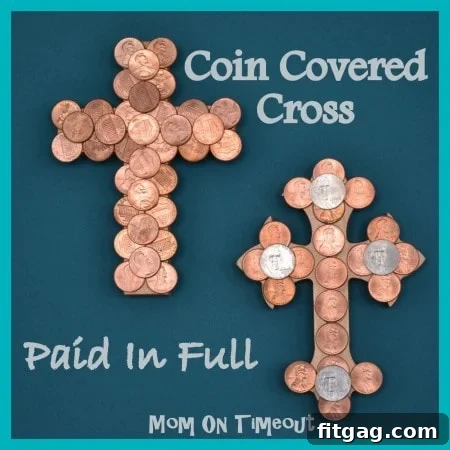
Wooden crosses covered in shimmering coins – a profound “Paid In Full” Easter Craft that beautifully illustrates the true meaning of the season.
As Easter rapidly approaches, the air fills with a palpable sense of excitement in our home. Barely three weeks away, I find myself pulling out the vibrant Easter baskets, the colorful plastic eggs, and an array of delightful decorations. For our family, the season isn’t just about festive decor; it’s a cherished opportunity to engage in meaningful Easter crafts. My boys, Reece and Bryce, absolutely adore getting involved in these creative projects, transforming our home into a beautiful and fun space that truly celebrates the spirit of Easter.
In the whirlwind of chocolate bunnies and exhilarating egg hunts, it’s incredibly easy to lose sight of the profound reason we celebrate Easter. That’s why, from the very beginning of the season, I make it a point to remind my boys about the central message: the death, burial, and resurrection of Jesus Christ. This isn’t just a historical event; it’s the cornerstone of our faith. When Jesus willingly went to the cross, he made the ultimate sacrifice, paying the penalty for all our sins. Through his selfless act, he secured the promise of eternal life for every single person who believes in him.
This year, we’re creating something truly special and deeply symbolic: Coin-Covered Crosses. These radiant crosses offer a beautiful, tangible way to illustrate the immense price Jesus paid for our redemption. The variations for this craft are virtually endless, allowing for personal touches and unique expressions of faith. What makes these crosses particularly captivating is the metallic gleam of the coins. When the sunlight catches the surface, the Coin-Covered Cross shines brilliantly, serving as a constant, shimmering reminder of that divine payment, “Paid In Full.”
This project isn’t just about gluing coins; it’s an opportunity for discussion, reflection, and teaching. It allows children to actively participate in understanding a fundamental truth of their faith, making the abstract concept of sacrifice and redemption more concrete and memorable. As they meticulously place each coin, they are not just creating a craft; they are building a symbol of hope, love, and forgiveness that will resonate with them for years to come.
Essential Materials for Your Symbolic Coin-Covered Cross Craft
To embark on this truly special Easter craft journey, gather the following items. Remember, creativity is key, so feel free to adapt these suggestions to your personal style and what you have readily available!
Copper or Metallic Paint: While copper offers a warm, penny-like glow, feel free to choose any metallic shade that speaks to you. Gold, silver, or even a deep bronze can create stunning effects. Martha Stewart’s metallic paints, for instance, are known for their beautiful finish and coverage.
Wood Cross: The foundation of your craft! I found mine easily from specialized craft shops like Mr. Woody’s Etsy shop, which often offers a variety of sizes and styles. You can also find plain wooden crosses at most craft stores, or even repurpose a piece of wood into a cross shape with a little DIY spirit. Consider different sizes – a small cross for a child’s desk, or a larger one for a prominent display.
Paint Brush: A good quality brush will ensure smooth, even coverage. A flat brush works well for larger surfaces, while a smaller, round brush can help with edges and crevices. Don’t forget a cup of water for rinsing and paper towels for drying!
Coins: This is where the “Paid In Full” symbolism truly shines. Pennies are traditional and offer a beautiful copper hue, but you can mix and match. Consider nickels, dimes, or even international coins for a unique texture and color palette. You might even want to clean older, tarnished coins to bring out their metallic luster.
Strong Adhesive: A reliable glue is crucial to ensure your coins stay securely in place. Craft glue, strong multi-purpose adhesive, or even a low-temperature hot glue gun (with adult supervision) can work effectively. Make sure it dries clear to maintain the aesthetic of your finished piece.
Having all your materials organized beforehand makes the crafting process smoother and more enjoyable, especially when working with eager little hands!
Step-by-Step Guide: Crafting Your “Paid In Full” Easter Cross
Step 1: Gathering Your Treasure and Initiating the Lesson
The very first thing I did was embark on a “treasure hunt” – raiding my children’s piggy banks, quite literally! My mission was to find “pretty” pennies, those bright, untarnished copper gems, which, surprisingly, proved to be a bit of a challenge in our house. This seemingly simple act of searching for coins became an invaluable teaching moment. As we sorted through the change, I seized the opportunity to explain to Reece and Bryce the profound meaning behind this craft and the true essence of Easter. We talked about how Jesus paid a priceless debt for us, and how each coin, though small in value, collectively represents a grand payment, much like his ultimate sacrifice. This initial step isn’t just about collecting materials; it’s about laying the spiritual groundwork for the entire project.
Step 2: Preparing Your Cross with a Radiant Base Coat
The next exciting step involves preparing your wooden cross by painting it. While you have the creative freedom to choose any color, I knew I was going to be primarily using copper pennies. Therefore, I opted for a beautiful Martha Stewart copper metallic paint, which provided a stunning, complementary base. The metallic sheen of the paint truly made the cross glow, even before the coins were applied. For most crosses, a single coat of paint is usually sufficient to provide good coverage and a vibrant base. However, because these wooden crosses are often multi-dimensional, with various edges and angles, I had to apply the paint in stages, allowing one area to dry before rotating and completing the next. This ensures that no matter what angle someone views the finished piece from, it will appear cohesive, polished, and thoughtfully crafted. Don’t rush this step; a well-painted base provides a perfect canvas for your coin mosaic.
Step 3: Strategically Arranging Your Coins for Impact
Once your painted cross is completely dry, it’s time for the creative layout of your coins. This step is all about planning your design before committing to glue. Consider how you want your coins to look: do you prefer all “heads” showing, all “tails,” or a playful mix of both? Think about the aesthetic appeal of uniform coins versus a mix of different types – pennies, nickels, dimes – to add varied colors and textures. You might want to arrange them in neat rows, overlap them slightly for a layered effect, or create a more organic, mosaic-like pattern. Take your time during this stage, experimenting with different arrangements until you achieve a look that you absolutely love. This pre-planning ensures that your final “Paid In Full” cross will be both visually appealing and deeply symbolic.
Step 4: Securely Attaching Your Symbolic Coins to the Cross
With your coin arrangement finalized, the next crucial step is to begin gluing them onto the cross. Having already painted the cross in a metallic shade provides a wonderful advantage: it gives you the option not to cover every single square inch of the surface if you don’t wish to. The painted background can peek through, adding another layer of visual interest to your design. Apply a small dab of strong adhesive to the back of each coin and carefully press it into place according to your pre-planned layout. Work systematically, perhaps starting from the center and working your way outwards, or from one end of the cross to the other. Ensure each coin is firmly secured, giving the glue ample time to set before moving or handling the cross too much. Patience is key here to achieve a lasting and beautiful result.
Step 5: Adding Depth and Dimension with Multiple Coin Layers (Optional)
While the look of the copper pennies by themselves is undeniably beautiful and classic, you can elevate your Coin-Covered Cross by adding an extra layer of dimension and color. This is an optional step, but it truly makes the craft stand out. By introducing a different type of coin, like nickels, you create a striking contrast. The silver-colored nickels against the warm copper of the pennies add visual depth and interest, making the cross pop even more. You can strategically place these secondary coins to highlight certain areas, create patterns, or simply to fill in gaps. This layering technique allows for greater creativity and results in a more intricate and captivating finished piece, further emphasizing the richness and multifaceted nature of the “Paid In Full” message. Experiment with overlapping and placement until you achieve a truly dynamic and impressive display.
The Radiant Result: A Symbol of Gratitude and Redemption
Having completed these steps, I truly believe these Coin-Covered Crosses have turned out exceptionally beautiful. Beyond their aesthetic appeal, I am particularly moved by the powerful symbolism they embody. Each shimmering coin, carefully placed, serves as a tangible reminder of the immeasurable price Jesus paid for our salvation. The metallic glow catches the light, drawing the eye and inviting reflection on the profound message of redemption. This craft transcends mere decoration; it becomes a focal point for discussion, a visual aid for teaching, and a personal expression of faith.
As I gaze upon these crosses, the words echo in my heart: Paid In Full. I am overwhelmingly thankful for that incredible, life-changing truth. This craft is more than just an activity; it’s a testament to unwavering faith and a profound expression of gratitude for the ultimate sacrifice. Displaying this cross in your home serves as a daily reminder of God’s immense love and the forgiveness freely offered to all who believe.
Consider placing your finished Coin-Covered Cross in a prominent location in your home during the Easter season – perhaps on a mantelpiece, as a centerpiece for your Easter dinner table, or even in a child’s bedroom to serve as a gentle reminder of the true story of Easter. It also makes for a deeply personal and thoughtful gift for friends, family, or members of your church community, sharing the powerful message of “Paid In Full” in a unique and memorable way. May this craft inspire conversations, foster faith, and bring a renewed sense of wonder to your Easter celebrations.
For an array of delicious appetizer recipes, explore HERE.
Indulge your sweet tooth with our delightful dessert recipes, found HERE.
Never miss a new recipe or craft idea! Sign up to receive our emails directly in your inbox!
Connect with us and discover even more inspiring ideas by following us on social media: Facebook – Pinterest – Instagram – Twitter – Bloglovin’.
We wish you a joyful and blessed Easter season! Have a wonderful day!
The post Redemption Coin Cross Craft first appeared on Fitgag.