Whoville Grinch Cupcakes
Get ready to make hearts (and stomachs) grow three sizes with these absolutely adorable Grinch Cupcakes! These festive Christmas cupcakes are incredibly easy to prepare and beautifully decorated to capture the mischievous charm of our favorite animated green character. This delightful dessert isn’t just a treat; it might just steal Christmas in the best way possible, leaving everyone enchanted by its whimsical appearance and delicious taste.
Feeling a bit like the Grinch this holiday season? Don’t let the holiday hustle get you down. Simplify your celebrations and infuse a little more cheer with some of my other stress-free, delightful recipes. Pair these Grinch Cupcakes with a vibrant Christmas Punch, bake up a batch of equally charming Grinch Cookies, and complete your festive feast with a refreshing scoop of Peppermint Ice Cream. These treats promise to bring smiles and make your holiday preparations a joyous occasion.
Unleash the Holiday Spirit with Irresistible Grinch Cupcakes
He’s a mean one, Mr. Grinch, but there’s nothing mean about these incredibly tasty and visually stunning cupcakes! These Grinch Cupcakes are the epitome of festive delight, bringing a playful and delicious twist to your holiday dessert table. Imagine everyone’s favorite Christmas curmudgeon brought to life in cake form, complete with his iconic green face and Santa hat. Crafting these adorable treats is not just baking; it’s an experience that’s sure to make your heart, and everyone else’s, grow three sizes!
The magic begins with your favorite boxed cake mix, transformed with a dash of vibrant green food coloring. But the real spectacle lies in the brilliant decorating – a process that looks intricate but is surprisingly simple to master. These cute cupcakes will undoubtedly turn your holiday gathering into quite the “Holiday Whobilation,” sparking joy and perhaps helping everyone discover the true meaning of Christmas… or at least find their sweet tooth. They’re perfect for school parties, family gatherings, or just a cozy evening watching your favorite holiday movies.
Give your Grinch Cupcakes a unique personality with a playful smirk, a heartwarming smile, or even a classic Grinchy frown!
Why You’ll Adore These Grinch Cupcakes This Holiday Season
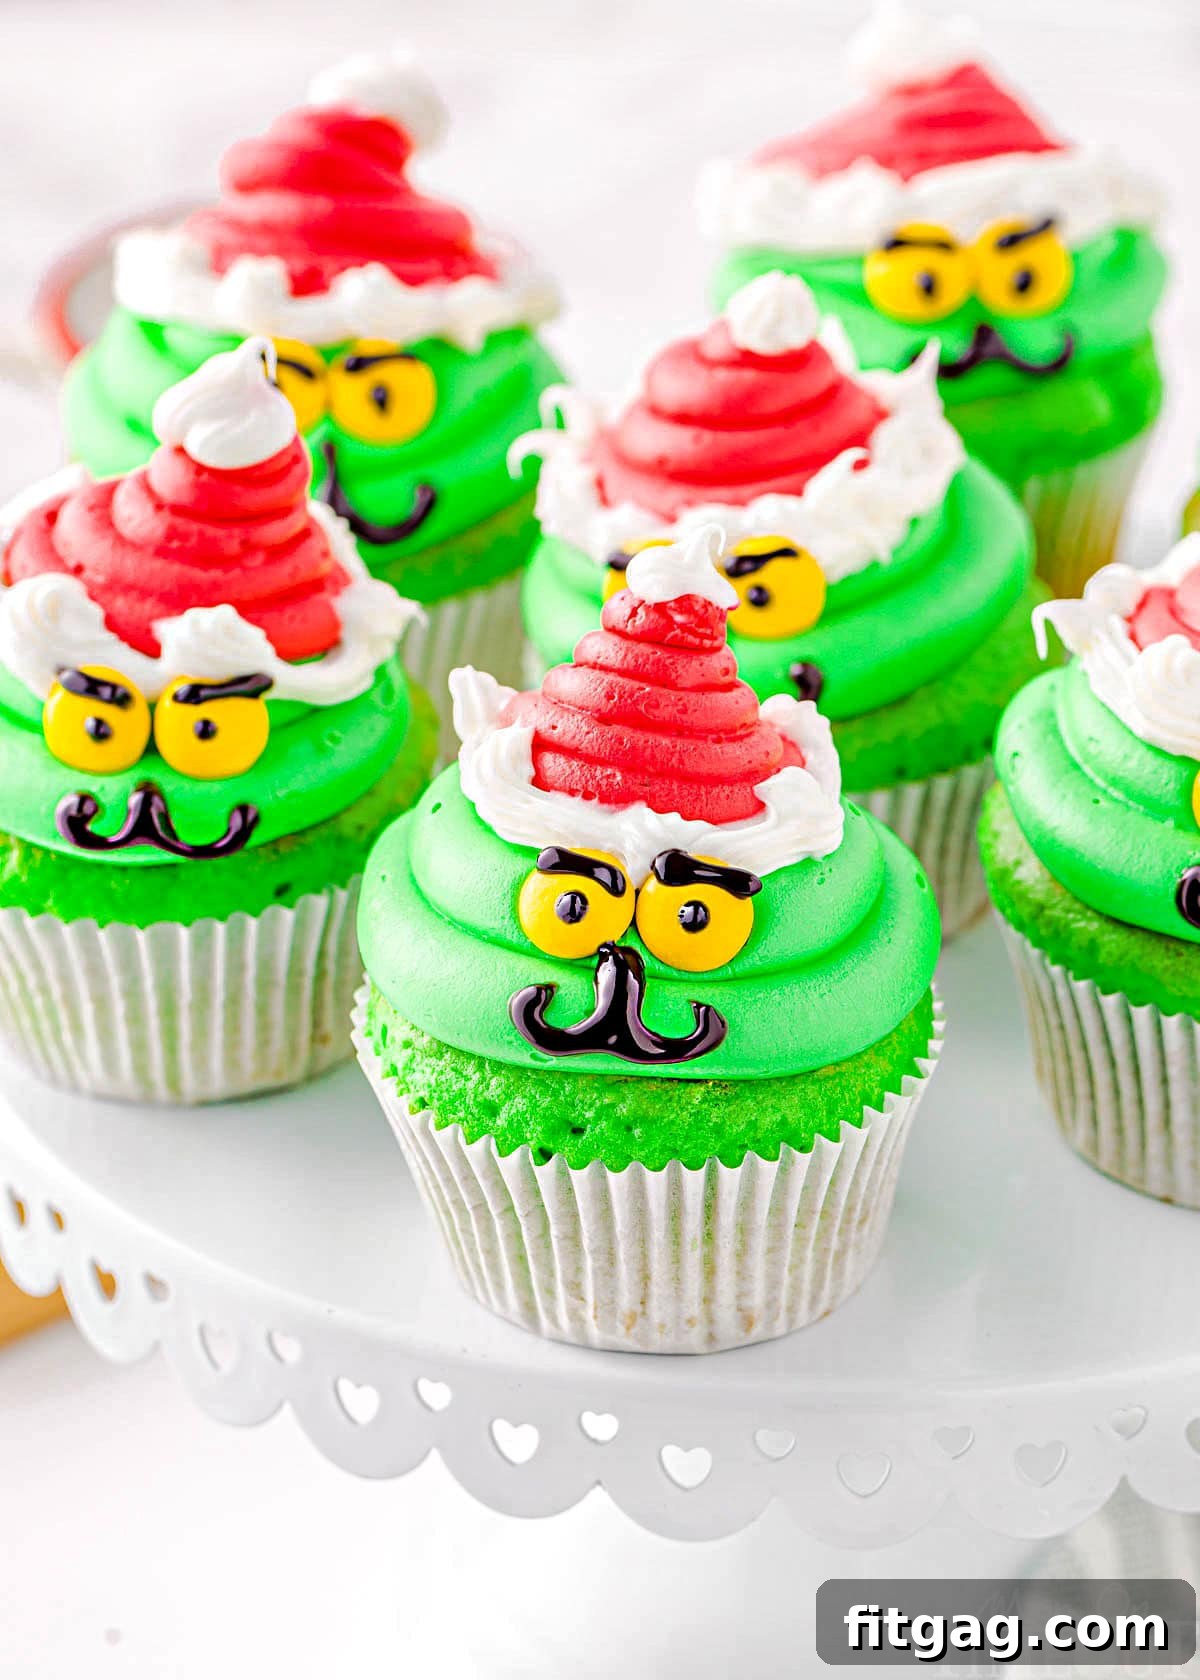
Unforgettable Visual Appeal: These delightful cupcakes are true standouts amidst any spread of holiday treats. Just look at their charming faces! The vivid green frosting, contrasted with the bright red Santa hats, will instantly excite and entice anyone to pick one up and take a bite. They are an instant conversation starter and a feast for the eyes.
Deceptively Simple Preparation: While they boast an impressively elaborate look, these Grinch Cupcakes are surprisingly easy to make. The cupcake base itself is straightforward, whether you choose a convenient boxed mix or a homemade recipe. And though the decorations might seem as over-the-top as Martha May Whovier’s holiday lights, the design is brilliantly simple, relying on a few basic piping techniques that even beginners can master with ease.
A Festive Mood Booster: Beyond their taste and appearance, these cupcakes bring a unique sense of holiday whimsy. They embody the transformation of the Grinch, from a grumpy figure to a symbol of Christmas cheer, making them a perfect representation of the season’s spirit.
Perfect for All Ages: Kids will be absolutely thrilled by these character cupcakes, and adults will appreciate the nostalgic nod to a classic holiday tale. Decorating them can even become a fun family activity, creating cherished memories alongside delicious desserts.
Versatile for Any Occasion: Whether you’re hosting a grand Christmas party, bringing a treat to a school potluck, or simply looking for a fun project on a snowy afternoon, these Grinch Cupcakes fit every bill. They’re a crowd-pleaser that guarantees smiles and holiday spirit.
More Christmas Recipes Even The Grinch Can’t Resist
Looking to expand your holiday baking repertoire? Here are more festive treats that are sure to win over even the most cynical of hearts, just like our Grinch Cupcakes:
Christmas Bark
Peanut Butter Fudge with M&Ms
Homemade Gumdrops
Christmas Crack
Reindeer Cookie Bars
Essential Ingredients for Your Grinch Cupcakes
Don’t be a mean one this Christmas! Amp up the “Who-liday” cheer with a delightful tray of Grinch Cupcakes. As always, you’ll find the complete printable recipe with detailed instructions in the recipe card at the very end of this post. For now, let’s gather what you’ll need to create these charming treats:
White Cake Mix: A 15.25-ounce box of your favorite white cake mix forms the perfect base. While using a quality boxed mix makes these cupcakes incredibly easy and quick, you can absolutely opt for a homemade white cupcake recipe if you prefer. Using a white cake mix ensures that your green food coloring will result in a vibrant, true Grinch green without any yellow undertones from a vanilla or yellow mix.
Eggs: You’ll need 3 large eggs. It’s best if they are at room temperature, as this helps them incorporate more smoothly into the batter, leading to a more uniform and tender cupcake texture.
Whole Milk: One cup of whole milk is recommended for the richest flavor and most desirable consistency. While lower-fat milk or non-dairy alternatives can be substituted, whole milk truly elevates the moisture and decadence of these cupcakes.
Salted Butter: Eight tablespoons of melted salted butter contribute significantly to the cupcakes’ rich flavor and moist crumb. Make sure it’s completely melted before adding to the mix. If you only have unsalted butter, simply add a pinch of salt to the batter. Vegetable or canola oil can be used as a substitute for butter, but note that the cupcakes might not be quite as rich or flavorful.
Food Coloring: Essential for capturing the Grinch’s iconic look! You’ll need neon green food coloring for the cupcakes and the main frosting, and red food coloring for his adorable Santa hat. Gel food coloring typically provides the most vibrant and concentrated color.
White Frosting: Plan on at least two 16-ounce tubs of good quality white frosting. Having a little extra on hand is always a good idea to avoid running out mid-decoration. If you’re a fan of homemade frosting, feel free to use your go-to recipe; a classic vanilla buttercream or even a cream cheese frosting (like the one from my carrot cake recipe) would work beautifully and add an extra layer of gourmet flavor.
Powdered Sugar: Approximately ¼ to ½ cup of powdered sugar will be used to help stiffen your store-bought frosting, making it much easier to pipe and hold its shape for those intricate Grinch details. Adjust the amount as needed until you reach your desired consistency.
Yellow Reese’s Pieces or M&Ms: You’ll need 48 of these vibrant yellow candies to create the Grinch’s distinct eyes. Remember to place them printed side down for a cleaner, more consistent look.
Black Cookie Icing: A single tube of black decorating icing is crucial for all the intricate facial details – his mischievous eyebrows, expressive irises, the iconic nose, and of course, his signature smile or frown. You can easily find this in the baking aisle of most grocery stores or online.
Crafting Your Grinch Cupcakes: A Step-by-Step Guide
Prepare the Grinchy Cupcakes
Preheat and Prep: Begin by preheating your oven to 350°F (175°C). Line two standard muffin tins with festive cupcake liners, setting them aside for now.
Mix the Batter: In a large mixing bowl, combine your white cake mix, the 3 room-temperature eggs, 1 cup of whole milk, and 8 tablespoons of melted salted butter. Using a hand mixer or stand mixer, beat these ingredients together until they are thoroughly combined and smooth, typically for about 2 to 3 minutes. Avoid overmixing, as this can lead to tough cupcakes.
Achieve Grinch Green: Gradually add neon green food coloring to your batter, a few drops at a time. Mix well after each addition until you achieve that perfect, vibrant Grinch-like green color. The key is to add slowly and observe the color development to prevent it from becoming too dark.
Fill the Liners: Carefully scoop the green batter into your prepared muffin tins, filling each liner approximately two-thirds full. This allows enough room for the cupcakes to rise without spilling over, ensuring beautifully domed tops.
Bake to Perfection: Place the muffin tins in your preheated oven and bake for 18 to 23 minutes. The cupcakes are ready when a toothpick inserted into the center comes out clean, indicating they are fully cooked through.
Cool Completely: Once baked, remove the cupcakes from the oven and transfer them immediately to a wire rack. Allow them to cool completely before attempting to frost them. This step is crucial; warm cupcakes will melt your carefully piped frosting, leading to a runny mess.
Whip Up the Festive Frosting
Green Grinch Frosting: Take one 16-ounce tub of white frosting and empty it into a bowl. Add ¼ cup of powdered sugar and a few drops of neon green food coloring, matching the vibrant green of your cupcakes. Using a hand mixer, beat the mixture until it’s thick, perfectly combined, and free of any streaks. Test a small amount to ensure it holds its shape when piped. If it seems too soft, add another tablespoon or two of powdered sugar and beat again until stiff.
Pipe the Grinch Heads: Transfer this luscious green frosting into a piping bag fitted with a large, circular piping tip (such as a Wilton 2A). Pipe a tall, generous swirl of green frosting onto each completely cooled cupcake. This large swirl forms the Grinch’s head, so make sure it’s substantial enough to accommodate his eyes and the Santa hat.
Reserve White Frosting: Set aside approximately ¾ cup of white frosting from your remaining tub. Transfer this into a separate piping bag, fitted with a smaller circular tip (like a Wilton #22 star tip, or a plain round tip if you prefer a smoother look for the fur). This will be used for the Santa hat’s trim.
Create Red Santa Hat Frosting: To the rest of the white frosting in the tub, add several drops of red food coloring. Mix thoroughly until you achieve a bright, vibrant Santa red color with no white streaks remaining. You can add a bit of powdered sugar here too if the color addition makes it a bit too soft.
Pipe the Santa Hats: Scoop the red frosting into a piping bag fitted with a smaller round piping tip (such as a Wilton #12). Carefully pipe a swirling cone shape on top of each green Grinch head, forming the iconic Santa hat. Remember to leave a small gap between the red hat and the green head for the white “fur” trim.
Add White Details: Now, using the piping bag with the reserved white frosting, pipe a fluffy trim around the base of each red Santa hat. Then, pipe a small dollop of white frosting on the very tip of each red hat to create the classic pom-pom ball.
Place the Eyes: Position two yellow Reese’s Pieces or M&Ms on each Grinch head, just below the white fur trim of his hat. For a more expressive look, you can place them slightly higher so they peek out over the white trim.
Final Grinchy Expressions: The moment of truth! Use the black cookie icing to meticulously pipe on the Grinch’s iconic eyebrows, the small irises for his eyes, his signature upturned nose, and finally, his mouth. This is where you can truly give each Grinch cupcake its own personality – a sly smirk, a cheerful smile, or a classic grumpy frown.
Serve and Enjoy: Your Grinch Cupcakes are now complete! Serve them immediately to eager guests or refrigerate them until you’re ready to share the “Who-Lidays!”
Storage and Freezing Information for Your Grinch Cupcakes
To keep these festive Grinch Cupcakes fresh and delicious, store them in an airtight container. It’s important to choose a container deep enough to prevent the beautiful frosting decorations from getting squished. They will stay fresh in the refrigerator for up to 5 days, or at room temperature for up to 2 days, making them a great make-ahead option for your holiday celebrations.
To freeze: If you’re planning even further ahead, you can freeze the unfrosted cupcakes. Once they have cooled completely, transfer them to a freezer-safe container or wrap each cupcake individually in plastic wrap before placing them in a container. They will remain fresh in the freezer for up to 3 months. When you’re ready to enjoy them, simply defrost the cupcakes until they reach room temperature, then decorate them as directed. Keep in mind that while the cupcakes freeze well, the texture and consistency of the frosting might slightly change after freezing and thawing, so it’s always best to frost them fresh if possible.
Grinch Cupcakes FAQs: Your Questions Answered
Piping bags and frosting tips are readily available and can typically be found in several places. Most major supermarkets will carry a basic selection, often located near party supplies or in the baking aisle. For a wider variety and specialized tips, your local craft and hobby supply store will have an extensive section dedicated to cake decorating. Alternatively, you can easily order a comprehensive set online, which often includes various tips and piping bags.
While piping bags and tips certainly make the decorating process easier and yield more professional results, these adorable Grinch Cupcakes can absolutely be made without them! For piping bags, sturdy freezer-safe Ziploc bags are an excellent substitute as they are thicker and hold up well to squeezing. To create the Grinch’s head, snip a larger hole off one corner of the bag to achieve broad swirls. For the Santa hat, make a slightly smaller cut. For finer details like the white fur trim, snip an even tinier hole and create a fluffy effect by piping many small dots. With a little creativity, your Grinches will still be charming!
Absolutely, you can! While a white cake mix works best for achieving a pure, vibrant green Grinch color without any underlying yellow hues, feel free to experiment with other flavors. Yellow or vanilla cake mixes are popular alternatives that will still provide a delicious base. Just be aware that the green might appear slightly different with a yellow base, but it will still be delightful! Chocolate cake could also work for a dark Grinch, or a red velvet for a more dramatic holiday twist.
Yes, you can! The unfrosted cupcakes can be baked up to 2-3 days in advance and stored in an airtight container at room temperature, or frozen for up to 3 months (see storage instructions above). The frosting can also be made a day or two ahead and stored in the refrigerator in an airtight container. When you’re ready to serve, simply bring the frosting to room temperature, beat it briefly to restore its fluffy texture, and then decorate your cooled cupcakes. This allows for flexible holiday planning!
Getting the perfect frosting consistency is key for easy piping. If your frosting is too runny, gradually add more powdered sugar, one tablespoon at a time, beating well after each addition until it stiffens to your desired piping consistency. If, on the other hand, your frosting is too stiff or difficult to pipe, add a very small amount of milk (or heavy cream), about a teaspoon at a time, until it becomes smoother and more workable. Remember to mix gently but thoroughly after each adjustment to avoid over-thinning or over-thickening.
Special Tools and Ingredients to Elevate Your Grinch Cupcakes
To achieve the most charming and professional-looking Grinch Cupcakes, a few specific tools and ingredients can make a significant difference:
Wilton 22 Star Tip: This tip is excellent for creating the fluffy fur trim on the Grinch’s Santa hat, giving it that perfect textured look.
Green Food Coloring (or Neon Green Food Coloring): Essential for achieving that unmistakable Grinch green. Gel food colorings are preferred for their vibrant, concentrated color.
Red Food Coloring: For the bold and festive Santa hats. Again, gel coloring will give the best results.
Green Cupcake Liners: While not strictly necessary, green liners can add an extra touch of thematic coherence and visual appeal to your Grinch creations.
Wilton 2A Open Round Tip: Ideal for piping the main green swirl that forms the Grinch’s head, creating a smooth, substantial base for the decorations.
Wilton 12 Open Round Tip: Perfect for piping the red Santa hats, allowing for a clean, rounded cone shape.
Piping Bags: A good quality set of piping bags is indispensable for clean and precise decoration. Many sets come with a variety of tips included, offering great value.
Trish’s Expert Tips and Tricks for Perfect Grinch Cupcakes
Choose Coordinating Cupcake Liners: When it comes to the paper cupcake liners, I find that green, red, or classic white work best. These colors seamlessly complement the Grinch’s green complexion and his festive red Santa suit, enhancing the overall presentation of your holiday treats.
Ensure Complete Cooling: This tip is paramount: let the cupcakes cool completely before you even think about applying the frosting. If your cupcakes are even slightly warm, the frosting will melt and slide off, ruining your careful decorations and resulting in a messy, less appealing cupcake.
Master Frosting Consistency: If your frosting isn’t holding its shape as you pipe, don’t panic! A quick fix is to place the piping bag (or the bowl of frosting) in the fridge for about 15 minutes. This will help stiffen it up. Alternatively, you can beat in a bit more powdered sugar to achieve a firmer consistency, then chill. Remember that the warmth from your hands can soften the frosting in the piping bag, so if you notice your Grinches starting to “slouch,” pop that bag back into the fridge for a few minutes.
Double the Batch, Double the Fun: This recipe makes a generous 24 cupcakes, perfect for most gatherings. However, if you’re hosting a larger “Whobilation” or simply want more Grinchy goodness, it’s super easy to double the batch! Just scale up all the ingredients proportionally and ensure you have enough muffin tins.
Avoid Overfilling Liners: Resist the urge to overfill your cupcake liners. Filling them only about two-thirds full ensures that all your cupcakes bake evenly and rise beautifully without overflowing the edges, which can lead to uneven shapes and sticky messes.
Practice Makes Perfect (or Pretty Good!): If you’re new to piping, don’t be afraid to practice on a piece of parchment paper first. You can scoop the frosting back into the bag and reuse it. This helps you get a feel for the pressure and movement before decorating the actual cupcakes.
Get the Kids Involved: Decorating Grinch Cupcakes is a fantastic activity for children. Let them help with placing the eyes or even piping the mouth. It’s a fun way to engage them in holiday baking and create lasting memories.
High-Quality Ingredients Matter: While a boxed mix makes it easy, using good quality eggs, whole milk, and butter can significantly enhance the flavor and texture of your cupcakes. Similarly, a good quality food coloring will give you vibrant, true colors without needing to use excessive amounts.
Even More Delightful Christmas Treats to Try
Keep the festive baking going with these other incredible Christmas treats that are perfect for sharing or enjoying at home:
Grinch Cookies
Stained Glass Cookies
Whipped Shortbread Cookies
Buddy The Elf Cookies (Haystacks)
Polar Bear Paw Cupcakes
Grinch Cupcakes Recipe
Print
Pin
Grinch Cupcakes
Ingredients
15.25 ounces white cake mix (1 box)
3 large eggs (room temperature)
1 cup whole milk
8 tablespoons salted butter (melted)
Neon green food coloring (divided)
32 ounces white frosting (2x 16-ounce tubs)
¼-½ cup powdered sugar
48 yellow Reese’s Pieces (or M&Ms)
1 tube black decorating icing
Red food coloring
Instructions
Make the Cupcakes
Prepare the Frosting
Decorate
Notes
Storage Information
Store these cupcakes in an airtight container in the fridge for up to 5 days or at room temperature for up to 2 days. Ensure the container is deep enough to protect the frosting.
To freeze: Unfrosted cupcakes can be frozen for up to 3 months. Wrap individually in plastic wrap or store in a freezer-safe container after they’ve cooled completely. Defrost at room temperature before decorating. Note that frosting texture may change after freezing.
Special Tools and Ingredients Needed
Wilton 22 – star tip
green food coloring or neon green food coloring
red food coloring
green cupcake liners
Wilton 2A – open round
Wilton 12– open round
piping bags – this set also comes with some piping tips
Make Your Own Frosting
Skip the store-bought frosting and create your own delicious buttercream instead:
1 cup unsalted butter
1/4 teaspoon fine sea salt
1 teaspoon vanilla extract
4 cups powdered sugar
2 to 3 tablespoons heavy cream
Beat butter on medium speed until completely smooth, about 1 minute.
Add salt, vanilla extract, and one cup of powdered sugar. Beat until completely combined.
Beat in 2 more cups of powdered sugar, one cup at a time, beating after each addition, until smooth and creamy (3-4 minutes).
Add 1 tablespoon of heavy cream and continue beating.
Mix in the remaining cup of powdered sugar, half a cup at a time.
Add additional heavy cream, one teaspoon at a time, until desired consistency is reached. Turn the mixer to medium-high speed and continue beating for an additional minute until the frosting is fluffy and smooth.
Nutrition
The post Whoville Grinch Cupcakes first appeared on Fitgag.