Say Goodbye to Back Pain with These 12 Yoga Poses
If you are experiencing back pain, yoga is a great way to get some relief!
Moderate-level back pain can often be assisted with the power of yoga. Yoga naturally helps strengthen and lengthen your spine, stretch your muscles, and fix your back’s alignment.
According to a study in the Archives of Internal Medicine, chronic back pain sufferers who practiced yoga regularly were half as likely to need pain pills or over-the-counter treatments for their pain than those who did not practice yoga.
I’ve rounded up the best specific yoga poses that help to alleviate back pain just for you!
I recommend completing the following pain-relieving yoga sequence two to three times a week to start feeling back pain relief.
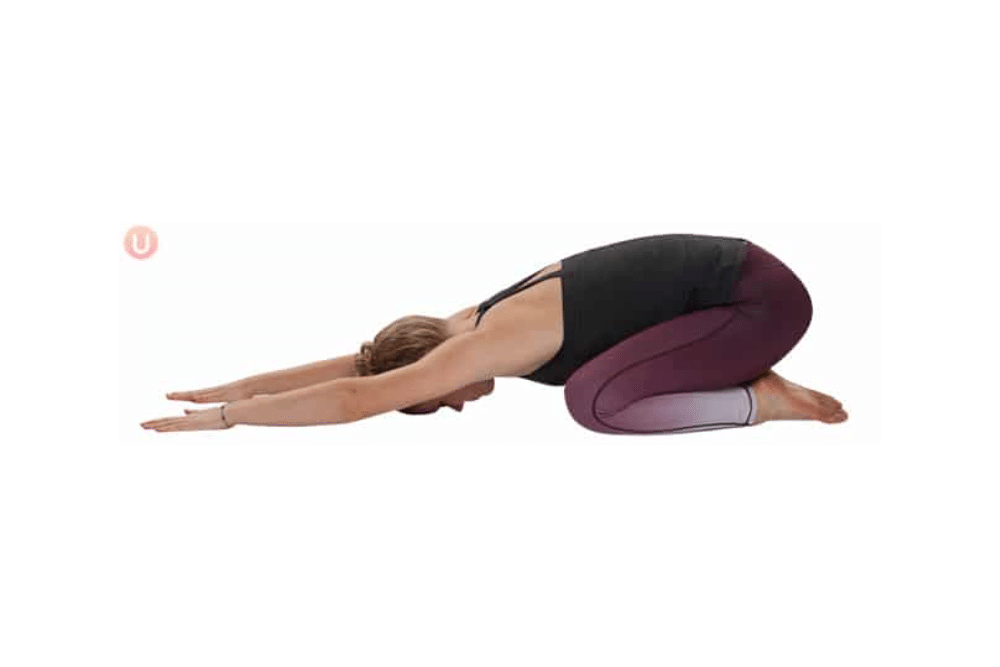
1. Child’s Pose
Photo Credit: Get Healthy U
The child’s pose lengthens and stretches the spine while relieving tension in the neck and shoulders. You can also try using a block under the forehead for more relief.
How to do child’s pose:
Begin with hands and knees on the mat, with your knees spread to the outer edges of the mat.
Sit your tailbone down and back between your heels and lower your belly between your thighs.
Stretch your arms long in front of you and relax your forehead on the mat. Breathe and hold as long as you’d like.
2. Cat/Cow Pose
Photo Credit: Shutterstock
How to do to cat/cow pose:
Begin on your hands and knees with hands directly under your shoulders and knees under your hips.
Start with your spine in a “neutral” or long position. On an exhale, slowly tuck your tailbone, lowering the crown of your head so your back gently rounds into a cat pose.
Return to a neutral spine. On an inhale, gently lift your chest and tailbone so your lower back curves downward. Look slightly upward with a relaxed neck. This is cow pose.
Repeat as many times as you’d like.
3. Downward Dog
Photo Credit: Shutterstock
Downward dog lengthens and strengthens at the same time. It’s also a big stretch for the hamstrings, which can be a cause of back pain. Take some time here to pedal the feet, twist the hips, and rock side to side.
How to do downward dog:
Begin in a kneeling position on your mat with hands directly under your shoulders, fingers spread wide.
Tuck your toes under and engage your abdominals as you push your body up off the mat so only your hands and feet are on the mat.
Press through your hands, gently moving your chest toward your thighs and your heels toward the floor.
4. Crescent Twist Pose
Photo Credit: Get Healthy U
A crescent twist helps open up the hips, which can significantly impact the back. It’s a great pose for sciatica and can also improve spinal range of motion.
How to do a crescent twist:
From a standing position, step your left foot to the back of the mat and lower the inside of the foot down.
Reach both arms straight overhead and bend the right knee to 90 degrees.
Relax your shoulder as you continue reaching up and lengthen the back leg.
Draw your hands to a prayer position in front of your chest.
Keep hands in prayer as you twist the left elbow over the right knee, pressing your elbow against the side of your leg and relaxing your neck as you gaze up.
Hold 30 seconds and switch sides.
5. Warrior 1 Pose
Photo Credit: Get Healthy U
Warrior 1 is an energizing pose that creates stability and improves balance. Having a better posture can significantly impact and alleviate back pain.
How to do warrior 1 pose:
From a standing position, step your left foot to the back of your mat and lower the inside of your foot so that your back foot is at an angle.
Bend your right knee 90 degrees and straighten your back leg.
Reach arms overhead and keep the torso facing the front.
Relax your shoulders and breathe gently in and out. Hold 30 seconds and switch sides.
6. Triangle Pose
Photo Credit: Shutterstock
Triangle pose taps into the spinal nerves and strengthens the lower back.
How to do a triangle pose:
From a standing position, step your left foot to the back of your mat and lower the inside of your foot so that your back foot is at an angle. Both legs are long and straight.
Reach your right arm over your right leg and left arm over your left leg, keeping arms straight and back long.
Now begin to reach the right hand forward over the right foot, lengthening through the waist, and slowly tip over so your right hand rests gently on your shin.
Lengthen your left arm up, stacking your left shoulder over your right shoulder and left hip over the right hip. Gaze toward theleft hand.
Breathe and switch sides.
7. Revolved Triangle
Photo Credit: Get Healthy U
Revolved triangle is another pose that improves balance with the help of internal and external obliques. This pose activates the spine.
How to do a revolved triangle pose:
From a standing position, step your left foot to the back of your mat and lower the inside of your foot so that your back foot is at an angle. Both legs are long and straight.
Reach your right arm over your right leg and left arm over your left leg, keeping arms long and back tall.
Begin reaching your right hand forward while twisting your left arm down toward your right foot. Your right hand should end up reaching to the sky while your left hand rests gently on your right shin (or, if possible, ankle or floor).
Breathe as you stretch and lift through your torso.
Hold for 30 seconds and switch sides.
8. Locust Pose
Photo Credit: Shutterstock
Locust pose will strengthen and elongate all the muscles along the spine.
How to do a locust pose:
Lie face down on your belly and lift your chest and legs off the mat.
You can take arms by your side, reaching fingers behind you. This is complete activation of the entire back of the body.
9. One-Leg Forward Fold
Photo Credit: Shutterstock
Try not to force this; relax in the pose for optimal release in the spine.
How to do a one-leg forward fold:
Seated, extend the left leg out in front of you and bend the right knee, letting it fall open to the side like a half-butterfly.
Reach forward and fold softly over the legs.
Switch sides after three breaths.
10. Knees to Chest
Photo Credit: Shutterstock
This has the same effects as a child’s pose without impacting the knees. It rounds and releases. You can gently rock right to left for a gentle massage on the spine.
How to do knees to chest: Lie down on your back and hug your knees up into your chest.
11. Twist Pose
Photo Credit: Get Healthy U
Twists relieve pressure in the lower back and encourage a spinal range of motion.
How to do a twist:
Begin on your back with knees bent, feet flat on the floor, and arms stretched out to the sides.
Gently lower your knees to the left side of your body and place them on the floor. Gaze right and breathe.
Engage your abdominals and slowly pull your knees back to the start position.
Gently lower your knees to the right side of your body and place them on the floor. Gaze left and breathe.
Hold for 30 seconds, then switch to the other side.
12. Savasana
Photo Credit: Shutterstock
Place a pillow or blanket under the knees and lie down with arms by side. This final pose, or savasana, allows the body to absorb the practice.
How to do savasana:
Lying on your back, close your eyes. Place one hand on your belly and one hand on your chest. (Or you can leave them by your sides.)
Inhale through your nose slowly for 4 counts as your belly rises with air. Exhale through your nose just as slowly for 4 counts. You should feel the texture of your breath against the back of your throat as you exhale.
Try to practice this for at least 1 minute—several minutes if you can—progressively slowing down your breaths.
The Best Core Exercises for Seniors
Photo Credit: Shutterstock
Ab workouts aren’t limited to athletes and the under-30 crowd!
As a matter of fact, seniors rank as one of the top groups who should be doing core strengthening exercises regularly because targeting your midsection with exercises that sculpt and strengthen is key to staying healthy and active.
The Best Core Exercises for Seniors
9 Tips For Joint Health | Keep Your Joints Healthy As You Age
Photo Credit: Shutterstock
Keeping your joints healthy is key to staying mobile and experiencing less pain as you age. Although you may not be able to prevent all joint injuries or arthritis, there are many things you can start doing today to improve your joint health!
9 Tips For Joint Health | Keep Your Joints Healthy As You Age
Strength Training for Women Over 50: 11 Best Moves
Photo Credit: Get Healthy U
There are many factors involved in maintaining good physical and mental health as you age, but one of the most important things to consider as you grow older is weight training.
These strength training exercises are proven to get results for women over 50!