Relax to the Max With This 20-Minute Yoga Flow You Can Do Entirely Lying Down
Resting tends to be something we put off or save for later when there’s “more time.” Yet, when we’re feeling fatigued, rushed, or distracted, slowing down can be one of the most productive ways to recharge a tired body and fragmented mind.
“So much of our day-to-day life is ruled by demands on our time, energy, and bodies,” says yoga teacher Victoria Rutledge, E-RYT 500. “Slowing down allows us to notice our patterns of thought and cultivate a non-judgmental self-awareness that primes us for honest and generous communication with ourselves and our communities.”
If you’re imagining a long mid-afternoon nap, go for it. (Really, we mean it!) But for those of us who only have so much time to spare, you’ll be pleased to know that a 20-minute yoga practice done entirely lying down is just as good—if not better—than a nap.
With no more than a yoga mat, timer, blanket, and two yoga blocks (if you have them), you can effectively down-shift into a state of physical relaxation and a more calm yet focused mind in a matter of minutes.
Supine (lying on your back) poses are a wonderful way to use the force of gravity to your advantage and relax your whole body. And, these yoga poses are a great antidote to the downward pressure put on your spinal column and pelvis that you feel after sitting or standing for long periods of time.
What’s more, when you lie on your back, you support the circulation of the blood around your spine and vertebrae, according to Rutledge.
“This can support the long-term health of the spine, meaning more mobility later into life,” she says.
This 20-minute yoga flow lying down can help you release tension, improve your breathing, and be more present simply by creating a little more space between you and the outside world.
Before you begin your yoga flow lying down, dress so you don’t get cold or uncomfortable, and consider setting up your space by setting a blanket down over your yoga mat if you know you prefer extra padding or warmth. You can use an eye mask to block out light and to help relax your facial muscles, which are intricately connected to your nervous system.
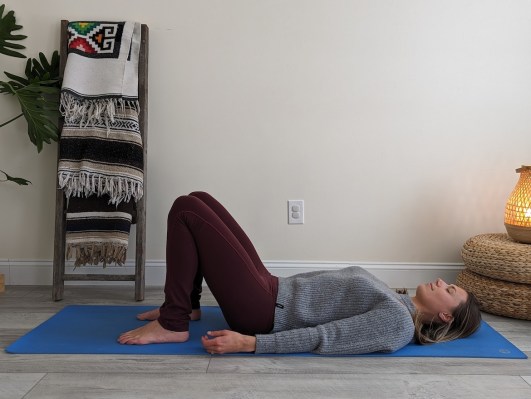
1. Corpse pose with knees bent (Savasana)
This knee-bent corpse pose modification helps to relieve low back tension that may arise if your legs are fully extended, and it grounds you with your feet placed flat on the floor.
If you feel some gentle movement might help you feel more comfortable, try slowly tilting your pelvis back and forth a few times as if you were in a reverse cat-cow pose. Then, come into stillness.
Photo: Katherine Englishman, RYT-500
Lie down on your back and bend your knees with your feet flat on the floor. Turn your toes slightly in and allow your knees to fall in toward each other.
Extend your arms straight down at your sides to gently stretch the front and back of your chest.
Inhale to fill your lungs from bottom to top.
Slowly exhale and release all your body weight down into the support of the mat beneath you.
Remain here for 3 to 5 minutes.
2. Eye of the needle pose (Sucirandhrasana)
This pose that gently opens up tight hip muscles and softens tension in your lower back. If you have an extra minute to spend on each side, remain here and feel even the tightest hips melt like butter in this pose.
Photo: Katherine Englishman, RYT-500
Lie down on your back and bend your knees with your feet flat on the floor. Turn your toes slightly in and allow your knees to fall in toward each other.
Lift your left foot up to cross your left ankle over your right knee.
If you feel a lot of tension in your hips, stay here and focus on taking deep, full breaths. If you’d prefer a deeper stretch, clasp both hands behind your right thigh and gently draw your legs in toward your chest only far enough so that your hips remain on the mat.
Inhale to fill up the back of your lungs.
Exhale to soften and relax your body.
Remain here for two minutes, then switch sides.
3. Twisted eye of the needle pose (Parsva Sucirandhrasana)
This supine twist essentially puts the eye of the needle pose onto its side for a posture that delivers an even bigger outer hip stretch, IT band release, and can reduce spinal tension.
Photo: Katherine Englishman, RYT-500
Lie down on your back and bend your knees with your feet flat on the floor. Turn your toes slightly in and allow your knees to fall in toward each other.
Lift your right foot up to cross your right ankle over your left knee.
Inhale to lengthen the spine and as you exhale, allow both legs to fall to your left side in the same position, so your left leg is on the ground beside you and your right foot is now flat on the floor.
Gently wedge your left elbow and hand between the mat and your knee, so the elbow is on the ground, and your palm is gently supporting the inside of your right knee. If this feels awkward or uncomfortable, simply hold your right ankle with your left hand or stretch your arms out to the side with the top knee pointing up.
Use your exhalations to relax your head, neck, back, and pelvis down into the mat.
Turn your head to look over your opposite shoulder, as long as there’s no sensation of strain or discomfort.
Remain here for two minutes, then switch sides.
“Slowing down allows us to notice our patterns of thought and cultivate a non-judgmental self-awareness that primes us for honest and generous communication with ourselves and our communities.” —Victoria Rutledge, E-RYT 500
4. Reclined bound angle pose (Supta Baddha Konasana)
Practice this reclined version of cobbler’s pose (Baddha Konasana) as a more gentle way to stretch your inner thighs, groin, and hips. This pose also opens up your chest to improve breath capacity and relaxes your spine.
You can practice this on your back without props, or you can place a yoga block underneath the outside of your knees for support. If you don’t have blocks, try rolling up a blanket and wrapping it around your outer ankles.
Photo: Katherine Englishman, RYT-500
Lie down on your back and bend your knees with your feet flat on the floor.
Slowly open your knees out to the sides, lowering them toward the ground. Bring the soles of your feet together as your knees fall apart. Add props like the two blocks or rolled up blanket as mentioned above, or lie back on a yoga bolster if you prefer.
Place your hands on your stomach and take a deep, diaphragmatic breath.
Exhale and soften your jaw, release the weight of your pelvis, and close your eyes.
Remain here for two to three minutes.
5. Supported bridge pose (Setu Bandhasana)
It’s amazing what a difference placing a single yoga block beneath your pelvis in bridge pose can make. Adding a stable form of support to suspend your hips above your heart does more than merely stretch your frontal hips and quadriceps. It slows down your heart rate, reduces blood pressure, and can make you feel both feather light and firmly grounded all at once for an almost magically relaxing experience.
If you don’t have a yoga block, a bolster or several thick folded blankets can also prop up your hips and aid in relaxing your upper body. The goal here is to elevate your heart over your head. Less thinking, more being.
Photo: Katherine Englishman, RYT-500
Begin lying on your back with the knees bent and feet flat on the floor. Your knees should be stacked directly over your ankles and your toes should point forward.
Exhale to lift your hips and place a yoga block on the middle height, lengthwise, underneath your hips.
Roll one shoulder at a time underneath you to broaden your chest for a deep, full breath.
Gently lift your head and place it down so the flat part of the back of your skull is resting on your mat, with your neck in a neutral position (not flat on the mat or overarched). There should be no compression, discomfort, or pain sensation in your neck. If there is, exit the pose immediately and try lowering the block or blanket.
Once you feel comfortable, release any effort to your breathing and relax your weight down into the mat or your props. Cover your eyes with your eye pillow if you’d like.
Remain here for three to five minutes.
To exit the pose, inhale to lift your hips and remove the prop. Exhale to lower back down.
6. Banana pose (Bananasana)
End your yoga flow lying down with a wonderfully relaxing pose that offers a deep release in your side body and lower back—requiring very little effort for a very big reward. Sounds good, right?
Banana pose is named as such because it resembles the shape of its namesake fruit. If you have more time to spare, spend as long as five minutes on each side and reap the many, many benefits that come as a result of your restful practice.
Photo: Katherine Englishman, RYT-500
Begin on your back with your arms overhead and legs extended.
Inhale and stretch to elongate your whole body.
Exhale to shift your hips over to the left side of the mat, while moving your feet and hands to the bottom and top right corners.
Pause for a moment to notice how this crescent shape feels first, then, as you inhale, decide to gradually deepen the stretch (or not!) by crossing your right ankle over the left and right hand over your left palm to stretch yourself a little longer in both directions.
Exhale and relax your whole body down into the mat.
Remain here for three minutes. As you exhale, slowly return to the center, pausing for another moment before switching sides.