Wholesome Wheat Loaf
There’s nothing quite like the comforting aroma and satisfying taste of freshly baked bread. This homemade Whole Wheat Bread recipe stands head and shoulders above anything you’ll find on grocery store shelves, delivering a truly wholesome and delightful experience. Crafted with a blend of hearty oats, rich brown sugar, and golden honey, it boasts a robust texture and a subtly sweet flavor profile that makes it incredibly versatile. Whether you’re building a towering sandwich, dipping into a warm bowl of soup, or simply enjoying a slice of toast with your morning coffee, this bread is designed to elevate every meal.
If you cherish the art of baking homemade bread, be sure to explore more of our cherished recipes! You might fall in love with our tender Banana Bread, the delightfully simple Molasses No Knead Bread, or our family-favorite Cinnamon Swirl Bread, each promising a unique and delicious baking adventure.
Bake the Best Honey Wheat Bread from Scratch
The joy of homemade bread is truly one of life’s simplest yet most profound pleasures. There’s an undeniable magic in pulling a warm, golden loaf straight from your oven, filling your home with an irresistible aroma. Our Honey Wheat Bread recipe is a cherished staple in our household, a testament to the enduring appeal of baking from scratch. What makes this whole wheat bread so special are its delightful layers of flavor: the subtle sweetness of honey and brown sugar, the wholesome heartiness imparted by rolled oats, and the rich, earthy nuttiness of whole wheat flour. Each bite offers a comforting taste that reminds you of simpler times and genuine goodness.
This recipe yields two beautifully rustic, incredibly delicious loaves, rich in both flavor and texture. It’s a heartwarming, wholesome bread that’s wonderfully satisfying on its own, but truly shines when paired with your favorite fruit jams, creamy butters, or robust sandwich fillings. Imagine the tender crumb, the slightly chewy crust, and the balanced sweetness that makes it an ideal companion for any meal, any time of day. It’s more than just bread; it’s an invitation to savor a moment of culinary bliss.
Why This Honey Wheat Bread Recipe Will Become Your Favorite
Beyond the unparalleled aroma of freshly baked bread that fills your kitchen, there are countless reasons to adore this particular recipe. It’s designed to be a consistently delicious, reliable, and rewarding baking project:
Unmatched Versatility. This isn’t just a one-trick pony bread. While it’s utterly divine served warm, straight from the oven with a generous smear of butter, its hearty yet tender texture makes it perfect for so much more. Transform it into a sturdy base for your favorite sandwiches, a delightful side for a steaming bowl of soup, or simply enjoy it as a classic piece of toast. Its balanced flavor profile complements both sweet and savory toppings, making it a true kitchen chameleon.
Simple Pantry Staples. You’ll be pleased to find that this exceptional bread comes together quickly with ingredients you likely already have on hand. Most components are standard pantry items, readily available at any grocery store. The recipe does call for bread flour, which contributes to a superior texture, but if you’re in a pinch, all-purpose flour can be substituted with excellent results, ensuring you can bake this delicious bread whenever the craving strikes.
Perfectly Balanced Flavor. The harmonious blend of honey and brown sugar gives this robust bread just the right touch of sweetness without ever being overpowering. These natural sweeteners also contribute to its beautiful golden crust and tender crumb. Should you prefer a less sweet loaf, both the brown sugar and honey amounts can be easily reduced by half, or one can even be eliminated entirely, allowing you to customize the flavor to your personal preference.
Wholesome & Hearty Goodness. This isn’t just tasty bread; it’s genuinely good for you. Packed with the nutritional benefits of whole wheat flour and fiber-rich oats, it offers a healthier alternative to many store-bought options. The oats also lend a delightful texture and added substance, making each slice wonderfully satisfying and filling, contributing to a truly wholesome eating experience for you and your family.
Rewarding Homemade Experience. There’s immense satisfaction in baking your own bread from scratch. This recipe is straightforward enough for novice bakers to achieve fantastic results, yet offers enough depth of flavor and texture to impress even seasoned bread makers. The process of watching the dough rise, feeling its elasticity, and finally tasting the fruits of your labor is incredibly fulfilling and makes the minimal effort entirely worthwhile.
Delightful Ways to Savor Your Homemade Wheat Bread
While enjoying a warm slice straight from the oven with a dollop of our creamy Honey Butter remains my absolute favorite, this versatile bread opens up a world of delicious possibilities. Here are even more mouth-watering ways to enjoy your freshly baked masterpiece:
The Quintessential Breakfast. Start your day on a comforting note by slathering a warm slice with rich butter, your favorite fruit jam, or a drizzle of extra honey. The wholesome goodness of the oats and whole wheat combined with a touch of sweetness makes it the perfect accompaniment to your morning coffee or a soothing cup of tea, providing a hearty and delicious start to any day.
Elevated Sandwiches. Transform an ordinary lunch into something extraordinary. This robust whole wheat bread serves as an ideal foundation for a classic peanut butter and jelly, or as the base for gourmet cold cut creations. Its hearty texture holds up beautifully to a wide array of fillings, from deli meats and cheeses to crisp vegetables. And let’s not forget the ultimate comfort food: a grilled cheese sandwich made with this bread becomes an instant classic, with its mild sweetness perfectly complementing the savory cheese.
Crispy, Golden Toast. This bread toasts to perfection, achieving a delightful crisp exterior while remaining tender within. For a modern and healthy twist, top your toast with creamy avocado, a sprinkle of flaky sea salt, a dash of red pepper flakes, and a generous drizzle of high-quality olive oil. Or keep it simple with just butter and cinnamon sugar – the possibilities are endless for creating your ideal toast sensation.
Indulgent French Toast. Make your weekend brunches truly special by using thick slices of this homemade bread for the best French toast you’ve ever tasted! The inherent heartiness from the oats and whole wheat flour adds an extra dimension of flavor and texture that elevates this classic dish. It pairs exquisitely with warm maple syrup, an abundance of fresh berries, and a cloud of homemade whipped cream, creating an unforgettable sweet treat.
The Perfect Soup Companion. A thick slice of this wholesome bread is the ultimate partner for your favorite hearty soups, stews, or chili. Its sturdy structure is perfect for soaking up rich broths and savory sauces, making it an indispensable addition to any comforting meal. In our home, we often plan to bake this bread on the same day we prepare a pot of soup, ensuring we can enjoy them together for the freshest, most satisfying experience.
Essential Ingredients for Your Wholesome Whole Wheat Bread
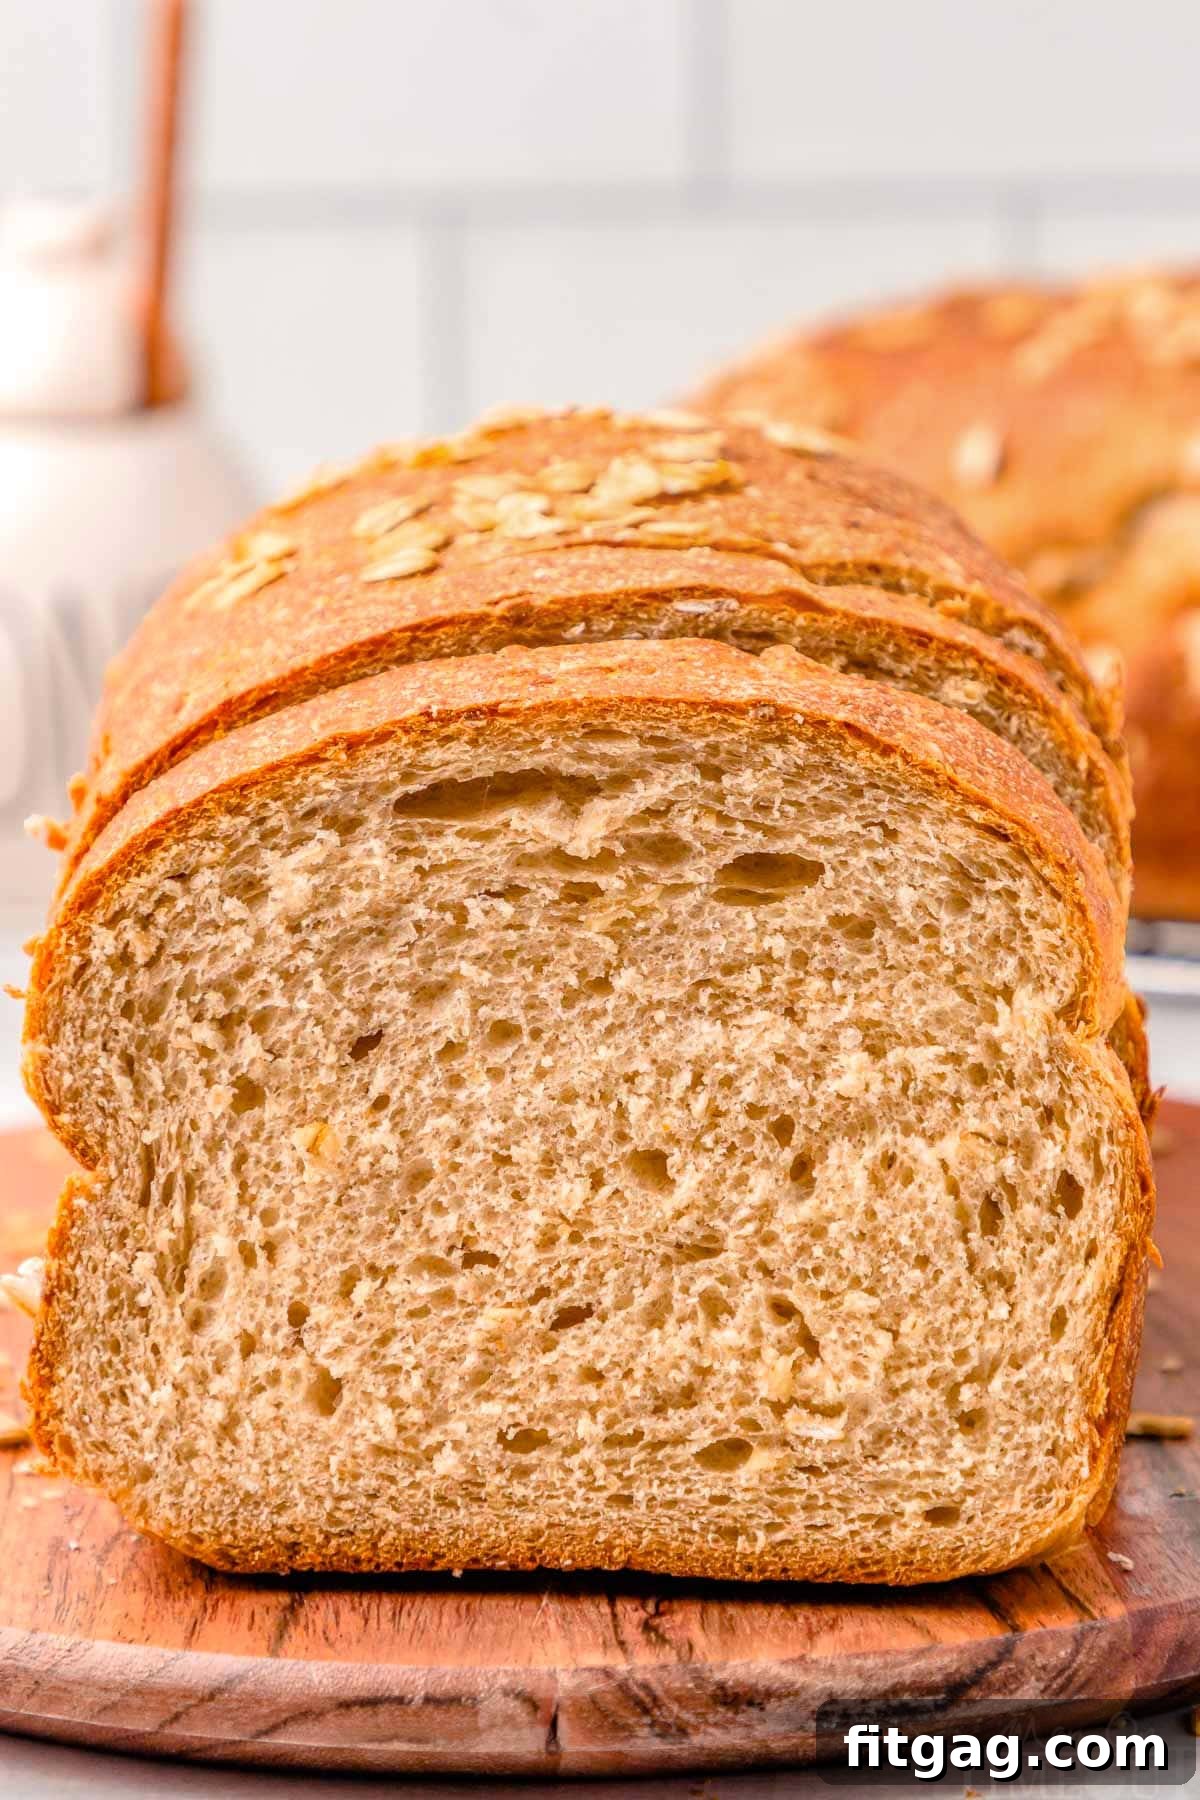
We absolutely adore this whole wheat bread recipe for its robust texture, delicate sweetness, and the perfect harmony of flavors. The oats provide a delightful chewiness, the honey contributes a hint of floral sweetness, and the brown sugar ties everything together with its rich caramel notes. This recipe yields two freshly baked loaves, making it perfect for sharing with loved ones or stocking your pantry. For a comprehensive list of quantities and detailed instructions, please refer to the complete printable recipe card located at the end of this post. Here’s a closer look at the key ingredients you’ll need to create this culinary masterpiece:
Yeast. The magic behind every airy loaf! Yeast is the crucial leavening agent that helps the bread rise, creating its characteristic soft crumb. We use active dry yeast, which typically needs to be proofed, but instant yeast can also be used; if using instant, there’s no need for proofing.
Granulated Sugar. A small amount of granulated sugar acts as food for the yeast, helping to activate and proof it efficiently, ensuring your dough rises beautifully.
Warm Water. Essential for awakening the yeast! The water should be comfortably warm, ideally around 110°F (43°C), to create the perfect environment for yeast activation without killing it.
Whole Milk. Whole milk is key to achieving a rich, tender crumb and an enhanced depth of flavor in your bread. Like the water, it should be warmed to about 110°F (43°C) to maintain the ideal temperature for the yeast.
Unsalted Butter. Melted unsalted butter adds luxurious richness and a wonderful depth of flavor to the bread, contributing to its tender texture and golden crust.
Brown Sugar and Honey. This dynamic duo provides a lovely, balanced sweetness and a beautiful golden-brown color to the finished loaves. Brown sugar offers a subtle molasses note, while honey adds a distinct, aromatic sweetness. For a less sweet loaf, you can reduce each by half or choose to omit one of them entirely.
Oats. Old-fashioned rolled oats are incorporated into the dough to create a heartier bread with a delightful, chewy texture. We also love sprinkling a few extra oats on top of the loaves before baking for an appealing rustic finish.
Whole Wheat Flour. We prefer to use about half whole wheat flour in this recipe, striking a perfect balance between robust, nutty flavor and a tender crumb. If you wish to increase the whole wheat content, simply reduce the amount of bread flour by the same measure.
Salt. A vital ingredient that enhances the flavor of all components, balancing the sweetness and strengthening the gluten structure in the dough for better texture.
Bread Flour. Known for its higher protein content, bread flour is instrumental in developing strong gluten, which results in a chewy, elastic, and perfectly textured loaf. While bread made with all-purpose flour will still be delicious, using bread flour truly makes a noticeable difference in the final texture. If substituting with all-purpose flour, consider adding 2 tablespoons of vital wheat gluten to mimic the protein benefits of bread flour.
Crafting Your Own Whole Wheat Bread: A Step-by-Step Guide
If you’ve yet to experience the pure delight of homemade bread, prepare for an absolute treat! This recipe is incredibly simple, yielding results far superior to any store-bought alternative, and requires surprisingly minimal active effort. While you’ll need to account for a couple of hours of rise time, the actual hands-on preparation is less than 15 minutes. The full printable recipe with comprehensive instructions can be found in the recipe card at the end of this post, but here’s a detailed breakdown of the process.
Preparing the Dough: The Heart of Your Loaf
Activate the Yeast. In a large mixing bowl (or the bowl of your stand mixer), combine the yeast, granulated sugar, and warm water. Stir gently until the sugar dissolves, then let the mixture sit undisturbed for 5 minutes. During this time, you should observe bubbles or a foamy layer forming on the surface. This crucial step not only softens the yeast but also confirms its activity. If no bubbles or foam appear, your yeast may be expired, and it’s best to start with a fresh batch.
Combine Wet Ingredients. Once your yeast is proofed, stir in the warm whole milk, melted unsalted butter, light brown sugar, honey, and old-fashioned oats. Mix until all these ingredients are thoroughly combined and the mixture is well-integrated.
Introduce Whole Wheat Flour and Salt. Add the whole wheat flour and salt to the wet mixture. Stir until just combined, ensuring there are no dry pockets of flour. Use a spatula to scrape down the sides and bottom of the bowl as needed to incorporate everything evenly.
Gradually Add Bread Flour. Begin incorporating the bread flour, adding it about ⅓ cup at a time. Mix on medium-low speed, carefully scraping down the sides and bottom of the bowl frequently, until all the flour is well incorporated into the dough. The dough will start to come together.
Knead the Dough. Increase the mixer speed to medium-high and continue to knead the dough for a full 8 minutes. During this time, you’ll notice the dough transforming, becoming smoother and more elastic, and starting to pull away from the sides of the bowl. This kneading process is essential for developing the gluten structure that gives bread its characteristic chewiness.
First Rise (Bulk Fermentation). Lightly spray a clean, large bowl with nonstick cooking spray. Transfer the kneaded dough into this bowl, turning it once to coat lightly. Cover the bowl tightly with plastic wrap or a clean tea towel. Place the covered bowl in a warm, draft-free spot and allow the dough to rise for approximately 2 hours, or until it has visibly doubled in size. This slow rise is critical for flavor development and a light texture.
Shaping and Baking: Bringing Your Loaves to Life
Prepare Loaf Pans. While the dough is on its first rise, prepare two loaf pans by spraying them generously with nonstick cooking spray. For easier removal and cleanup, line each pan with a strip of parchment paper, leaving an overhang on the longer sides. This recipe works beautifully in standard 8.5 x 4.5 inch loaf pans, but it can also be baked in 9 x 5 inch loaf pans.
Divide and Shape the Dough. Gently remove the risen dough from the bowl and transfer it to a lightly floured surface. Divide the dough into two equal portions. For each portion, roll or pat the dough into a rectangle, roughly 8 by 12 inches. It’s important to gently press out any large air pockets you see during this shaping process, as this prevents unwanted large holes from forming in your finished bread.
Form the Loaves. Starting from one of the shorter ends of the rectangle, tightly roll up the dough into a log. Once rolled, firmly pinch the seam together along the length of the loaf to seal it securely. Place each shaped dough log, seam-side down, into your prepared loaf pans. If desired, sprinkle the tops of each loaf with an additional tablespoon of old-fashioned oats for a rustic touch and added texture.
Second Rise (Proofing). Cover the loaf pans loosely with plastic wrap or a clean tea towel. Place them back in a warm, draft-free location and allow them to rise again until they have doubled in size. This second rise typically takes about 45 minutes to 1 hour, depending on your kitchen’s temperature.
Preheat Oven. About 10 to 15 minutes before the second rise is complete, preheat your oven to 375°F (190°C). This ensures the oven is at the correct temperature when the loaves are ready to bake, which is crucial for a good oven spring.
Bake to Golden Perfection. Place the risen loaves into the preheated oven. Bake for 25 to 30 minutes, or until the tops are beautifully golden brown and the internal temperature of the bread, measured with an instant-read thermometer, registers around 210°F (99°C). If you notice the crust browning too quickly, loosely tent a piece of aluminum foil over the tops of the loaves to prevent over-browning.
Cool Before Slicing. Once baked, remove the bread from the oven. Carefully take the loaves out of their pans and transfer them to a wire rack to cool completely for at least 20 minutes before attempting to slice them. This resting period is vital, much like letting meat rest after cooking; it allows the internal structure of the bread to set fully, ensuring cleaner slices and preventing a gummy texture.
Storage Solutions for Your Homemade Bread
To keep your delicious homemade whole wheat bread at its freshest, store it in an airtight container or a large resealable plastic bag at room temperature for up to 3 days. For extended freshness, you can refrigerate the bread for up to 1 week.
To freeze your bread: For optimal preservation, wrap the cooled loaves tightly in plastic wrap, then place them in a freezer-safe ziploc bag. This method allows the bread to maintain its quality for up to 3 months. When you’re ready to enjoy, simply thaw the bread at room temperature. For convenience, consider slicing the bread before freezing; this way, you can easily pull out and thaw only the exact number of slices you need at a time, minimizing waste and maximizing freshness.
Frequently Asked Questions About Whole Wheat Bread
Yes, you can substitute quick oats for old-fashioned rolled oats. However, be aware that quick oats are cut finer and will absorb liquid more quickly, which may result in a slightly different, less chewy texture in the final bread. The flavor will remain largely similar.
Several factors can cause dough not to rise. First, check the expiration date on your yeast; old yeast loses its potency. Ensure that your dough is placed in a warm, draft-free environment during the rising process, as cold or fluctuating temperatures can hinder yeast activity. Crucially, verify that your warm water and milk were not excessively hot (above 110°F or 43°C), as extreme heat will kill the yeast, preventing any rise.
Absolutely, you can use all-purpose flour as a substitute for bread flour in this recipe. Your bread will still be delicious and rise well, though you might notice a slight difference in texture; it may be a bit softer and less chewy than if made with bread flour due to the lower protein content. To help mimic the gluten development of bread flour, you can also add 2 tablespoons of vital wheat gluten to your all-purpose flour.
This dough tends to be a bit stickier than some others, primarily due to the inclusion of honey. A certain level of stickiness is normal and desired for a tender crumb. However, if your dough is excessively sticky to the point where it’s consistently adhering to the bowl and not forming any discernible ball even after kneading, gradually add more bread flour, one tablespoon at a time, until the dough begins to pull away from the sides of the bowl more cleanly.
Yes, you can certainly adjust the sweetness level to your preference. You can reduce the amount of both brown sugar and honey by half, or even omit one of them entirely. We recommend trying the recipe as written first to experience its intended flavor balance, then adjusting the sweetness in subsequent batches based on your personal taste.
Yes, non-dairy milk alternatives like almond milk, soy milk, or oat milk can be used in this recipe. Be aware that substituting non-dairy milk may subtly alter the flavor profile and texture of the bread, but it will still produce a delicious loaf.
Absolutely! This recipe is incredibly adaptable and can be easily halved. Simply divide all the ingredient quantities by two to make a single, perfect loaf.
There are a few reliable indicators. The crust should be a rich, golden brown color. You can also carefully remove a loaf from its pan and tap the bottom; if it sounds hollow, it’s typically done. For the most accurate assessment, use an instant-read thermometer to check the internal temperature, which should register around 210°F (99°C).
Of course! While a stand mixer simplifies the kneading process, hand kneading is a perfectly viable and traditional method for making this bread. It might take a bit more physical effort and time (around 15-20 minutes of continuous kneading), but the results will be just as wonderful.
Trish’s Expert Tips and Clever Tricks for Perfect Whole Wheat Bread
This whole wheat bread recipe is wonderfully straightforward, but a few expert tips and tricks can elevate your baking results from good to absolutely outstanding. Pay attention to these details for the best possible loaves every time:
Elevate with Add-Ins. For an added layer of flavor and delightful crunch, consider incorporating nuts or seeds into your dough. Sunflower seeds, pecans, walnuts, flax seeds, or even sesame seeds would work beautifully. Start with about half a cup of chopped nuts or seeds during the kneading process and adjust the quantity to your preference.
Sweet Surprises with Dried Fruit. For a touch of natural sweetness and texture, try adding dried fruits. Raisins, dried cranberries, chopped apricots, or even a mix of your favorites will create sweet pockets in every bite. Add about ½ to ¾ cup of dried fruit during the final stages of kneading.
Easily Halve the Recipe. If your household doesn’t consume two loaves quickly, or you simply prefer to bake smaller batches, this recipe is incredibly easy to halve. Simply divide all ingredient quantities by two to yield a single perfect loaf.
Choose the Right Loaf Pan. This recipe is versatile enough to work in both 8.5 x 4.5 inch loaf pans for a slightly taller, denser loaf, or in standard 9 x 5 inch loaf pans, which will result in a slightly wider, less tall loaf. Both sizes produce excellent results.
Don’t Skip the Proofing Test! The initial step of activating your yeast (combining it with warm water and sugar) is more than just starting the process; it’s a critical “proofing” test. If you don’t see distinct bubbles or a foamy layer after 5 minutes, your yeast is likely inactive. Do not proceed with the recipe; instead, acquire fresh yeast and restart. This step saves you time and ingredients!
Adjust Flour for Dough Consistency. While kneading, the dough should be slightly sticky due to the honey, but not overly wet or soupy. If it feels too liquidy or sticks excessively to the bowl and your hands, add flour one tablespoon at a time until it reaches a manageable, elastic consistency that begins to pull away from the bowl. Remember, a little stickiness is good!
Prevent Over-Browning. If you notice the crust of your loaves starting to brown too quickly during the baking process, especially towards the end, simply tent a piece of aluminum foil loosely over the tops. This will protect the crust from burning while allowing the interior of the bread to continue cooking through.
Crucial Cooling Time. Resist the urge to slice into your freshly baked bread immediately! Allow the loaves to cool on a wire rack for at least 20 minutes. This resting period is essential for the bread’s internal structure to fully set, making it easier to slice cleanly and ensuring a more pleasant, less gummy texture. Think of it as letting meat rest after cooking – it improves the final result significantly.
The Butter Brush Finish. For an extra touch of perfection and a beautifully glossy, soft crust, brush the tops of your hot loaves with a little melted unsalted butter immediately after they come out of the oven. This adds both flavor and an appealing sheen.
Explore More Delectable Bread Recipes
If you loved baking this Whole Wheat Honey Bread, you’re in for a treat with our other popular bread recipes. Expand your baking repertoire with these irresistible options:
Molasses No Knead Bread
Irish Soda Bread
Pumpkin Bread
Banana Bread
Beer Bread
Print
Pin
Wholesome Honey Whole Wheat Oatmeal Bread
Course
bread
Cuisine
American
Keyword
honey wheat bread, wheat bread, whole wheat bread, whole wheat bread recipe, oatmeal bread, homemade bread
Prep Time
25 minutes
Cook Time
25 minutes
Rise Time
2 hours 30 minutes
Servings
32 slices
Calories
90kcal
Author
Trish – Mom On Timeout
Ingredients
2 ¼ teaspoons dry active yeast (or instant yeast)
1 tablespoon granulated sugar
½ cup warm water (110°F / 43°C)
1 cup whole milk (110°F / 43°C)
4 tablespoons unsalted butter (melted)
¼ cup light brown sugar
¼ cup honey
1 cup old fashioned oats
1¾ cup whole wheat flour
1 teaspoon fine sea salt
1¾ to 2¼ cups bread flour (all-purpose flour can be substituted)
Instructions
Notes
Storage Information
This wholesome bread remains fresh for up to 3 days when stored in an airtight container or a large ziploc bag at room temperature. For longer storage, you can refrigerate the bread for up to 1 week.
To freeze: For optimal freshness over time, wrap the cooled bread tightly in plastic wrap, then place it in a freezer-safe ziploc bag. It can be stored in the freezer for up to 3 months. Thaw frozen bread at room temperature. Consider slicing the bread before freezing; this allows you to easily thaw only the desired number of slices as needed, making it very convenient.
Tools and Equipment (affiliate links): Glass Mixing Bowls | Whisk | Silicone Spatula | 8.5 x 4.5 inch Loaf Pan or 9 x 5 inch Loaf Pan
Please refer to the post above for more detailed information, step-by-step process photos, additional recipe tips, and frequently asked questions.
Nutrition
The post Wholesome Wheat Loaf first appeared on Fitgag.